Configuring Storage Spaces for Azure SQL IaaS
One way to use SQL in Azure is to deploy SQL IaaS by installing SQL on an Azure VM. This post goes over provisioning disk system in Azure optimized for SQL. In this demo we’re using a DS14v2 size VM, but any VM size that supports 16 data disks is OK. To see the VM SKU’s that support 16 or more disks in a given Azure location we can use the PowerShell cmdlet:
Get-AzureRmVMSize -Location 'eastus' |
    where MaxDataDiskCount -GE 16 | sort MaxDataDiskCount
and we’ll see a list like

We deployed a VM using the Microsoft Gallery image of the latest 2016 server version, using an unmanaged OS disk in a storage account configured as:
- Premium
- LRS
- GPv2
- Hot
Attach 16 disks:
Next we provision and attach 16 one TB unmanaged SSD disks (page blobs) using the following PowerShell code:
$VMName = 'myVMName'
$RGName = 'myResourceGroupName'
0..15 | foreach {
    $VM = Get-AzureRmVM -ResourceGroupName $RGName -Name $VMName
    $DataDiskName = "$VMName-DataDisk-$_"
    $OSDiskUri    = $VM.StorageProfile.OsDisk.Vhd.Uri
    $DataDiskUri  = "$($OSDiskUri | Split-Path)\$DataDiskName.vhd".Replace('\','/')
    $ParameterSet = @{
        VM           = $VM
        Name         = $DataDiskName
        Caching      = 'ReadWrite'
        DiskSizeInGB = 1023
        Lun          = $_
        VhdUri       = $DataDiskUri
        CreateOption = 'Empty'
    }
    $VM = Add-AzureRmVMDataDisk @ParameterSet
    Update-AzureRmVM -ResourceGroupName $RGName -VM $VM
}
Create Storage Pool:
Next we RDP to the VM and provision a storage pool. In Server Manager under File and Storage Service/Volumes/Storage Pools we should see the 16 disks under the default ‘Primordial’ pool. We can right click on that and create new pool. The important thing here is to select ‘Manual’ disk allocation for each of the 16 disks. This is important since this is an all-SSD pool. The default setting will cause the system to reserve all 16 disks for Journal and we won’t be able to create any virtual disks.
The same task can be performed via PowerShell as follows:
$PoolName = 'SQLPool'
$ParameterSet = @{
    FriendlyName = $PoolName
    StorageSubSystemFriendlyName = (Get-StorageSubSystem).FriendlyName
    PhysicalDisks = Get-PhysicalDisk –CanPool $True
}
New-StoragePool @ParameterSet
Get-PhysicalDisk -FriendlyName 'Msft Virtual Disk' |
    Set-PhysicalDisk -Usage ManualSelect # otherwise all SSD disks will be reserved for journal
Create Virtual disks and volumes:
Finally we create virtual disks and volumes as follows:

This particular configuration uses 8 out of the 16 TB in the pool leaving 8 TB for future virtual disk growth. A Virtual disk can be expanded in Server Manager, to be followed by volume expansion in Disk Management tool.
The virtual disks in this configuration can survive a single disk failure being in a 2-way mirror. Although this is almost not a practical concern given that the 16 disks are triple redundant (each block of each disk is synchronously written to 3 physical underlying disks)
2 way-mirrored virtual disks also enhance read performance since read operations occur against one of the 2 disks in a mirrored space.
In the data/log/temp virtual disks, the Interleave size has been dropped to 64KB down from the default 256KB since SQL writes are 8-32KB. With 8 columns, this makes the data stripe size (64 * 8) 512KB
StorSimple 8k software release 4.0
Around mid February 2017, Microsoft released StorSimple software version 4.0 (17820). This is a release that includes firmware and driver updates that require using Maintenance mode and the serial console.
Using this PowerShell script to save the Version 4.0 cmdlets and compare them to Version 3.0, I got:

Trying the new cmdlets, the Get-HCSControllerReplacementStatus cmdlet returns a message like:

The Get-HCSRehydrationJob returns no output (no restore jobs are running)
The Invoke-HCSDisgnostics seems pretty useful and returns output similar to:

The cmdlet takes a little while to run. In this case it took 14 minutes and 38 seconds:

It returns data from its several sections like;
System Information section:

This is output similar to what we get from the Get-HCSSystem cmdlet for both controllers.
Update Availability section:

This is output similar to Get-HCSUpdateAvailability cmdlet, although the MaintenanceModeUpdatesTitle property is empty !!??

Cluster Information section:

This is new exposed information. I’m guessing this is the output of some Get-HCSCluster cmdlet, but this is pure speculation on my part. I’m also guessing that this is a list of clustered roles in a traditional Server 2012 R2 failover cluster.
Service Information section:

This is also new exposed information. Get-Service is not an exposed cmdlet.
Failed Hardware Components section:

This is new exposed information. This device is in good working order, so this list may be false warnings.
Firmware Information section:

This output is similar to what we get from Get-HCSFirmwareVersion cmdlet
Network Diagnostics section:

Most of this information is not new, but it’s nicely bundled into one section.
Performance Diagnostics section:

Finally, this section provides new information about read and write latency to the configured Azure Storage accounts.
The full list of exposed cmdlets in Version 4.0 is:
Clear-DnsClientCache
Set-CloudPlatform
Select-Object
Restart-HcsController
Resolve-DnsName
Out-String
Out-Default
Set-HcsBackupApplianceMode
Measure-Object
Invoke-HcsmServiceDataEncryptionKeyChange
Invoke-HcsDiagnostics
Get-History
Get-Help
Get-HcsWuaVersion
Get-HcsWebProxy
Invoke-HcsSetupWizard
Set-HcsDnsClientServerAddress
Set-HcsNetInterface
Set-HcsNtpClientServerAddress
Test-HcsNtp
Test-HcsmConnection
Test-Connection
Sync-HcsTime
Stop-HcsController
Start-Sleep
Start-HcsUpdate
Start-HcsPeerController
Start-HcsHotfix
Start-HcsFirmwareCheck
Set-HcsWebProxy
Set-HcsSystem
Set-HcsRemoteManagementCert
Set-HcsRehydrationJob
Set-HcsPassword
Get-HcsUpdateStatus
Trace-HcsRoute
Get-HcsUpdateAvailability
Get-HcsSupportAccess
Enable-HcsRemoteManagement
Enable-HcsPing
Enable-HcsNetInterface
Disable-HcsWebProxy
Disable-HcsSupportAccess
Disable-HcsRemoteManagement
Enable-HcsSupportAccess
Disable-HcsPing
Test-NetConnection
Test-HcsStorageAccountCredential
TabExpansion2
Reset-HcsFactoryDefault
prompt
Get-NetAdapter
Disable-HcsNetInterface
Enable-HcsWebProxy
Enter-HcsMaintenanceMode
Enter-HcsSupportSession
Get-HcsRoutingTable
Get-HcsRemoteManagementCert
Get-HcsRehydrationJob
Get-HcsNtpClientServerAddress
Get-HcsNetInterface
Get-HcsFirmwareVersion
Get-HcsDnsClientServerAddress
Get-HCSControllerReplacementStatus
Get-HcsBackupApplianceMode
Get-Credential
Get-Command
Export-HcsSupportPackage
Export-HcsDataContainerConfig
Exit-PSSession
Exit-HcsMaintenanceMode
Get-HcsSystem
Update-Help
Powershell script to get disk information including block size
This script can be downloaded from the Microsoft Technet Gallery. It contains the Get-SBDisk function which takes one parameter as input being one or more computer names or IP addresses. It return s a PowerShell object for each fixed disk of each input computer.
To see the inline help and example:
help Get-SBDisk -ShowWindow

This script takes advantage of this function and collects disk information on all computers in the current AD domain (without the need to use ActiveDirectory PowerShell module):
$adsi = [adsisearcher]"objectcategory=computer"
$adsi.SearchRoot = "LDAP://dc=$($env:USERDNSDOMAIN.replace('.',',dc='))"
$adsi.filter = "(&(objectClass=Computer)(!userAccountControl:1.2.840.113556.1.4.803:=2))" # enabled computers
$adsi.PageSize = 1000000
$EnabledADComputers = $adsi.FindAll()
$EnabledADComputerNames = @()
$EnabledADComputerNames += $EnabledADComputers | % { $_.Properties.name } # List of the names of enabled computers from AD
$i = 0
$DiskInfo = @()
$EnabledADComputerNames | % {
   $i++
   Write-Progress -Activity "Checking disks on computer $_" -Status "$i of $($EnabledADComputerNames.Count)"
   $DiskInfo += Get-SBDisk $_ -Verbose
}
$DiskInfo | FT -a # output disk information to console
$DiskInfo | Out-GridView # Output disk information to ISE grid view
$DiskInfo | Export-Csv .\DiskInfo.csv -NoType # Save disk information to CSV

"Checked $($EnabledADComputerNames.Count) computers in AD"
"Found $(($DiskInfo | % { $_.ComputerName } | select -Unique).Count) reachable computers"
"$($DiskInfo.Count) disks checked"

This is formatted to work with PS version 2.
During the script run you may see progress similar to:

and output similar to:

To view a list of disks with less than 20% free space:
"Disks with less than 20% free space"
$DiskInfo |
    where { $_.'Free(%)' -lt 20 -and $_.'Free(%)' -ne 100 } |
       sort 'Free(%)' | FT -a

StorSimple 8k series as a backup target?
19 December 2016
After a conference call with Microsoft Azure StorSimple product team, they explained:
- “The maximum recommended full backup size when using an 8100 as a primary backup target is 10TiB. The maximum recommended full backup size when using an 8600 as a primary backup target is 20TiB”
- “Backups will be written to array, such that they reside entirely within the local storage capacity”
Microsoft acknowledge the difficulty resulting from the maximum provisionable space being 200 TB on an 8100 device, which limits the ability to over-provision thin-provisioned tiered iSCSI volumes when expecting significant deduplication/compression savings with long term backup copy job Veeam files for example.
Conclusion
- When used as a primary backup target, StorSimple 8k devices are intended for SMB clients with backup files under 10TB/20TB for the 8100/8600 models respectively
- Compared to using an Azure A4 VM with attached disks (page blobs), StorSimple provides 7-22% cost savings over 5 years
15 December 2016
On 13 December 2016, Microsoft announced the support of using StorSimple 8k devices as a backup target. Many customers have asked for StorSimple to support this workload. StorSimple hybrid cloud storage iSCSI SAN features automated tiering at the block level from its SSD to SAS to Azure tiers. This makes it a perfect fit for Primary Data Set for unstructured data such as file shares. It also features cloud snapshots which provide the additional functionality of data backup and disaster recovery. That’s primary storage, secondary storage (short term backups), long term storage (multiyear retention), off site storage, and multi-site storage, all in one solution.
However, the above features that lend themselves handy to the primary data set/unstructured data pose significant difficulties when trying to use this device as a backup target, such as:
- Automated tiering: Many backup software packages (like Veeam) would do things like a forward incremental, synthetic full, backup copy job for long term retention. All of which would scan/access files that are typically dozens of TB each. This will cause the device to tier data to Azure and back to the local device in a way that slows things down to a crawl. DPM is even worse; specifically the way it allocates/controls volumes.
- The arbitrary maximum allocatable space for a device (200TB for an 8100 device for example), makes it practically impossible to use the device as backup target for long term retention.
- Example: 50 TB volume, need to retain 20 copies for long term backup. Even if change rate is very low and actual bits after deduplication and compression of 20 copies is 60 TB, we cannot provision 20x 50 TB volumes, or a 1 PB volume. Which makes the maximum workload size around 3TB if long term retention requires 20 recovery points. 3TB is way too small of a limit for enterprise clients who simply want to use Azure for long term backup where a single backup file is 10-200 TB.
- The specific implementation of the backup catalog and who (the backup software versus StorSimple Manager service) has it.
- Single unified tool for backup/recovery – now we have to use the backup software and StorSimple Manager, which do not communicate and are not aware of each other
- Granular recoveries (single file/folder). Currently to recover a single file from snapshot, we must clone the entire volume.
In this article published 6 December 2016, Microsoft lays out their reference architecture for using StorSimple 8k device as a Primary Backup Target for Veeam

There’s a number of best practices relating to how to configure Veeam and StorSimple in this use case, such as disabling deuplication, compression, and encryption on the Veeam side, dedicating the StorSimple device for the backup workload, …
The interesting part comes in when you look at scalability. Here’s Microsoft’s listed example of a 1 TB workload:

This architecture suggests provisioning 5*5TB volumes for the daily backups and a 26TB volume for the weekly, monthly, and annual backups:

This 1:26 ratio between the Primary Data Set and Vol6 used for the weekly, monthly, and annual backups suggests that the maximum supported Primary Data Set is 2.46 TB (maximum volume size is 64 TB) !!!???

This reference architecture suggests that this solution may not work for a file share that is larger than 2.5TB or may need to be expanded beyond 2.5TB
Furthermore, this reference architecture suggests that the maximum Primary Data Set cannot exceed 2.66TB on an 8100 device, which has 200TB maximum allocatable capacity, reserving 64TB to be able to restore the 64TB Vol6

It also suggests that the maximum Primary Data Set cannot exceed 8.55TB on an 8600 device, which has 500TB maximum allocatable capacity, reserving 64TB to be able to restore the 64TB Vol6

Even if we consider cloud snapshots to be used only in case of total device loss – disaster recovery, and we allocate the maximum device capacity, the 8100 and 8600 devices can accommodate 3.93TB and 9.81TB respectively:

Conclusion:
Although the allocation of 51TB of space to backup 1 TB of data resolves the tiering issue noted above, it significantly erodes the value proposition provided by StorSimple.
Upgrading Server 2012 R2 to Server 2016 and Storage Spaces
Server 2016 has enhanced and added new features to Storage Spaces. Most notably is the introduction of Storage Spaces Direct, Storage Replica, and Storage QoS. This post explores upgrading a physical Server 2012 R2 that uses mirrored tiered storage space.
After installing Server 2016 (Desktop Experience), and choosing to keep ‘nothing’

In Server Manager, File and Storage Services\Volumes\Storage Pools, we see the old Storage Pool from the prior installation of Server 2012 R2

To recover the Storage Pool, its virtual disks, and all data follow these steps:
- Set Read-Write access

- Upgrade the Storage Pool Version
 Note that this step is irreversible

- Right click on each virtual disk and attach it

- Finally, in Disk Management, right click on each virtual disk and online it


The virtual disks retain the drive letters and volume labels assigned to them in the old 2012 R2 server. All data is intact.
Deploying StorSimple On-Premises Virtual Array (OVA) via GUI tools
The StorSimple model 1200 OVA (On-Premises Virtual Array) is available as VHD/VHDX or VMDK file to be deployed on local Hyper-V or VMWare hypervisor.
Note that the StorSimple OVA model 1200 is incompatible with the StorSimple 8k series physical and virtual devices (8100, 8600, 8010, 8020). This means we cannot recover volumes from 8k device to a 1200 OVA device or vice versa.
1. Deploy ‘Virtual Device Series’ StorSimple Manager:
You cannot deploy an OVA under your ‘Physical Device Series’ StorSimple Manager service. To deploy a ‘Virtual Device Series’ StorSimple Manager follow these steps in the classic portal:

Uncheck the box at the bottom to create a Storage Account.
Note that OVA is available on the following Azure regions as of 20 October 2016:
- Australia East
- Australia Southeast
- Brazil South
- East Asia
- Southeast Asia
- East US
- West US
- Japan East
- Japan West
- North Europe
- West Europe
Enter a name for your StorSimple Manager service.
2. Create a Storage Account
I prefer to manually create a Storage Account instead of having one created automatically, to be able to give it a name that makes sense for the deployment, and becomes easy to identify and recognize later on.

Make sure the Storage Account is in the same Azure region as the StorSimple Manager service.
3. Download the OVA image file
Under the new StorSimple Manager service/devices/create virtual device:

You’ll see a page like:

Click the link under item #1 that corresponds to your hypervisor to download the OVA file. Copy the Registration Key at the bottom. It will be used later in step x to register the OVA with the StorSimple Manager service.
Extract the .ZIP file

4. Provision a VM for the OVA:
I’m using Hyper-V on Server 2012 R2 in this example. Minimum VM specs: 4 cores, 8 GB of RAM, 500 GB disk space for drive c: (system disk).

Gen 2 is supported and recommended when using VHDX image on Server 2012 R2

According to Microsoft, dynamic memory is not supported 😦
Connect to the Hyper-V switch of your choice. Use the downloaded disk:

Click Next and Finish. Go back the VM settings/Processor, and select to use 4 cores:

Add a second disk to the VM under the SCSI controller. Set it as 500 GB dynamically expanding disk.

Start the VM and login to it. This takes several minutes. The default user is StorSimpleAdmin and the default password is Password1. Login and change the password (8 character minimum). The OVA image has a Core version of Server 2012 R2, and if DHCP server is available it picks up an IP address:

An extremely limited set of commands is available:

However, Microsoft has made the support mode available without the need for a decryption tool:

This exposes the entire PowerShell capabilities for admins to manage the device.

This is really a good decision on Microsoft’s part. The current local web interface has many idiosyncrasies that can be frustrating for a device admin. Having the option to manage the device via PowerShell goes a long way towards faster device adoption and customer satisfaction in my opinion and experience.
Although not required, I recommend using a static MAC address for the OVA VM. To do so shut down the VM from Hyper-V Manager, then under settings\network\advanced, select static MAC:

Start the VM.
5. Configure the OVA via the local web interface
Browse to the OVA IP address, and bypass the local certificate warning in the browser. Login with the new password you created in the prior step.

Under configuration/network settings, I recommend using a static IPv4 address

Notes:
- By default, the OVA will attempt to get IP address if there’s DHCP server in the environment.
- To view/change the IP address configuration in the local web interface, if you try to change the DNS server IP it will error out. A work around is to change it back to DHCP, apply, browse to the DHCP IP, login, change it back to static IP and make all the needed changes in one step. In other words, you must change IP address and DNS server address in one step or it fails to accept the changes’
- There’s no way to remove IPv6 information in the local web interface
Browse to the new IP address to continue. For this post I’m using the device as an iSCSI SAN. I settled on leaving the device in ‘workgroup’:

Note:
I was unable to join an on-premises AD domain:

and entered credentials as:

But got the error message “Domain does not exist”!!??

I attempted to use the NetBIOS names (sam1 domain and sam1\administrator user) but got the same error.
I verified connectivity between the DC and the OVA, running these commands on the DC:

I also verified that the DC is responding to DNS queries. I ran the following command from a 3rd computer:

I skipped Proxy settings, since I’m not using a proxy to get to the Internet in this environment.
Interestingly enough, Time Server settings accepted the local DC with no problem:

Finally, I registered the device with the StorSimple Manager Service by entering the Service Registration Key. This was my first device on this StorSimple Manager Service, so I recorded the Service Data Encryption Key received upon successful registration.
Notes:
- If this is not the first device to be registered with this StorSimple Manager service, you’ll need the Service Data Encryption Key as well to be able to register the device
- You must have 3 green check marks at the Network, Device, and Time settings to be able to register the device under Cloud setting

6. Complete OVA configuration in Azure
In the classic portal (24 October 2016), click on your StorSimple Manager Service/Devices link and you should see the newly registered OVA

Click on that and click Complete Device Configuration

In the next screen, select a Storage Account. I recommend checking the box to Enable Cloud Storage Encryption, and entering a 32 character seed for at-rest encryption of data blocks that the device sends to the Azure Storage Account:

StorSimple Manager Services completes the following tasks:

StorSimple Test-HcsStorageAccountCredential Powershell cmdlet output inaccurate
Test-HcsStorageAccountCredential is a function in the HCS (Hybrid Cloud Storage) PowerShell module.

This module is only available on StorSimple device. The purpose of this function is to test connectivity and authentication to an Azure Storage account or other supported public clouds’ storage containers. This may be needed during device deployment to troubleshoot connectivity issues; specifically Storage Account access.
The cmdlet/function has 3 parameter sets. When using the ‘name’ parameter set, we may see several outputs like:
 The output above indicates that the Storage Account does not exist, or
 that the Storage Account is not used by any volume container on this device.
Once a volume container is created to use a newly created Storage Account

The Test-HcsStorageAccountCredential returns a different output:

The above output indicates that the StorSimple device can access the Storage Account successfully. What’s indicative of success here is NOT the ‘HcsErrorMessage: Success’ message. This is considered a success because of the ‘StatusCode: 0‘ message.
Now, if you change the Storage account keys (password portion of the credential needed to access it), the Test-HcsStorageAccountCredential returns output similar to:

The HcsErrorMessage and the HttpMessage above seem to be accurate.
After synchronizing the Storage Account keys with the StorSimple Manager service, deleting the volume container associated with the Storage Account, and deleting the Storage Account, the Test-HcsStorageAccountCredential returns output similar to:

The above message is a bit confusing. I expect to see a message similar to the red error message above indicating that the Storage Account does not exist. ‘HcSErrorMessage: Success’ here is inaccurate. On the bright side, ‘HttpMessage: ResourceNotFound’ is accurate.
In one scenario, where volume container creation fails with error 502, the Test-HcsStorageAccountCredential returns output similar to:

Again, ‘HcSErrorMessage: Success’ here is inaccurate. This particular error ended up being a mis-configured proxy settings on the device where NTLM was specified instead of None and no username/pwd were provided. The proxy was not requiring or using any authentication.
The PowerShell commands to use are:
Get-HCSWebProxy # to view current Proxy settings

Set-HCSWebProxy -ConnectionURI 'http://myproxy.mydomain.com:8000' -Authentication
None # to configure the device to use Proxy

Enable-HCSWebProxy # to enable Proxy use
Conclusion:
When using the Test-HcsStorageAccountCredential function/cmdlet with the ‘name’ parameter set, any StatusCode value other than 0 indicates failure to connect or/and authenticate to the Storage Account. ‘HcSErrorMessage: Success’ may be inaccurate.
Deleting Storage Account associated with a StorSimple Volume Container disables ALL volumes on the device
I came across the following interesting situation with an 8600 StorSimple device running software version 3.0 (17759).
Problem description
All iSCSI volumes from the StorSimple device in question are down at the Windows 2012 R2 host (about a dozen volumes in this case). If you create a new volume and present it to the Windows host, attempting to partition it (GPT) fails with the error message ‘disk not ready’.
2 Additional observations were made:
- All cloud snapshots failed about a month before this incident.
- Software update 3.0 was applied to this device roughly the same time the incident occurred. The accompanying firmware update was not applied.
The time line is as follows:
- Storage account was deleted prior to 6/28/2016 (not showing in Operation Logs which are kept for 90 days)
- 60+ days later (8/28/2016) all cloud snapshots started to fail. The error message suggests failure to access the storage account

- 82+ days later around 9/20/2016, users started to report volumes not available
- 9/24/2016, software update 3.0 was applied from the classic portal

Initial testing
- About a dozen volumes were provisioned from this device to one Windows 2012 R2 host. Volume Containers were associated with 3 Storage Accounts in the same subscription

- One of the 3 Storage Accounts (the one on the top of the above image) was missing. Apparently it was inadvertantly deleted.
- Get-HCSSystem showed normal device condition
- iSCSI connectivity including iSCSI initiator and MPIO configuration were reviewed, tested and showed no issues.
- Ping (Test-Connection) and tracert.exe (Trace-HCSRoute) from each of the host iSCSI interfaces to each of the device iSCSI interfaces and back came back OK.
- Test-HCSMConnection showed no problems.
- Test-HcsStorageAccountCredential against the 2 existing Storage Accounts showed no problem.

Troubleshooting and Root Cause Analysis
I initially suspected that the Storage Account keys were changed without getting synchronized with the StorSimple Manager service, cutting off the device from its Storage Accounts. That would explain volume failure of all volumes and cloud snapshot failure. Both of which need to read and write to Storage Accounts.
- However, Operation Logs showed no events or records related to change of Storage Account keys associated with a StorSimple volume.
- Operation Logs showed no event/record of Storage Account deletion.
- Synchronizing the Storage Account keys of the 2 existing Storage Accounts did not solve the problem.
After opening a ticket with Microsoft, they obtained a device Support Package and recognized that the device appears to be constantly trying and failing to reach the volume whose Storage Account is deleted which is causing failure to serve the remaining unaffected volumes.
Steps to reproduce the problem
- Create 3 Storage Accounts
- Create 3 Volume Containers, each using a separate Storage Account
- Create 3 volumes, 1 in each volume container
- Present all volumes to a Windows 2012 R2 host, online, partition, format, copy test data
- Delete 1 Storage Account
- All 3 volumes will fail (inaccessible) after some time (see questions and answers section below about how much time)
Solution
Create a Storage Account with the same name as the one that was accidentally deleted, and synchronize the keys with the StorSimple Manager service


Although this solution will untie the device to serve the volumes whose Storage Accounts have not been deleted, it does not restore the volume(s) whose data is lost when their Storage Account was deleted. Such volumes’ data need to be restored from snapshot.
Questions and answers:
- If the Storage Account has been deleted 60+ days before cloud snapshots started to fail, what prompted the cloud snapshot failure if that was caused by Storage Account deletion?
- If the Storage Account has been deleted 82+ days before volumes started to fail, what prompted volume failure if that was caused by Storage Account deletion?
[Microsoft]:
What happened here is that eventually, all the failed authentication attempts to the deleted storage account filled out the barrier queue (queue to the cloud). Once it is filled beyond a certain point, it becomes completely stuck, and anything in line behind it is unable to get through. It was once the barrier queue was completely overrun with all these connection issues to the deleted storage account that cause all other cloud traffic to be affected. This has the same effect as losing your cloud connection, and with this being a hybrid appliance when this happens it can cause many different issues such as we saw here with volumes being unavailable and backups unable to complete.
Recommendations to Microsoft
- Log events of Storage Account key changes in Operation Logs
- Currently 90 days worth of events show up in Operation Logs. It would be helpful if that retention period is configurable by the client on each subscription
- Make the device Support Package available to the client without the need for a key from Microsoft. In this case, information available only in the Support Package held the key to the workaround/solution.
- Update the device software so that loss of a Storage Account affects only its associated volumes not all volumes (Perhaps a separate queue per volume container instead of a queue per device)
- Update the StorSimple Manager service or/and Storage Account so that a Storage Account cannot be deleted if there’s an associated StorSimple Volume Container
Moving your StorSimple 8k device
You may have the situation where you need to move your StorSimple 8k iSCSI SAN from one physical location to another. Assuming that the move is not so far as to move to another continent or thousands of miles away, the following process is what I recommend for the move:
- On the file servers that receive iSCSI volumes from this StorSimple device, open Disk Management, and offline all volumes from this StorSimple device
- (Optional) In the classic portal, under the device/maintenance page, install the latest Software and Firmware update. The reason this unrelated step is here, is to take advantage of the down time window to perform device update. This may take 1-12 hours, and may require access to the device serial interface.
- Ensure that you have the Device Administrator password. You’ll need that to change the device IP configuration for the new site. If you don’t have it, you can reset it by going into the classic portal, under the device/configuration page.
- Power down the device by going to the classic portal, under device/maintenance, click Manage Controllers at the bottom, and shutdown Controller0, and repeat to shutdown Controller1

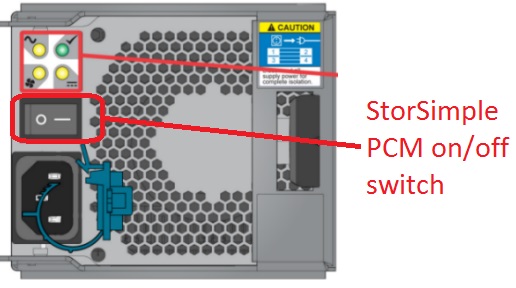
- After the device is powered down, toggle the power buttons on the back on the PCM’s to the off position. Do the same for the EBOD enclosure if this is an 8600 model device.
- Move the device to the new location
- Rack, cable, and power on the device by toggling the power buttons on the back of the PCM modules.
- In the serial console,
- Type 1 to login with full access, enter the device Administrator password.
- Type in Invoke-HCSSetupWizard, enter the new information for data0 interface: IP, mask, gateway, DNS server, NTP server, Proxy information if that’s needed for Internet access in the new site (Proxy URL as http://my.proxy.domain.com:8888, authentication is typically T for NTLM, Proxy username and password if needed by your Proxy – Proxy must be v1.1 compliant)
- Back in the classic portal, you should see your device back online, go to the device/configuration page, update any settings as needed such as controller0 and controller1 fixed IPs, and iSCSI interface configuration if that has changed.
- If the same file servers have moved with the StorSimple device,
- Bring online the file servers, change IP configuration as needed
- Verify iSCSI connectivity to the StorSimple device
- Verify iSCSI initiator configuration
- Online the iSCSI volumes
- Test file access


StorSimple 8k series software version reference
This post lists StorSimple software versions, their release dates, and major new features for reference. Microsoft does not publish release dates for StorSimple updates. The release dates below are from published documentation and/or first hand experience. They may be off by up to 15 days.
- Version 4.0 (17820) – released 12 February 2017 – see release notes, and this post.
- Major new features: Invoke-HCSDiagnostics new cmdlet, and heatmap based restores
- Version 3.0 (17759) – released 6 September 2016 – see release notes, and this post.
- Major new features: The use of a StorSimple as a backup target (9/9/2016 it’s unclear what that means)
- Version 2.2 (17708) – see release notes
- Version 2.1 (17705) – see release notes
- Version 2.0 (17673) – released January 2016 – see release notes, this post, and this post
- Major new features: Locally pinned volumes, new virtual device 8020 (64TB SSD), ‘proactive support’, OVA (preview)
- Version 1.2 (17584) – released November 2015 – see release notes, this post, and this post
- Major new features: (Azure-side) Migration from legacy 5k/7k devices to 8k devices, support for Azure US GOV, support for cloud storage from other public clouds as AWS/HP/OpenStack, update to latest API (this should allow us to manage the device in the new portal, yet this has not happened as of 9/9/2016)
- Version 1.1 (17521) – released October 2015 – see release notes
- Version 1.0 (17491) – released 15 September 2015 – see release notes and this post
- Version 0.3 (remains 17361) – released February 2015 – see release notes
- Version 0.2 (17361) – released January 2015 – see release notes and this post
- Version 0.1 (17312) – released October 2014 – see release notes
- Version GA (General Availability – 0.0 – Kernel 6.3.9600.17215) – released July 2014 – see release notes – This is the first Windows OS based StorSimple software after Microsoft’s acquisition of StorSimple company.
- As Microsoft acquired StorSimple company, StorSimple 5k/7k series ran Linux OS based StorSimple software version 2.1.1.249 – August 2012
StorSimple Software update 3.0 (17759)
This post describes one experience of updating StorSimple 8100 series device from version 0.2 (17361) to current (8 September 2016) version 3.0 (17759). It’s worth noting that:
- StorSimple 8k series devices that shipped in mid 2015 came with software version 0.2
- Typically, the device checks periodically for updates and when updates are found a note similar to this image is shown in the device/maintenance page:

- The device admin then picks the time when to deploy the updates, by clicking INSTALL UPDATES link. This kicks off an update job, which may take several hours

- This update method is known as updating StorSimple device using the classic Azure portal, as opposed to updating the StorSimple device using the serial interface by deploying the update as a hotfix.
- Released updates may not show up, in spite of scanning for updates manually several times:

The image above was taken on 9 September 2016 (update 3.0 is the latest at this time). It shows that no updates are available even after scanning for updates several times. The reason is that Microsoft deploys updates in a ‘phased rollout’, so they’re not available in all regions at all times.

- Updates are cumulative. This means for a device running version 0.2 for example, we upgrade directly to 3.0 without the need to manually upgdate to any intermediary version first.
- An update may include one or both of the following 2 types:
- Software updates: This is an update of the core 2012 R2 server OS that’s running on the device. Microsoft identifies this type as a non intrusive update. It can be deployed while the device is in production, and should not affect mounted iSCSI volumes. Under the covers, the device controller0 and controller1 are 2 nodes in a traditional Microsoft failover cluster. The device uses the traditional Cluster Aware Update to update the 2 controllers. It updates and reboots the passive controller first, fails over the device (iSCSI target and other clustered roles) from one controller to the other, then updates and reboots the second controller. Again this should be a no-down-time process.
-
Maintenance mode updates:
These are updates to shared components in the device that require down time. Typically we see LSI SAS controller updates and disk firmware updates in this category. Maintenance mode updates must be done from the serial interface console (not Azure web interface or PowerShell interface). The typical down time for a maintenance mode update is about 30 minutes, although I would schedule a 2 hour window to be safe. The maintenance mode update steps are:
- On the file servers, offline all iSCSI volumes provisioned from this device.
- Log in to the device serial interface with full access
- Put the device in Maintenance mode: Enter-HcsMaintenanceMode, wait for the device to reboot
- Identify available updates: Get-HcsUpdateAvailability, this should show available Maintenance mode updates (TRUE)
- Start the update: Start-HcsUpdate
- Monitor the update: Get-HcsUpdateStatus
- When finished, exit maintenance mode: Exit-HcsMaintenanceMode, and wait for the device to reboot.


Powershell script to list StorSimple network interface information including MAC addresses
In many cases we can obtain the IP address of a network interface via one command but get the MAC address from another command. StorSimple 8k series which runs a core version of server 2012 R2 (as of 20 June 2016) is no exception. In this case we can get the IP address information of the device network interfaces via the Get-HCSNetInterface cmdlet. However, to identify MAC addresses we need to use the Get-NetAdapter cmdlet. This Powershell script merges the information from both cmdlets presenting a PS Object collection, each of which has the following properties:
- InterfaceName
- IPv4Address
- IPv4Netmask
- IPv4Gateway
- MACAddress
- IsEnabled
- IsCloudEnabled
- IsiSCSIEnabled
Script output may look like:

For more information about connecting to StorSimple via PowerShell see this post.
Presenting StorSimple iSCSI volumes to a failover cluster
In a typical implementation, StorSimple iSCSI volumes (LUNs) are presented to a file server, which in turn presents SMB shares to clients. Although the StorSimple iSCSI SAN features redundant hardware, and is implemented using redundant networking paths on both the Internet facing side and the iSCSI side, the file server in this example constitutes a single point of failure. One solution here is to present the iSCSI volume to all nodes in a failover cluster. This post will go over the steps to present a StorSimple iSCSI volumes to a failover cluster as opposed to a single file server.
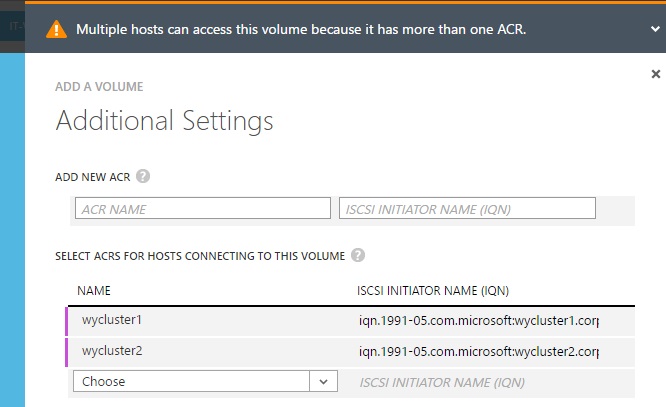
Create volume container, volume, unmask to all cluster nodes
As usual, keep one volume per volume container to be able to restore one volume at a time. Give the volume a name, size, type: tiered. Finally unmask it to all nodes in the failover cluster:
Format the volume:
In Failover Cluster Manager identify the owner node of the ‘File Server for general use‘ role:

In Disk Management of the owner node identified above, you should see the new LUN:

Right click on Disk20 in the example above, click Online. Right click again and click Initialize Disk. Choose GPT partition. It’s recommended to use GPT partition instead of MBR partition for several reasons such as maximum volume size limitation.
Right click on the available space to the right of Disk20 and create Simple Volume. It’s recommended to use Basic Disks and Simple Volumes with StorSimple volumes.
Format with NTFS, 64 KB allocation unit size, use the same volume label as the volume name used in StorSimple Azure Management Interface, and Quick format. Microsoft recommends NTFS as the file system to use with StorSimple volumes. 64KB allocation units provide better optimization as the device internal deduplication and compression algorithms use 64KB blocks for tiered volumes. Using the same volume label is important since currently (1 June 2016) StorSimple does not provide a LUN ID that can be used to correlate a LUN created on StorSimple to one appearing on a host. Quick formatting is important since these are thin provisioned volumes.
For existing volumes, Windows GUI does not provide a way of identifying the volume allocation unit size. However, we can look it up via Powershell as in:
@('c:','d:','y:') | % {
 $Query = "SELECT BlockSize FROM Win32_Volume WHERE DriveLetter='$_'"
 $BlockSize = (Get-WmiObject -Query $Query).BlockSize/1KB
 Write-Host "Allocation unit size on Drive $_ is $BlockSize KB" -Fore Green
}
Replace the drive letters in line 1 with the ones you wish to lookup.
Summary of volume creation steps/best practices:
- GPT partition
- Basic Disk (not dynamic)
- Simple volume (not striped, mirrored, …)
- NTFS file system
- 64 KB allocation unit (not the default 4 KB)
- Same volume label as the one in StorSimple
- Quick Format
Add the disk to the cluster:
Back in Failover Cluster Manager, under Storage, right click on Disks, and click Add Disk

Pick Disk20 in this example

Right click on the new cluster disk, and select Properties

Change the default name ‘Cluster Disk 3’ to the same volume label and name used in StorSimple

Assign Cluster Disk to File Server Role
In Failover Cluster Manager, under Storage/Disks, right click on TestSales-Vol in this example, and select Assign to Another Role under More Actions

Select the File Server for General Use role – we happen to have one role in this cluster:

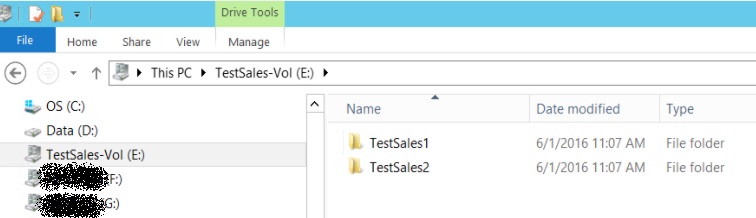
Create clustered file shares
As an example, I created 2 folders in the TestSales-Vol volume:
In Failover Cluster Manager, under Roles, right click on the File Server for General Use role, and select Add File Share

Select SMB Quick in the New Share Wizard

Click Type a custom path and type in or Browse to the folder on the new volume to be shared

Change the share name or accept the default (folder name). In this example, I added a dollar sign $ to make this a hidden share

It’s important to NOT Allow caching of share for StorSimple volumes. Access based enumeration is my personal recommendation

Finally adjust NTFS permissions as needed or accept the defaults:

Click Create to continue

Repeat the above steps for the TestSales2 folder/share in this example
Powershell script to Auto-Expand StorSimple volume based on amount of free space
StorSimple Hybrid Cloud Storage array is an on-premise iSCSI SAN that extends seamlessly to the cloud. iSCSI volumes provisioned from a StorSimple device can be expanded but cannot be shrunk. So, a typical recommendation here is to start a volume small and grow it as needed. Growing a volume is a process that does not require down time. This script grows a StorSimple volume automatically based on set conditions of volume free space and a not-to-exceed value.
The input region of this script is the one that should be edited by the script user:
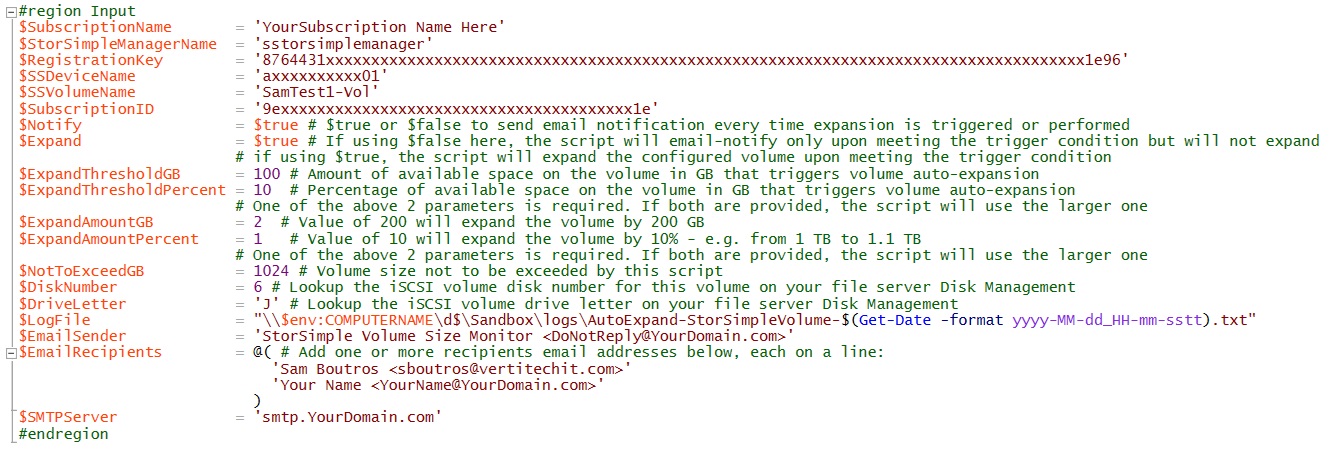
Similar to the script that monitors StorSimple Backups, the values for SubscriptionName, SubscriptionID, and StorSimpleManagerName variables can be found in the classic Azure Management Interface under your StorSimple Manager node Dashboard and Device pages:

and the RegistrationKey:

and the SSDeviceName (StorSimple Device Name)

The value for the SSVolumeName (StorSimple volume name) variable can be found under the device\volume container:

Notify variable can be either $true or $false. This instructs the script whether or not to send email notification when an expansion is triggered,
Similarly, Expand variable can be either $true or $false. This instructs the script whether or not to expand the volume when an expansion is triggered, When set to $false (and Notify is set to $true) and an expansion is triggered, the script will send an email notification that an expansion is triggered but will not do the actual expansion.
ExpandThresholdGB and ExpandThresholdPercent variables are used by the script to identify the amount of free space on the volume below which a volume expansion is triggered. Only one of these variables is needed. If both are provided the script will use the larger value.
- Example 1: If the volume size is 100 GB, and the ExpandThresholdGB is set to 10 (GB) and the ExpandThresholdPercent is set to 15 (%), the script will trigger a volume expansion if the amount of free space is at or below 15 GB
- Example 2: If the volume size is 100 GB, and the ExpandThresholdGB is set to 10 (GB) and the ExpandThresholdPercent is set to 5 (%), the script will trigger a volume expansion if the amount of free space is at or below 10 GB
Similarly, the ExpandAmountGB and ExpandAmountPercent variables instruct the script on how much to expand the volume once expansion is triggered. Only one of these variables is needed. If both are provided the script will use the larger value.
- Example 1: If the volume size is 100 GB, and the ExpandAmountGB is set to 10 (GB) and the ExpandAmountPercent is set to 15 (%), the script will expand the volume by 15 GB once expansion is triggered.
- Example 2: If the volume size is 100 GB, and the ExpandAmountGB is set to 10 (GB) and the ExpandAmountPercent is set to 5 (%), the script will expand the volume by 10 GB once expansion is triggered.
The value assigned to the variable NotToExceedGB is used by the script as volume maximum size that the script must not exceed. For example, if the prior 4 variables instruct the script to expand a 900 GB volume by an additional 200 GB and the NotToExceedGB variable is set to 1024 (1 TB), the script will expand the volume by 124 GB only to reach the NotToExceedGB amount but to not to exceed it.
DiskNumber and DriveLetter are values that the script user should obtain from the server’s Disk Management screen of the file server using this iSCSI volume:

As of the time of writing this post and script (1 April 2016), there’s no way to correlate a volume on a file server to a volume on a StorSimple device. For example, if you create 3 volumes of the same size on a StorSimple device and call them data1, data2, and data3, and present them to the same file server and format them with the same file system and block size, and use volume labels data1, data2, data3, there’s no way to tell if data1 on the StorSimple device is the volume labeled data1 on the file server. This is why it’s recommended to provision and format StorSimple volumes one at a time and use the same volume label when formatting the volume as the volume name on StorSimple. Long story short, it’s the user’s responsiblity to:
- Make sure the DrviveLetter and DiskNumber correspond to the SSVolumeName, and
- Update the DrviveLetter and DiskNumber values if they change on the file server due to adding or removing volumes.
One last point here; if this iSCSI volume is presented to a Windows Failover cluster, this script must be run on the owner node.
LogFile is the path to where the script will log its actions – each log line will be time stamped. This could be on a network share.
EmailSender is the name and email address you wish to have the email notification appear to come from. For example: StorSimple Volume Size Monitor <DoNotReply@YourDomain.com>
$EmailRecipients = @(
‘Sam Boutros <sboutros@vertitechit.com>’
‘Your Name <YourName@YourDomain.com>’
)
is an array that takes one or more email addresses in the format shown above.
SMTPServer is your SMTP relay server. You need to make necessary configuration/white-listing changes to allow your SMTP server to accept and relay SMTP email from the server running the script.
Sample script output:

another example:

and example of email notification:

Possible future enhancements to this script include:
- Rewrite the script as a function so that it can handle several volumes
- Rewrite the script to use Powershell remoting, so that it does not have to run on the file server.
- Add functionality to detect if the target file server is a member of a failover cluster, and to automatically target the owner node.
Troubleshooting StorSimple high latency IO’s blocking low latency IO’s
By design StorSimple hybrid cloud storage tiers off automatically the oldest blocks from the local SSD tier down to the SAS tier as the SSD tier fills up (reaches ~80% capacity). In turn it also tiers down the oldest blocks from the SAS tier to the Azure tier as that fills up (reaches ~80% capacity).
This has the great benefits of:
- Automated tiering: This negates the need for data classification and the entirety of the efforts associated with that.
- Granular tiering: Tiering happens at the block level not at the file level. That’s 64KB for tiered volumes. So, a file can have some hot blocks in SSD, some older blocks in SAS, and some cold blocks that have been displaced all the way down to the Azure tier by warmer blocks (of the same or other files)
As of the time of writing this post (28 March 2016), tiering is fully automated and not configurable. The exception is ‘Locally Pinned Volume’ feature that comes with StorSimple software update 2.0 (17673) and above. A locally pinned volume loses the deduplication and compression features of a ‘Tiered Volume’, and always resides on the physical device. Currently no visibility is provided as to what tier a Locally Pinned Volume resides (SSD or SAS).
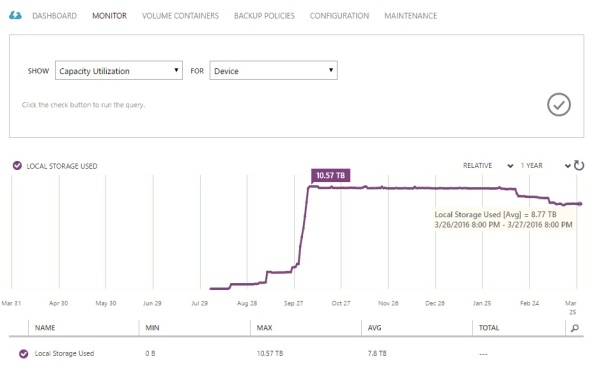
In the following scenario – take the example of an 8100 StorSimple device that has 15.8 TB local usable capacity (prior to dedplication and compression):
- Customer creates handful of volumes – about 30 TB provisioned out of 200 TB max allowed on the device, migrates some 25 TB of data:

The above ‘Primary’ capacity graph shows about 25 TB of data as it appears to the SMB file servers that consume the iSCSI volumes, while the below ‘Device’ capacity graph shows that about 10 TB of that 25 TB resides on the same device for the same time period.
- Customer does an archive data dump, such as 2 TB of old backup or archive files. Any new data comes in as hot and in a ‘full’ device, it will displace older blocks to Azure. In this case, we have several TB of active production data that got inadvertently displaced to Azure. The following access pattern is observed:
- End user attempts to retrieve files. If the file blocks are in Azure, they will be retrieved, but to make room for them in the SSD tier, other blocks has be tiered down to the full SAS tier, which will have to tier off blocks back to Azure to make room for blocks coming down from SSD. So, a read operation has caused 2 tiering operations including a write operation to Azure. This is described as high latency IO operation.
- If this is taking several minutes, during the period where the device is handling high latency IO’s described above, if other users are requesting files that RESIDE ENTIRELY LOCALLY on the device (described as low latency IO operations), it has been observed that those read requests are slowed down as well to a crawl. That’s is high latency IO’s appear to block low latency IO’s.
- So in this scenario, a 2 TB archive data dump on an 8100 device with 10 TB on the device, result in the entire 10 TB being shuffled out to Azure and back in, few blocks at a time, until the 2 TB archive data ends up in Azure returning the device to its pre-incident status.


In my opinion, this is a situation to be avoided at all costs. Once it occurs, the device may exhibit very slow performance that may last for weeks until the archive data dump has made its way through the rest of the data on the device to Azure.
Best practices recommended to avoid this scenario:
- Adhere to the recommended device use cases, particularly unstructured data/file shares. StorSimple is not meant for multi-terabyte high performance SQL databases for example. Another example that is not recommended as a workload on StorSimple is large PST files. They’re essentially database file that are accessed frequently, and get scanned, indexed and accessed in their entirety.
- Do not run any workload or process that scans the active data set in its entirely. Anti-virus and anti-malware scans must be configured for incremental use or quick scans only, never for a full scan of all files on a volume. This applies to any process that may try to index, categorize, classify, or read all files on a volume. The exception is a process or application that reads files metadata and properties only – not open the files and reads inside of them. Reading metadata is OK because metadata always resides locally on the device.
- Carefully plan your data migration to StorSimple, putting emphasis on migrating the oldest data first. Robocopy can be a very helpful tool in the process.
I’m adding the following enhancements to my wishlist that I hope to see implemented by Microsoft in the next StorSimple software release:
- Resolving the core issue of high latency IO’s seeming to block/impede low latency IO’s
- More visibility into the device tiering metrics. Simply put, a storage admin needs to know when a StorSimple device is ‘full’ and is tiering off blocks from the primary data set to Azure. This knowledge is critical to avoid the situation described above. A metric of the amount of space available before the device is full, is even better to help provide predictability before reaching that point.
- ‘Cloud Pinned Volume’ feature would be very helpful. This should allow the StorSimple storage admin to provision an iSCSI volume that resides always in Azure and does not affect the device heat map.
Powershell script to re-hydrate StorSimple files based on date last accessed
In some rare situations, a StorSimple hybrid cloud storage device can reach a point where a large cold data dump has displaced hot data to the cloud (Azure). This happens if the device local SSD and SAS tiers are full (including reserved space that cannot be used for incoming data blocks from the iSCSI interfaces). In this situation, most READ requests will be followed by Azure WRITE requests. What’s happening is that the device is retrieving the requested data from Azure, and to make room for it on the local tiers it’s displacing the coldest blocks back to Azure. This may result in poor device performance especially in situations where the device bandwidth to/from the Internet is limited.
In the scenario above, if the cold data dump occurred 8 days ago for example, we may be interested in re-hydrating files last access in the week prior to that point in time. This Powershell script does just that. It identifies files under a given directory based on date last accessed, and reads them. By doing so, the StorSimple device brings these files to the top SSD tier. This is meant to run off hours, and is tested to improve file access for users coming online the next day.
To use this script, modify the values for the $FolderName variable. This is where the script looks for files to re-hydrate. The script searches for all sub-folders.

Also modify the values of the $StartDays and $EndDays variables. As shown in the example above, the selection of 15 StartDays and 9 EndDays will re-hydrate data whose LastAccessTime was 9-15 days ago.
Script output may look like:

As usual, a log file is generated containing the same output displayed on the console. This is helpful if the script will be run as a scheduled task or job.
Powershell script to collect disk information from one or many computers
In many scenarios you may need to collect disk drive information from one or many Windows computers. For example when trying to identify used storage in the process of planning to move from traditional on premise storage to cloud integrated storage such as StorSimple. This script can help with this task.
To use this script, run it to load its 2 functions. The main function is Get-DiskInfo.
to see its built in help, type in:
help Get-DiskInfo -ShowWindow
Powershell displays help information similar to:

The help information includes some examples like:
Get-DiskInfo
Simply running the function with no parameters. The script assumes you mean get disk information of this computer, and creates a log file under the current path in a sub-folder named logs.
Output may look like:

The log file will have the same information displayed on the screen. This is handy when/if this is run as (unattended) scheduled task or job.

Another example illustrates using the output PS object to present and save the information into CSV for further reporting and analysis:
$Drives = Get-DiskInfo v2012R2G2-SQL2,notthere,v2012R2G2-IIS2
The script will return list of drives of the computers v2012R2G2-SQL2,v2012R2G2-IIS2, save the output to a log file, and in the $Drives variable. Output may look like:

The source computers can be Windows XP, Windows 7, Windows 8, Windows 10, Server 2003, Server 2008, Server 2012, Server 2016. They must have Powershell installed, and Powershell remoting configured. See this post for more details.
We can display the data in the $Drives variable to the screen as in:
$Drives | select Computer,Drive,’Used(GB)’,’Free(GB)’,’Free(%)’,’Total(GB)’ | FT -a

Or display it to a window instead as in:
$Drives | select Computer,Drive,’Used(GB)’,’Free(GB)’,’Free(%)’,’Total(GB)’ | Out-GridView

Or save to CSV file for further reporting and analysis with MS Excel as in:
$Drives | select Computer,Drive,Used,Free,Total | Export-Csv .\Drives1.csv -NoType

The last example:
Get-DiskInfo (Import-Csv .\ComputerList.csv).ComputerName
demonstrates that we can read the list of computers from a CSV file. In this example the input CSV file looks like:

You can simply create a new file in Notepad. The first line must be ‘ComputerName’ to match the property name used in the example above. This is followed by the computer names, each on its own line. Finally save with CSV file extension instead of TXT.
StorSimple 8k update to version 2.0 (17673)
StorSimple update 2.0 brings in a number of new exciting features such as Locally Pinned Volumes, OVA (On-premise Virtual Array), and enhanced SVA (StorSimple Virtual Array) model 8020 with 64TB capacity as opposed to 30 TB capacity of the prior model 1100 (now renamed 8010).
Update 2.0 is another intrusive update that requires down time. It includes LSI firmware update (KB 3121900), and SSD disk firmware update (KB 3121899).
Prior to the update, we can see the device running Software version 1.2 (17584)

This can also be seen from the serial or Powershell interfaces by using the Get-HcsSystem cmdlet:

Ensure that both controllers have routable IPs
As suggested by the update instructions, we ensure that both controllers 0 and 1 have routable IPs prior to start. To do so, I ping some external Internet IP address such as bing.com from each of the controllers’ fixed IPs:
From Controller 0 (the prompt must say ‘Controller0>’):
Test-HcsConnection -Source 10.1.2.86 -Destination bing.com
A positive response looks like:

From Controller 1 (the prompt must say ‘Controller1>’):
Test-HcsConnection -Source 10.1.2.87 -Destination bing.com

Phase I – Software update – start the update from the Azure Management Interface
In the classic portal, under the device Maintenance page, click Install Updates at the bottom:

check the box and the check mark:

Pre-upgrade checks are started:

And a Software Update Job is created:

successfully:

Unlike prior updates, the 2.0 update starts on the passive controller:

Under the StorSimple Manager/Jobs page, we can see an update job in progress:

The controller being updated will reboot several times. During the update we’ll see unusual controller health and state information in the portal:

This is normal while the update is in progress.
A few hours later, we can see that the passive controller has been patched to version 2.0

and that a controller failover has occurred, where controller 1 is now active, and controller 0 (now passive) is being patched:

About 4.5 hours the first phase of the update is finished:

We can see the device in normal state and health under the Maintenance page:

Phase II – Maintenance Mode LSI firmware update
Unfortunately this is an intrusive update that requires down time, similar to phase 2 of StorSimple version 1.2 update posted here.
To summarize the steps of maintenance mode updates:
- Schedule a down-time window
- Offline all StorSimple iSCSI volumes on the file servers
- Run a manual cloud snapshot of all volumes
- On the Device serial (not Powershell) interface, put the device in Maintenance mode:
Enter-HcsMaintenanceMode
Both controllers will reboot - Patch controller 0:
Get-HcsUpdateAvailability
Start-HcsUpdate
Check update progress:
Get-HcsUpdateStatus - After controller o is patched repeat last step on controller 1 to patch it
- Finally exit Maintenance mode:
Exit-HcsMaintenanceMode
Both controllers will reboot
The device is now back in normal operating condition, and we can online the volumes back on the file servers.
StorSimple virtual devices
In January 2016, Microsoft released StorSimple software version 2. According to the release notes, we now have the following StorSimple virtual devices:
- SVA (StorSimple Virtual Array) 8010 (formerly called the 1100)
- SVA 8020
- OVA (On-Premises Virtual Array) 1200 (this is in early preview as of 26 January 2016)
The following table lays out some of the differences:
| Model | 8010 | 8020 | 1200 |
| Type | SVA | OVA | |
| Resides | Azure | On-Premises as VM on Hyper-V or VMWare | |
| Storage | Standard (SAS) | Premium (SSD) | Client-provided |
| StorSimple Manager | Physical Device Series | Virtual Device Series | |
| Serves storage as | iSCSI (SAN) | iSCSI (SAN) or SMB (NAS) | |
| Management | Azure Web Interface | Azure Web Interface, local console (initial IP), and local web interface (initial Config) | |
| Max Capacity | 30 TB | 64 TB | 64 TB |
StorSimple 1200 OVA (On-premises Virtual Array) deployment
In January 2016 Microsoft released a new version of StorSimple, that’s a virtual device that can be deployed on-premises. This is commonly referred to as OVA (On-premises Virtual Array). The online documentation lists its features and installation/management instructions.
Create StorSimple Manager service
At this time (22 January, 2016) we have 2 ‘flavors’ of the StorSimple Manager service in Azure:
- Physical Device Series: This is the traditional StorSimple Manager service that is used to manage physical devices models 8100 and 8600 and the virtual devices models 8010 (formerly 1100) and 8020
- Virtual Device Series: This is the new StorSimple Manager service that’s used to manage the new On-Premises Virtual Array (OVA)
A StorSimple Manager service of the latter ‘flavor’ can be created in the Azure Management Interface by selecting the ‘Virtual Device Series’ option:

The OVA is in early ‘Preview’ release as of 26 January 2016, and many expected features are not available yet. For example, the Virtual Device Series StorSimple Manager service appears to be currently available only in East and West Japan regions!?
I recommend not checking the box to ‘Create a new Azure Storage Account’ here, and to manually create a storage account. I recommend creating a Storage account that’s physically closest to where the OVA will run to achieve lowest WAN latency. I also recommend using Geo-redundant storage.
Deploy StorSimple 1200 OVA (On-Premises Virtual Array)
This OVA is made available as a VHD image for Hyper-V or VMDK image for VMWare.
I deployed the OVA on a Server running Windows 2012 R2 and the Hyper-V role, using the following configuration:
- Generation 1 VM
- 8 GB static RAM
- 4 CPU cores
- 1 NIC
- 500 GB dynamic VHDX disk on virtual SCSI adapter
This script automates the task of deploying the OVA on Hyper-V (2012 R2)
Sample script output:

Log in using ‘Password1’, and change the password

You’ll see a display similar to the following (I’m not using DHCP on this network):

Similar to other versions of StorSimple, we’re provided a restricted version of Powershell where only a handful of cmdlets are exposed:

I use the Set-HcsIPAdress and Get-HcsIPAddress cmdlets to set and verify the OVA IP settings:

The Set-HcsIPAddress does not return any output even with the -verbose parameter!? I guess no news is good news..
StorSimple 1200 OVA (On-Premises Virtual Array) initial configuration
At this point, the rest of the OVA device configuration occurs from the device local web interface:

Log in with the new password you set in the prior step:

We then get this screen:

Network settings (note that it can use DHCP):

Device settings:

In this page we can change the device name and join it to an on-premises AD domain. I’m accepting the default option to use this OVA as an SMB file server (NAS) not as an iSCSI SAN.
Time settings:

Get the Service Registration Key from your StorSimple Manager:

and enter that in the Cloud Settings page to register the OVA with your StorSimple Manager service:

As of 26 January 2016, there’s no way to recover/change the service data encryption key on the ‘Virtual Device’ type of StorSimple Manager.
StorSimple Software Release 2.0 (17673)
In January 2016 Microsoft released software update 2.0 for StorSimple cloud integrated storage arrays. The release notes list some interesting features such as Local Volumes, SVA (StorSimple Virtual Array) model 8020 that provides 64TB capacity and uses Premium Storage (SSD). In the next few posts I will examine each of the new features in v2.0 including:
- StorSimple 1200 OVA (On-premises Virtual Array)
- StorSimple Virtual Array 8010 (formerly known as SVA 1100)
- StorSimple Virtual Array 8020
- StorSimple 8k series physical device update to version 2.0
- StorSimple Local Volumes
StorSimple 8k series factory reset
In some situations you may need to factory reset your 8k series StorSimple hybrid storage array. There are a few things you should know before you proceed:
- Offline the volume(s) in the file server(s) under Disk Management
- Clean up Azure objects (the order here is important):
Offline and delete all volumes in the Azure classic portal. Delete volume containers. Delete backup policies (important). Delete associated Storage Account(s) if not used for any other purpose. In the Azure classic portal, deactivate the device

Prior to deactivating the device in the Azure Management Interface, the Get-HcsSystem cmdlet will show a display similar to: 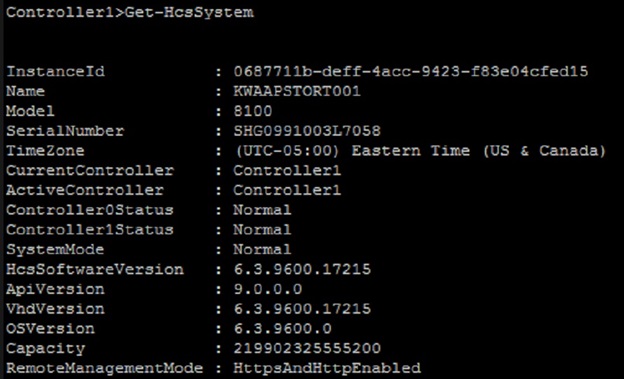
Looking for ‘Normal’ on all 3: Controller 0 Status, Controller 1 Status, and System Mode. If not, factory reset will fail. This will need Microsoft support assistance to get the device back out of Recovery mode.
After deactivating the device in the Azure Management Interface, the Get-HcsSystem cmdlet will show a display similar to:

Notice that SystemMode now says ‘Decommissioned’.
- On the device serial/powershell interface run the cmdlet Reset-HcsFactoryDefault
The device will reboot several times. The process can take few hours.
One issue we have now (12 January 2016) is that the device reverts back to the version it shipped with – that’s version 0.2, regardless of what version it was running prior to the factory reset. This means that after re-installation, the device needs to be updated to the latest version which takes several hours. updates may include Maintenance mode updates which require downtime and may need to be installed manually via the device serial console.
This can be seen in this image as well:

Notice that the device is on version 17584 (1.2) while the (source) VHD version is still 17361 (0.2). Part of the factory reset process is copying over the source VHD to the boot VHD; from which the device boots.
StorSimple 8k Device Software Version 1.2 (17584)
In this post I will go over the changes in Powershell cmdlets made available in StorSimple Software update 1.2 (17584)
To connect to StorSimple Powershell you can use the script in this post.
First, I identify the software version running on the device by using the Get-HcsSystem cmdlet:

Next, I get a list of available cmdlets:

As noted in prior posts, there are many more cmdlets in the Powershell Core, Utility, Management, HCS, and other PS modules. However, Microsoft has locked down the available cmdlets on this device.
Next, using this script I collect the commands’ information in an XML file.
65 cmdlets are exposed in StorSimple Update 1.2, compared to 58 in Update 0.2.
Comparing v0.2 to v1.2 shows 7 new cmdlets:

See this link for more information on HCS cmdlets, and this link for new features in StorSimple Software Update 1.2
StorSimple 8k encryption keys
30 January 2017 – for more information see my post Azure StorSimple Provides a Secure Storage Option for Healthcare Sector
12 November 2015 – Microsoft provides excellent online documentation for StorSimple. However, there has been a little confusion on the issue of StorSimple 8k encryption keys, hence this post. For example, the StorSimple security and data protection document, under the ‘Protect data at rest’ heading states:
We recommend that you rotate cloud storage encryption key quarterly.

The document has it right in the first line ‘The key cannot be modified or added later‘, but the last point is simply false.
The obvious difficulties here are:
- As soon as the at-rest encryption key is changed for a volume container, the device will fail to decrypt cloud snapshots encrypted with the old key
- The device will also fail to decrypt tiered off blocks to Azure from volumes in this volume container, rendering the volumes unreadable.
It’s for this very reason that changing the at-rest encryption keys is explicitly disabled in the interface:

Note:
After bringing this point to Microsoft attention, on November 11, 2015 Microsoft has updated the StorSimple security and data protection document, removing the last point. Excellent and quick response. Thank you.
This is not to be confused or mixed up with the Azure Storage Account credentials used by the device at the Volume Container level. Storage Account credentials are the Storage Account name and access key, which are analogous to a user name and password – a set of credentials. It’s not an encryption key. Perhaps calling it ‘password’ instead of ‘access key’ could have avoided some confusion. Storage Account credentials provide access to the Storage Account for a device, a user, or an application. Storage Account credentials can be changed without disruption.
To do so, change the primary access key:

Then synchronize it with the device:

Finally repeat the last 2 steps to regenerate and synchronize the secondary access key.
