StorSimple 8k series as a backup target?
19 December 2016
After a conference call with Microsoft Azure StorSimple product team, they explained:
- “The maximum recommended full backup size when using an 8100 as a primary backup target is 10TiB. The maximum recommended full backup size when using an 8600 as a primary backup target is 20TiB”
- “Backups will be written to array, such that they reside entirely within the local storage capacity”
Microsoft acknowledge the difficulty resulting from the maximum provisionable space being 200 TB on an 8100 device, which limits the ability to over-provision thin-provisioned tiered iSCSI volumes when expecting significant deduplication/compression savings with long term backup copy job Veeam files for example.
Conclusion
- When used as a primary backup target, StorSimple 8k devices are intended for SMB clients with backup files under 10TB/20TB for the 8100/8600 models respectively
- Compared to using an Azure A4 VM with attached disks (page blobs), StorSimple provides 7-22% cost savings over 5 years
15 December 2016
On 13 December 2016, Microsoft announced the support of using StorSimple 8k devices as a backup target. Many customers have asked for StorSimple to support this workload. StorSimple hybrid cloud storage iSCSI SAN features automated tiering at the block level from its SSD to SAS to Azure tiers. This makes it a perfect fit for Primary Data Set for unstructured data such as file shares. It also features cloud snapshots which provide the additional functionality of data backup and disaster recovery. That’s primary storage, secondary storage (short term backups), long term storage (multiyear retention), off site storage, and multi-site storage, all in one solution.
However, the above features that lend themselves handy to the primary data set/unstructured data pose significant difficulties when trying to use this device as a backup target, such as:
- Automated tiering: Many backup software packages (like Veeam) would do things like a forward incremental, synthetic full, backup copy job for long term retention. All of which would scan/access files that are typically dozens of TB each. This will cause the device to tier data to Azure and back to the local device in a way that slows things down to a crawl. DPM is even worse; specifically the way it allocates/controls volumes.
- The arbitrary maximum allocatable space for a device (200TB for an 8100 device for example), makes it practically impossible to use the device as backup target for long term retention.
- Example: 50 TB volume, need to retain 20 copies for long term backup. Even if change rate is very low and actual bits after deduplication and compression of 20 copies is 60 TB, we cannot provision 20x 50 TB volumes, or a 1 PB volume. Which makes the maximum workload size around 3TB if long term retention requires 20 recovery points. 3TB is way too small of a limit for enterprise clients who simply want to use Azure for long term backup where a single backup file is 10-200 TB.
- The specific implementation of the backup catalog and who (the backup software versus StorSimple Manager service) has it.
- Single unified tool for backup/recovery – now we have to use the backup software and StorSimple Manager, which do not communicate and are not aware of each other
- Granular recoveries (single file/folder). Currently to recover a single file from snapshot, we must clone the entire volume.
In this article published 6 December 2016, Microsoft lays out their reference architecture for using StorSimple 8k device as a Primary Backup Target for Veeam

There’s a number of best practices relating to how to configure Veeam and StorSimple in this use case, such as disabling deuplication, compression, and encryption on the Veeam side, dedicating the StorSimple device for the backup workload, …
The interesting part comes in when you look at scalability. Here’s Microsoft’s listed example of a 1 TB workload:

This architecture suggests provisioning 5*5TB volumes for the daily backups and a 26TB volume for the weekly, monthly, and annual backups:

This 1:26 ratio between the Primary Data Set and Vol6 used for the weekly, monthly, and annual backups suggests that the maximum supported Primary Data Set is 2.46 TB (maximum volume size is 64 TB) !!!???

This reference architecture suggests that this solution may not work for a file share that is larger than 2.5TB or may need to be expanded beyond 2.5TB
Furthermore, this reference architecture suggests that the maximum Primary Data Set cannot exceed 2.66TB on an 8100 device, which has 200TB maximum allocatable capacity, reserving 64TB to be able to restore the 64TB Vol6

It also suggests that the maximum Primary Data Set cannot exceed 8.55TB on an 8600 device, which has 500TB maximum allocatable capacity, reserving 64TB to be able to restore the 64TB Vol6

Even if we consider cloud snapshots to be used only in case of total device loss – disaster recovery, and we allocate the maximum device capacity, the 8100 and 8600 devices can accommodate 3.93TB and 9.81TB respectively:

Conclusion:
Although the allocation of 51TB of space to backup 1 TB of data resolves the tiering issue noted above, it significantly erodes the value proposition provided by StorSimple.
Powershell script to backup all user databases on current SQL server
This script will backup all user databases on the current SQL server. The Input region accepts values for 2 variables:
$Destination ==>This is the folder where backup files will be stored
$Retension ==> Number of days to keep backup files. Backup files older than this will be deleted. If you don’t want any files deleted, make this number high like 99999
The script creates a folder for each database under the $Destination folder. Backup file name contains the database name and date/time of backup. For example, for database ‘INM’, backup file would be ‘H:\SQL-Backup\INM\INM-20160605_081237AM.bak’
Script returns an object collection. Each object has the following properties:
- ServerName
- DatabaseName
- RecoveryModel
- BackupDateTime(yyyyMMdd_hhmmsstt)
- BackupDuration(hh:mm:ss)
- BackupFileSize(MB)
- BackupFileSize
Sample script output:

Also see script to list SQL Recovery Model of all databases on current server, script to modify and list SQL Recovery Model of all databases, and this related post.
SQL backup options and feature details
Simple Recovery Model
Overview:
- Transaction log is mainly used for crash recovery (no log backup)
- Transaction log keeps all records after last backup (full or differential)
- Supports Full and Differential backups only
- Changes since last backup will be lost
- Example: Full on Saturdays and differentials on weekdays.
Advantages:
- Automatically reclaims log space
Dis-advantages:
- The following features are not supported under the Simple Recovery Model:
- Log shipping
- AlwaysOn Database mirroring
- Point-in-time restores
- Changes since the most recent backup cannot be recovered
To view a database Recovery Model:
TSQL:
SELECT recovery_model_desc FROM sys.databases WHERE name = ‘MyDBName’
Powershell:
Get-SQLRecoveryModel -DBName MyDBName -ServerName MySQLServerName | FT -a
To view Recovery Model of all databases on current SQL server, use the Get-SQLRecoveryModel powershell script.
Sample script output:

To change a database Recovery Model:
TSQL:
USE master; ALTER DATABASE MyDBName SET RECOVERY SIMPLE
This will change the Recovery Model for database ‘MyDBName’ to Simple. Valid options are Simple, Full and Bulk_Logged
Powershell:
Set-SQLRecoveryModel -DBName MyDBName -RecoveryModel Simple -ServerName MySQLServerName
To modify Recovery Model of all user databases on current SQL server use the Set-SQLRecoveryModel script.
StorSimple 8k Device Software Version 0.2 (17361)
As of August 12, 2015, the version of StorSimple 8k software is 0.2 (17361). You can view this information in the Azure Management Interface. Click the device node/Dashboard: This information can also be viewed from the device Powershell/serial interface using the Get-HCSSystem cmdlet:
This version of the device software comes with this set of Powershell cmdlets: For more information on Powershell remoting into StorSimple 8k devices see this post.
StorSimple 8100 installation step by step
7/23/2015
Due to a ‘known issue’, it’s recommended not to configure interface Data 1 and to leave it disabled until the next major StorSimple software release (version 1.2)
In this post, I will go over StorSimple 8100 array step by step installation. StorSimple 8k series is the first generation running Windows 2012 R2 core OS and has the advantages of having 10 Gbps Network interfaces and interoperability with SVA (StorSimple Virtual Array). For more background on StorSimple see these posts.
StorSimple 8100 is a 2 RU iSCSI SAN that seamlessly extends to the cloud. It has SSD, SATA tiers in the box and uses Azure as the third tier. Data is automatically tiered at the block level where most frequently accessed blocks are stored in the linear SSD tier, less frequently accessed blocks are automatically tiered down to the deduplicated SSD tier, less frequently accessed blocks are automatically tiered down to the deduplicated and compressed SAS tier, and finally less frequently accessed blocks are automatically tiered down to the deduplicated, compressed, and encrypted Azure tier.
All local storage in the StorSimple array enjoys RAID 10 configuration protection and speed, fully redundant controllers, power supplies, and redundant data paths both on the iSCSI and network sides.
Racking and stacking:
Along with the array comes this box of goodies:
 The rails are easy to install requiring 1 screw on each of the front and back of right and left sides:
 and 2 screws in the front to keep the array from sliding out:
 The package comes with 7 screws, so there’s an extra one..
Power connections are straight forward. 2 cables should connect each of the power supply units to 20 AMP outlets on 2 separate fault domains. For more details on StorSimple power requirements see this link.
Wiring:
The package comes with transceivers that plug in to the 10 Gbps data ports:
 You will need to get 4x twinax cables like this one – not included in the package (assumes your 10 Gbps switch uses SFP+ ports):
 Slide in one end of each of the 4 twinax cables into a transceiver like so:
 There’s only one way this will ‘click’, so don’t force it
 Plug the ends with the transceiver into the purple 10 Gbps ports marked as Data2 and Data3 on the back of the StorSimple array:
 Plug the other sides of the 2 twinax cables connected to Data2 ports to one 10 Gbps switch, and the other sides of the 2 twinax cables connected to Data3 to another 10 Gbps switch. This will provide full wire and switch redundancy. These 4 ports on the 2 switches should have access to your iSCSI vlan/subnet.
Similarly, wire 2 ports marked Data0 to 1 Gbps ports on one switch and ports marked Data1 to 1 Gbps ports on another switch. These 4 ports will need to have access to your data (corporate/production) network and require outbound access to the Internet on the following ports:
- UDP port 53 for DNS
- TCP port 80 for HTTP
- UDP port 123 for NTP
- TCP port 443 for HTTPS/SSL
- TCP port 9354 for StorSimple Manager
If you have to setup outbound firewall rule(s) for StorSimple,
- The source IPs will be the 4 IPs assigned to Data 0, Data 1, Fixed Controller 0 IP and Fixed Controller 1 IP
- The destination ports will be UDP 53 and 123, and TCP 80, 443, and 9354
- The destination IPs will be ‘any’. I know most organizations will not like that, but this is practically what most end up doing here. Alternatively, the destination IPs can be all Azure IP subnets. Microsoft makes this IP list available for download, but it changes quite frequently.
The array features active/passive architecture. This means only one controller will be on at a time, with its 2x 10 Gbps ports and 2x 1 Gbps ports. So, although we wired 8 ports, we require 6 IP addresses. 4 on the data/vlan/subnet side (for data 0, data 1, and controller 0 fixed IP and controller 1 fixed IP), and 2 on the iSCSI/vlan/subnet.
For more information on wiring a StorSimple 8k series array see this document.
Next, power on the array.
Serial setup:
Initial array setup is done via serial interface and serves mainly to assign the array IP addresses. Everything after that is done from the Azure management interface.
The recommended setup is to connect both the serial cables to the serial ports on the 2 controllers of the array and wire the other side to a device in the data center that has a serial port.
 This provides remote access to the serial ports if that’s ever needed. Other options include serial over IP devices. The image above shows 1 port connected. To ensure access, wire up both serial ports.
On the server (or laptop) where the serial port is connected, start a connection using Putty for example:

Select the language to use, like ‘1’ for English

Enter ‘1’ to login with full access:

Type in ‘Password1’ to continue:

After successful login, the following prompt is presented:

Type in ‘Invoke-HcsSetupWizard’ as suggested:

Hit ‘Enter’ to accept the default choice and configure IPv4 on interface Data0
Enter the IP address you would like to assign to interface Data0, subnet mask, gateway, DNS.

Hit ‘Enter’ to accept the default time server ‘time.windows.com’ and ‘Enter’ again to bypass configuring a web proxy.
Change the default administrator password:

Set a password for StorSimple Snapshot Manager:
 The next step requires us to login to Azure management interface to obtain our StorSimple Manager service registration key:
StorSimple 8k wish list (updated 3/28/2016)
Having done several StorSimple installation and data migration for enterprise clients, I came across a number of features that would be nice to have in the next StorSimple software update. I will be dating each item. These requests apply to the StorSimple 8k series (8100 and 8600 models).
- 3/28/2016: Resolve the issue of high latency IO’s seeming to block/impede low latency IO’s
- 3/28/2016: More visibility into the device tiering metrics. Simply put, a storage admin needs to know when a StorSimple device is ‘full’ and is tiering off blocks from the primary data set to Azure. This knowledge is critical to avoid the situation described above. A metric of the amount of space available before the device is full, is even better to help provide predictability before reaching that point.
- 3/28/2016: ‘Cloud Pinned Volume’ feature would be very helpful. This should allow the StorSimple storage admin to provision an iSCSI volume that resides always in Azure and does not affect the device heat map.
- 5/1/2015: Need a way to backup and restore a StorSimple array configuration. This was an available feature on the 5k and 7k series arrays but is currently missing in the 8k series arrays. I’m; however; working on Powershell scripts to do just that.
- 5/1/2015: Need a way to browse a comprehensive backup catalog and be able to perform a granular restore at the file level. This has been requested by several customers. As it stands today, to recover a single file from a cloud snapshot, we must:
- Know what volume it’s on. This information is not always available, particularly in situations where the file system is presented to client computers under a virtual directory structure such as that provided by F5 ARX
- Clone the entire volume in the Azure Management Interface. This incurs unnecessary time and egress Azure bandwidth costs. It negatively impacts RTO (Recovery Time Objective)
- Manually locate and copy over the file(s) to be recovered in Windows Explorer on the Windows file server.
- Manually do post recovery cleanup, which includes offlining the cloned iSCSI volume on the Windows file server, offlining the cloned volume in Azure StorSimple Management Interface, and deleting the cloned volume.
- 5/1/2015: SVA is too slow. The StorSimple Virtual Array is currently too slow. Several clients have voiced a concern about that. SVA is spun up as an A3 VM in Azure, which has 4 processor cores and 7 GB memory.
- 3/29/2016: With the release of SVA 8020 using SSD storage, we see better performance. However, SVA remains a DR option mainly or for workloads that require low IO.
- 5/1/2015: SVA has 1 network interface. This is a problem because it means both network and iSCSI traffic are mixed and run on the same virtual NIC. It also means we have no path redundancy, fault tolerance, or load balancing.
- 5/1/2015: Need high availability for SVA. SVA is currently a single point of failure. Need to be able to use something like Azure Availability Set support to make the SVA highly available.
- 5/1/2015: Need SVA to support more than 30 TB maximum. Currently an SVA has a 30 TB maximum storage capacity, which means if we’re to support volume recovery in Azure, we must have volumes under 30 TB in size.
- 5/7/2015: Need clarity on deduplication/compression in the 8k series, both the on-prem and Azure tiers. This is not a request to estimate or predict disk space savings due to dedup/compression. This is a request to show actual dedup/compression ratios in already installed systems.
Wishes that came true !
- 5/1/2015: Need a way to gracefully power down a StorSimple array. This may be trivial, but there’s no where on the physical array to gracefully shut it down. No where in Azure to power it down, no where in Powershell (both the limited set of commands that run on the array and the StorSimple commands in the Azure PS module version 0.8.16. The only way to power it down now is to turn off each of the 2 power supply units on the back of the array.
==> solution: using the software, shutdown both controller 0 and controller 1. This can be done from the Azure Management Interface:
Under the device node, click Maintenance on top/right, then Manage Controllers at the bottom center: Then pick Shut Down Controller from the Select Action drop down menu.
This can also be done from the device Powershell/serial interface using the Stop-HCSController cmdlet:
Stop-HcsController -ControllerId Controller0
Stop-HcsController -ControllerId Controller1
- 5/1/2015: Need to be able to spin up and use StorSimple Virtual Arrays in Azure without the requirement to have a physical array. Again this feature has been requested by several clients.
This is now an available feature as the OVA (On-Premise Virtual Array) which came out with StorSimple Software version 2.0 release


Connecting to StorSimple 8k using Powershell
StorSimple 8k series Cloud Integrated Storage Arrays are typically managed from Azure StorSimple Manager. However, in some cases we may need to run Powershell commands directly against the array itself as in troubleshooting situations. This script establishes PS connectivity to a StorSimple 8k array. The script can be downloaded from the Microsoft Script Center Repository.
Requirements:
- Azure Powershell module. See this post for more details.
- Powershell remoting configured over HTTP and HTTPS on the array. This can be done in the Azure Management Interface under the Device/Configure page

- Windows 8.1 or 2012 R2 machine on the local network where the array is
- IP address of the array
- Array administrative password


The array runs a version of Windows 2012 R2 server core OS. It’s not domain joined. As a typical 2012 R2 server, it comes with Remote PS enabled. Line 11 adds the array to the local trusted hosts on the management computer. Lines 17-21 receive, encrypt and save the array admin password for future use. Lines 24-26 establish a remote PS session with the array.
 We can now run PS commands against the array. This is an alternative way of array management to using a serial interface as used in this post.
For example:
Invoke-Command -Session $StorSimpleSession { Get-Command } | sort name | FT -a
shows the available commands on the StorSimple 8k series array, which runs a limited version of Powershell.

For more information see Connect remotely to your StorSimple device
StorSimple 5k/7k series training video
This is a recording of a training session I did recently. It covers the common administrative tasks that may be needed to manage and use StorSimple 5k/7k series array. For more information on StorSimple see this post.
Summary of tasks covered include:
- How to provision LUNs/iSCSI volumes
- How to add it/present it to server(s)
- How to expand LUN/iSCSI volume
- Setup volume groups and protection policies for backup and DR
It also goes over best practices and recommended settings.
Azure, Veeam, and Gridstore, a match made in heaven!?
Microsoft Azure currently provides the best quality public cloud platform available. In a 2013 industry report benchmark comparison of performance, availability and scalability, Azure came out on top in terms of read, and write performance of Blob storage.

 Veeam is a fast growing software company that provides a highly scalable, feature-rich, robust backup and replication solution that’s built for virtualized workloads from the ground up including VMWare and Hyper-V virtual workloads. Veeam has been on the cutting edge of backup and replication technologies with unique features like SureBackup/verified protection, Virtual labs, Universal Application Item Recovery, and well-developed reporting. Not to mention a slew of ‘Explorers‘ like SQL, Exchange, SharePoint, and Active Directory Explorer. Veeam Cloud Connect is a feature added in version 8 in December 2014 that allows independent public cloud providers the ability to provide off-site backup for Veeam clients.
 Gridstore provides a hardware storage array optimized for Microsoft workloads. At its core, the array is composed of standard rack-mount servers (storage nodes) running Windows OS and Gridstore’s proprietary vController which is a driver that uses local storage on the Gridstore node and presents it to storage-consuming servers over IP.
The problem:
Although a single Azure subscription can have 100 Storage Accounts, each can have 500 TB of Blob storage, a single Azure VM can have a limited number of data disks attached to it. Azure VM disks are implemented as Page Blobs which have a 1TB limit as of January 2015. As a result, an Azure VM can have a maximum of 32 TB of attached storage.

Consequently, an Azure VM is currently not fully adequate for use as a Veeam Cloud Connect provider for Enterprise clients who typically need several hundred terabytes of offsite DR/storage.
Possible solution:
If Gridstore is to use Azure VMs as storage nodes, the following architecture may provide the perfect solution to aggregate Azure storage:
(This is a big IF. To my knowledge, Gridstore currently do not offer their product as a software, but only as an appliance)

- 6 VMs to act as Gridstore capacity storage nodes. Each is a Standard A4 size VM with 8 cores, 14 GB RAM, and 16x 1TB disks. I picked Standard A4 to take advantage of a 500 IOPS higher throttle limit per disk as opposed to 300 IO/disk for A4 Basic VM.
- A single 80 TB Grid Protect Level 1 vLUN can be presented from the Gridstore array to a Veeam Cloud Connect VM. This will be striped over 6 nodes and will survive a single VM failure.
- I recommend having a maximum of 40 disks in a Storage Account since a Standard Storage account has a maximum 20k IOPS.
- One A3 VM to be used for Veeam Backup and Replication 8, its SQL 2012 Express, Gateway, and WAN Accelerator. The WAN Accelerator cache disk can be built as a single simple storage space using 8x 50 GB disks, 8-columns providing 480 MB/s or 4K IOPS. This VM can be configured with 2 vNICs which a long awaited feature now available to Azure VMs.
- Storage capacity scalability: simply add more Gridstore nodes. This can scale up to several petabytes.
Azure cost summary:
In this architecture, Azure costs can be summarized as:

That’s $8,419/month for 80 TB payload, or $105.24/TB/month. $4,935 (59%) of which is for Page Blob LRS 96.5 TB raw storage at $0.05/GB/month, and $3,484 (41%) is for compute resources. The latter can be cut in half if Microsoft offers 16 disks for Standard A3 VMs instead of a maximum of 8.
This does not factor in Veeam or Gridstore costs.
Still, highly scalable, redundant, fast storage at $105/TB/month is pretty competitive.
November 2014 update rollup for Windows RT/8/2012 breaks VSS backup – hot fix
November 2014 update rollup for Windows RT, Windows 8, and Windows Server 2012 appears to have some issues that cause VSS based backup to break.
Error messages have been ovserved like:
EventId 12366 – VSS – An unhandled exception was encountered while processing a VSS writer event callback method. The VSS writer infrastructure is in an unstable state.
and
EventId 2034 – MSExchangeRepl – The Microsoft Exchange Replication service VSS Writer when processing the backup completion event.
Microsoft has acknowledged the issue and released hot fix KB2996928.
Veeam Cloud Connect on Azure – take 2
2 Months ago in early September 2014, I tested setting up Veeam Cloud Connect on Azure. That was with Veeam version 8 beta 2. Now that Veeam version 8 general availability was November 6th, 2014, I’m revisiting some of the testing with Veeam v8. I’ve also been testing the same with a number of cloud providers who have their own infrastructure. This is helpful to compare performance, identify bottlenecks, and possible issues that may increase or reduce costs.
Summary of steps:
In Azure Management Portal:
- Create a Cloud Service
- Create a Storage Account
- Create a VM: standard A2 with Windows 2012 R2 DC as the OS. Standard A2 is an Azure VM size that comes with 2 (hyperthreaded) processor cores, 3.5 GB of RAM, and up to 4x 1TB page blob disks @ 500 IOPS each. Prior testing with several providers have shown that cloud connect best features such as WAN accelerator need CPU and IOPS resources at the cloud connect provider end.
- Added an endpoint for TCP 6180

- Attached 4x disks to the VM, using max space possible of 1023 GB and RW cache


On the VM:
- I RDP’d to the VM at the port specified under Endpoints/Remote Desktop
- I ran this small script to create a storage space out of the 4x 1TB disks available:
# Script to create simple disk using all available disks
# This is tailored to use 4 physical disks as a simple space
# Sam Boutros – 11/18/2014 – v1.0
$PoolName = "VeeamRepo1"
$vDiskName = "VeeamvDisk1"
$VolumeLabel = "VeeamRepo1"
New-StoragePool -FriendlyName $PoolName -StorageSubsystemFriendlyName “Storage Spaces*” -PhysicalDisks (Get-PhysicalDisk -CanPool $True) |
New-VirtualDisk -FriendlyName $vDiskName -UseMaximumSize -ProvisioningType Fixed -ResiliencySettingName Simple -NumberOfColumns 4 -Interleave 256KB |
Initialize-Disk -PassThru -PartitionStyle GPT |
New-Partition -AssignDriveLetter -UseMaximumSize |
Format-Volume -FileSystem NTFS -NewFileSystemLabel $VolumeLabel -AllocationUnitSize 64KB -Confirm:$false
The GUI tools verified successful completion:

 This storage space was created to provide best possible performance for Veeam Cloud Connect:
- Fixed provisioning used instead of thin which is slightly faster
- Simple resiliency – no mirroring or parity, provides best performance. Fault Tolerance will be subject of future designs/tests
- Number of Columns and Interleave size: Interleave * Number Of Columns ==> the size of one stripe. The settings selected make the stripe size 1MB. This will help align the stripe size to the Block size used by Veeam.
- Allocation Unit 64KB for better performance
- Installed Veeam 8.0.0.817 Backup and Replication, using the default settings which installed SQL 2012 Express SP1, except that I changed default install location to drive f:\ which is the drive created above
- I ran the SQL script to show the GUI interface as in the prior post (under 11. Initial Veeam Configuration)
- The default backup Repository was already under f:

- Created a WAN Accelerator – cache size 400GB on drive f: created above
- Installed the additional Cloud Connect License
- Added a self-signed certificate similar to step 14 in the prior post.
- Added a Cloud Gateway


- Added a user/tenant


That’s it. Done setting up Veeam Cloud Connect on the provider side.
Options for using a Veeam Backup Repository on an Azure Virtual Machine
January 2015 update:
In December 2014, Microsoft announced the Public Preview Availability release of Azure Premium Storage. See this post for details on Azure Premium Storage features. What does that mean in terms of using Azure for a Veeam Backup Repository, or for Veeam Cloud Connect?
- Maximum disk capacity per VM remains a bottleneck at 32 TB.
- Only D14 VM size at this time can have 32x 1TB Page Blob disks. It comes with 16 cores, 112 GB RAM, 127 GB SAS system disk, 800 GB SSD non-persistent temporary drive ‘d’ that delivers 768 MB/s read or 384 MB/s write throughput. Base price for this VM is $1,765/month
- If using 32 Standard (spinning SAS) disks, set as a 16-column single simple storage space for maximum space and performance, we get a 32 TB data disk that delivers 960 MB/s throughput or 8k IOPS (256 KB block size).
- 32x 1TB GRS Standard (HDD) Page Blobs cost $2,621/month
- 32x 1TB LRS Standard (HDD) Page Blobs cost $1,638/month
- If using 32 Premium (SSD) disks, set as a 16-column single simple storage space for maximum space and performance, we get a 32 TB data disk that delivers 3,200 MB/s throughput or 80k IOPS (256KB block size). Premium SSD storage is available as LRS only. The cost for 32x 1TB disks is 2,379/month
- If using a D14 size VM with Cloud Connect, setting up the Veeam Backup and Replication 8, WAN Accelerator, and CC Gateway on the same VM:
- 16 CPU cores provide plenty adequate processing for the WAN Accelerator which is by far the one component here that uses most CPU cycles. It’s also plenty good for SQL 2012 Express used by Veeam 8 on the same VM.
- 112 GB RAM is an overkill here in my opinion. 32 GB should be plenty.
- 800 GB SSD non-persistent temporary storage is perfect for the WAN Accelerator global cache. WAN Accelerator global cache disk must be very fast. The only problem is that it’s non-persistent, but this can be overcome by automation/scripting to maintain a copy of the WAN Accelerator folder on the ‘e’ drive 32 TB data disk or even on an Azure SMB2 share.
- In my opinion, cost benefit analysis of Premium SSD Storage for the 32-TB data disk versus using Standard SAS Storage shows that Standard storage is still the way to go for Veeam Cloud Connect on Azure. It’s $740/month cheaper (31% less) and delivers 960 MB/s throughput or 8k IOPS at 256KB block size which is plenty good for Veeam.

10/20/2014 update:
Microsoft announced a new “Azure Premium Storage”. Main features:
- SSD-based storage (persistent disks)
- Up to 32 TB of storage per VM – This is what’s relevant here. I wonder why not extend that capability to ALL Azure VMs??
- 50,000 IOPS per VM at less than 1 ms latency for read operations
- Not in Azure Preview features as of 10/21/2014. No preview or release date yet.
High level Summary:
Options for using Veeam Backup Repository on an Azure Virtual Machine include:
- Use Standard A4 VM with 16TB disk and about 300 Mbps throughput (VM costs about $6.5k/year)
- Use a small Basic A2 VM with several Azure Files SMB shares. Each is 5 TB, with 1 TB max file size, and 300 Mbps throughput.
Not an option:
- Use CloudBerry Drive to make Azure Block Blob storage available as a drive letter. This was a promising option, but testing showed it fails with files 400 GB and larger. It also has a caching feature that makes it not adequate for this use case.
An Azure subscription can have up to 50 Storage Accounts (as of September 2014), (100 Storage accounts as of January 2015) at 500TB capacity each. Block Blob storage is very cheap. For example, the Azure price calculator shows that 100TB of LRS (Locally Redundant Storage) will cost a little over $28k/year. LRS maintains 3 copies of the data in a single Azure data center.

However, taking advantage of that vast cheap reliable block blob storage is a bit tricky.
Veeam accepts the following types of storage when adding a new Backup Repository:
I have examined the following scenarios of setting up Veeam Backup Repositories on an Azure VM:
1. Locally attached VHD files:
In this scenario, I attached the maximum number of 2 VHD disks to a Basic A1 Azure VM, and set them up as a Simple volume for maximum space and IOPS. This provides a 2TB volume and 600IOPS according to Virtual Machine and Cloud Service Sizes for Azure. Using 64 KB block size:

This short script shows block size (allocation unit) for drive e: used:
$DriveLetter = "e:"
$BlockSize = (Get-WmiObject -Query "SELECT BlockSize FROM Win32_Volume WHERE DriveLetter='$DriveLetter'").BlockSize/1KB
Write-Host "Allocation unit size on Drive $DriveLetter is $BlockSize KB" -ForegroundColor Green
This should come to 4.7 MB/s (37.5 Mbps) using the formula
IOPS = BytesPerSec / TransferSizeInBytes
But actual throughtput was about 2.5 MB/s (20 Mbps) as shown on the VM:

and in the Azure Management Portal:

Based on these results, I expect a Standard A4 Azure VM when configured with 16TB simple (striped) disk, with max 8k IOPS will actually deliver about 35 MB/s or 300 Mbps.

2. Using Azure Files:
Azure Files is a new Azure feature that provides SMB v2 shares to Azure VMs with 5TB maximum per share and 1TB maximum per file.
Testing showed that throughput upwards of 100 Mbps. Microsoft suggests that Azure Files throughput is up to 60 MB/s per share.

Although this option provides adequate bandwidth, its main problem is that it has maximum 1 TB file size which means maximum backup job is not to exceed 1 TB which is quite limiting in large environments.
Create simultaneous checkpoints of a group of related Virtual Machines
In some cases you may need to checkpoint a group of related VMs at exactly the time, such as a SharePoint farm, or a multi-tiered application. The process includes pausing, saving the VMs, creating checkpoints, restrating, and eventually restoring back to original state. Powershell can help automate the process:
1. Pause and Save:
# Input
$HVHost = “xHost16”
$VMs = “SSTest1″,”V-2012R2-Test1″,”v-2012R2-TW01”# Pause and Save
Stop-VM -Name $VMs -Save
# Confirm
Get-VM -ComputerName $HVHost -Name $VMs | Select VMName,State,ComputerName | FT -AutoSize

2. Checkpoint:
# Checkpoint
Checkpoint-VM -ComputerName $HVHost -Name $VMs
# Confirm
Get-VMSnapshot -ComputerName $HVHost -VMName $VMs | Select VMName, Name, ComputerName | FT -AutoSize

3. Restart:
# Restart
Start-VM -ComputerName $HVHost -Name $VMs
# Confirm
Get-VM -ComputerName $HVHost -Name $VMs | Select VMName, State, ComputerName | FT -AutoSize

Eventually, when it’s time to restore the group of VMs to their original state:
4. Remove all checkpoints:
# Later on, to remove all checkpoints:
Remove-VMSnapshot -ComputerName $HVHost -VMName $VMs -IncludeAllChildSnapshots
# Confirm
Get-VMSnapshot -ComputerName $HVHost -VMName $VMs | Select VMName, Name, ComputerName | FT -AutoSize
< no output>..

Hyper-V Virtual Machine checkpoints
In Windows Server 2012 R2 a VM checkpoint in Hyper-V captures a point in time state of a virtual machine’s memory, CPU, system state, and disk contents.
Checkpoints were called VM Snapshots in Server 2012 but that was confusing because it was too close to VSS volume snapshots for example, and it was also known as Checkpoint in VMM.
When a checkpoint is invoked, a .avhd file is created for each of the VM’s .vhd(x) files, and the .vhd(x) files becomes read-only. All changes are then written to the .avhd files preserving the state of the .vhd(x) files at the point of creating the checkpoint. If the VM attempts to access a file, Hyper-V will look for it in the .avhd file first, if not found, it will look for the parent .vhd file. This causes a performance degradation particularly if a number of nested checkpoints are created like:

In this example, The disk files can be observed in the VM folder:

where all the files are read-only except the latest .avhd file at the bottom. Only one checkpoint .avhd file is read-write at any given point in time. Each checkpoint has 1 parent check point. In Powershell, we can run the cmdlet:
Get-VMSnapshot -VMName vHost17
to identify each checkpoint’s parent checkpoint:

Removing a checkpoint merges its content (blocks) with its parent checkpoint. Checkpoints do not have to be removed in order. In this example, we can remove the 7:37:31 checkpoint using this Powershell cmdlet or from the Hyper-V Manager GUI:
Remove-VMSnapshot -VMName vHost17 -Name “vHost17 – (9/21/2014 – 7:37:31 PM)”
Hyper-V will merge the 7:37:31 checkpoint blocks with its parent RW checkpoint (7:37:43):


The entire tree of checkpoints can be deleted in one step by right clicking on the top checkpoint in Hyper-V Manager, and clicking ‘Delete Checkpoint Subtree’.
A checkpoint can be exported using the Export-VMSnapshot cmdlet. The resulting .vhd(x) file(s) can be used to create a clone of the original VM.
A checkpoint can be renamed in either Hyper-V Manager GUI or via Powershell cmdlet Rename-VMSnapshot.
A checkpoint can be applied (restored). This reverts the VM back to the point in time where the checkpoint was taken.
Powershell Script to report on VSS Writers on many computers
Backup of Windows machines uses VSS (Volume shadow Copy) to bring the files to a consistent state prior to performing the backup. VSS architecture is outlined in this diagram:
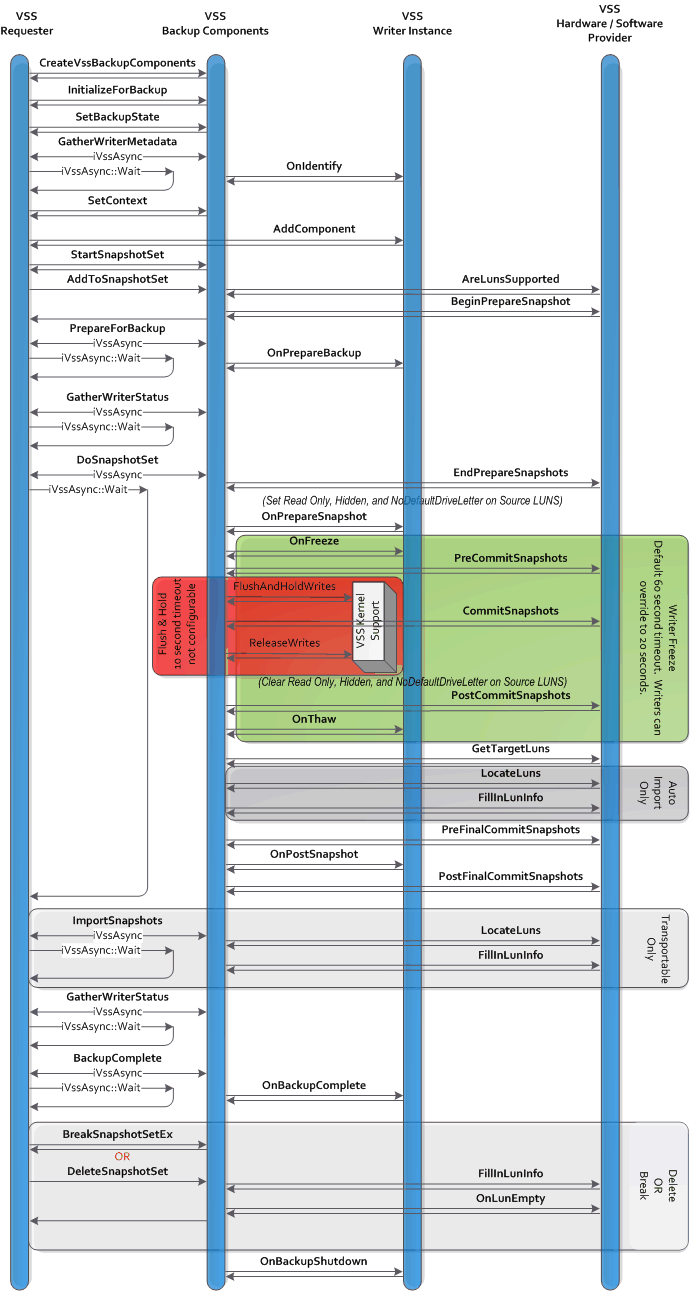
VSS call flow can be summarized in this chart:

Troubleshooting VSS often requires reporting on the status of VSS writers in the environment. This script can be used to report on VSS writers on many computers. The script is available in the Microsoft Script Center Repository.
For example:

This example gets VSS Writers on the list of $Computers, sort list by ComputerName:

and exports it to CSV file:
 Another example:
$Computers = Get-Content “.\MyComputerList.txt”
$VssWriters = Get-VssWriters $Computers -Verbose |
Where { $_.StateDesc -ne ‘Stable’ } | Sort “ComputerName”
$VssWriters | Out-GridView # Displays it in GridView
$VssWriters | Export-CSV “.\myReport.csv” -NoTypeInformation # Exports it to CSV
This reports any errors on VSS Writers on the computers listed in MyComputerList.txt, sorts list by ComputerName
Setting up Veeam 8 Cloud Connect on Azure
High level summary:
- Provision Azure VM with sufficient CPU cores, memory, and disk space.
- Configure Azure Storage account, and disk space on the VM for use as a Backup Repository and Global Deduplication Cache.
- Configure an End Point to allow Cloud Connect tenants access to the VM
- Install Veeam Backup and Replication 8 on the VM with additional Cloud Connect License
- Configure Veeam on the VM to act as Cloud Connect Gateway, WAN Accelerator, and house a Backup Repository in Azure blob storage.
- On the tenant side, add and configure a Service Provider, setup and run a backup copy job using the Cloud Repository as backup target.
1. Setup a Cloud Service:

In planning this deployment, select a region that’s geographically close to to your data center to have lowest latency.
2. Setup a Storage account:

Notes:
- Storage account must be in the same region as the Cloud Service.
- Geo-redundant replication will maintain 6 copies of the data in 2 geographically distant Azure data centers. This is the default, and can be changed later.
- Locally redundant replication will maintain 3 copies of the data in a single Azure data center. This costs 1/2 as much as geo-redundant replication, and provides twice the bandwidth.
- A Storage account has a 500TB maximum capacity.
3. Setup a Container under the Storage account:
Under Storage, select your Storage account, click the Containers link on top, then click Add at the bottom:

Containers are similar to file system folders.
4. Create a virtual machine from Gallery using the Server 2012 R2 Data Center image:

Configure as Basic A2 size. This size has 2 CPU cores, 3.5GB of memory, and can have a maximum of 4x 1TB disks in addition to the 127 GB boot disk and a 60 GB temporary disk.
 For Azure VM pricing details see this link.
 Configure the VM to use the Cloud Service and Storage account we created earlier:

5. Get the files needed to the new VM:
Once Azure is finished provisioning the new VM, click Connect at the bottom to connect to the new Azure VM via RDP. Enter the name and password used during the VM setup above.
I have prepared an Azure SMB share as shown in this post, and stored a number of files in it that we’ll need:

I will leverage that share and map a drive on the new Azure Veeam VM using this short script:
$Drive = net use * \\share01.file.core.windows.net\azureshare01 /u:share01 o73afb5eWZkhaaaatwHMus2wsxApQ==
if (-not (Test-Path -Path “c:\sandbox\Backup&Replication.8.0.0.592.BETA2.iso”)) {
New-Item -Path “c:\Sandbox” -ItemType Directory -ErrorAction SilentlyContinue
Copy-Item -Path “$($Drive[0].Split(“:”)[0].substring(6,1)):\Tools\Veeam 8 Beta 2\Backup&Replication.8.0.0.592.BETA2.iso” -Destination “c:\sandbox” -Force
}
Mount-DiskImage -ImagePath “c:\sandbox\Backup&Replication.8.0.0.592.BETA2.iso”
This maps a drive to the Azure share, copies the Veeam 8 iso to c:\sandbox on the VM, and mounts the iso:

These 2 drive mappings are not persistent (will not survive a VM reboot). This is OK since we only need them during setup.
6. Setup a persistent drive mapping to your Azure Storage account:
There’s a number of ways to make Azure storage available to the VM:
- Attach a number of local VHD disks. The problem with this approach is that the maximum we can use is 16TB, and we’ll have to use an expensive A4 sized VM.
- Attach a number of Azure File shares. There’s a number of issues with this approach:
The shares are not persistent although we can use CMDKEY tool as a workaround.
There’s a maximum of 5TB capacity per share, and a maximum of 1TB capacity per file. - Use a 3rd party tool such as Cloudberry Drive to make Azure block blob storage available to the Azure VM. This approach has the 500TB Storage account limit which is adequate for use with Veeam Cloud Connect. Microsoft suggests that the maximum NTFS volume size is between 16TB and 256TB on Server 2012 R2 depending on allocation unit size. Using this tool we get 128TB disk suggesting an allocation unit size of 32KB.
I’ve examined these 10 different tools and in my testing Cloudberry Drive provided the most functionality. To install it:
11/6/2014:
Veeam has released Veeam v8 today, so I can make this post public.
CloudBerry Drive has proved to be not a good fit for use with Veeam Cloud Connect because it caches files locally. For more details see this post. So, I recommend skipping CloudConnect installation and simply attach up to 16x 1TB drives to the Azure VM (may need to change VM size all the way up to Standard A4 to get the maximum of 16 disks), and set them up as a simple disk in the VM using Storage Spaces)
– Install C++ 2010 x64 Redistributable pre-requisite:

– Run CloudBerryDriveSetup, accept the defaults, and reboot. After reboot, run this command to mount the Veeam iso back:
Mount-DiskImage -ImagePath “c:\sandbox\Backup&Replication.8.0.0.592.BETA2.iso”
– In the Azure Management Portal, obtain your storage account access key (either one is fine):

– Back in the Azure VM, right-click on the Cloudberry icon in the system tray and select Options:

– Under the Storage Accounts tab, click Add, pick Azure Blob as your Storage Provider, enter your Azure Storage account name and key:

– Under the Mapped Drives tab, click Add, type-in a volume label, click the button next to Path, and pick a Container. This is the container we created in step 3 above:

– You can see the available volumes in Windows explorer or by running this command in Powershell:
Get-Volume | FT -AutoSize

7. Add VHD disks to the VM for the Veeam Global deduplication cache:
We will be setting up Veeam’s WAN Accelerator for Global Deduplication. This uses a folder for global deduplication cache. We’ll add VHD disks to the VM for that cache folder to have sufficient disk space and IOPS for the cache.

Highlight the Azure Veeam VM, click Attach at the bottom, and click Attach empty disk. Enter a name for the disk VHD file, and a size. The maximum size allowed is 1023 GB (as of September 2014). Repeat this process to add as many disks as allowed by your VM size. For example, an A1 VM can have a maximum of 2 disks, A2 max is 4, A3 max is 8, and A4 max is 16 disks.
In the Azure Veeam VM, I created a 2TB disk using Storage Spaces on the VM as shown:

This is setup as a simple disk for maximum disk space and IOPS, but it can be setup as mirrored disks as well.
8. Install Veeam prerequisites:
- In addition to C++ 2010 x64 Redistributable that we installed in step 6 above, install:
- Microsoft® System CLR Types for Microsoft® SQL Server® 2012 (SQLSysClrTypes.msi)
- Microsoft® SQL Server® 2012 Shared Management Objects (SharedManagementObjects.msi)
9. Install Veeam 8 Backup and Replication:
If you’re using a VM smaller than A2 with less than 2 CPU core, you’ll receive a warning during Veeam installation. This is safe to ignore.
Select to install the Veeam Powershell SDK
Accept the default installation location under c:\program files\Veeam\backup and replication
Click “Do not use defaults and configure product manually”

Change location of the Guest Catalog folder and vPower cache folder:

Veeam will automatically install SQL 2012 SP1 express on the VM:

10. Add an endpoint to the VM for TCP port 6180:
While Veeam is installing on the VM, let’s add an endpoint for Veeam Cloud Connect. In the Azure Management Portal, click on the VM, click Endpoints, and click Add at the bottom. Add a Stand Alone Endpoint:

Note that endpoint name follows the NetBIOS naming convention and cannot exceed 15 characters.
11. Veeam initial configuration:
Back in the VM, open Veeam Backup and Replication 8. Under Backup Infrastructure we need to see the Backup Repositories and WAN Accelerators nodes on the left:

However, these will be hidden in the GUI by design since we have not added any Hyper-V or VMWare server. To work around this issue we can run this SQL query to show the needed options in the GUI:
IF NOT EXISTS (SELECT * FROM [dbo].[Options] WHERE id = ’91BF2EB1-51AC-4C75-A472-22610288191D’)
BEGIN
INSERT INTO [dbo].[Options]
([id]
,[name]
,[value])
VALUES
(’91BF2EB1-51AC-4C75-A472-22610288191D’
,’WasViHostEverAdded’
,’True’)
END
ELSE
BEGIN
UPDATE [dbo].[Options] SET
[value] = ‘True’
WHERE
[id] = ’91BF2EB1-51AC-4C75-A472-22610288191D’END
GOIF NOT EXISTS (SELECT * FROM [dbo].[Options] WHERE id = ‘6B5FDC9C-6E1D-4533-B17C-5FECC304589F’)
BEGIN
INSERT INTO [dbo].[Options]
([id]
,[name]
,[value])
VALUES
(‘6B5FDC9C-6E1D-4533-B17C-5FECC304589F’
,’WasAnyHostEverAdded’
,’True’)
END
ELSE
BEGIN
UPDATE [dbo].[Options] SET
[value] = ‘True’
WHERE
[id] = ‘6B5FDC9C-6E1D-4533-B17C-5FECC304589F’
END
GO
Copy this query and in notepad save it as c:\sandbox\Show-UI.sql for example on the Azure Veeam VM. Then run this command:
SQLCMD.EXE -S localhost\VEEAMSQL2012 -d VeeamBackup -i c:\sandbox\Show-UI.sql -o c:\sandbox\Show-UI.log
Thanks to Veeam phenomenal support for the tip. Their quick response was very helpful.
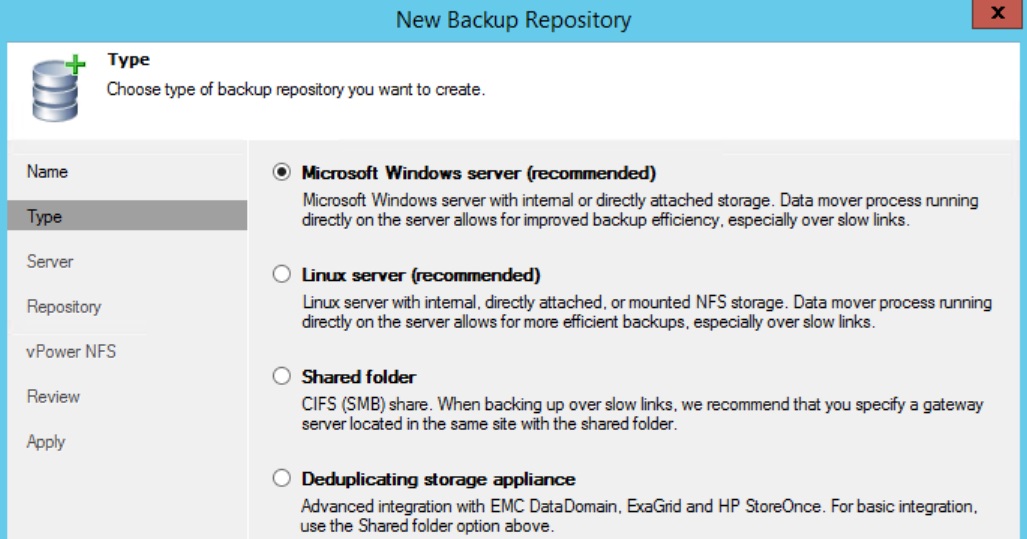
12. Add a Backup Repository:
In Veeam Backup and Replication, click WAN Accelerators, then click Add WAN Accelerator:

Give it a name, select Shared Folder:

This is necessary as opposed to the first option for directly attached storage, because of the way CloudBerry presents the attached Azure blob storage.
Type in the Shared Folder name, enter credentials to access it. To get the share name you can run “net use” command to see its exact path.

Click Next:

Accept vPower NFS defaults, and finish.
13. Add a WAN Accelerator:
In Veeam Backup and Replication, click WAN Accelerators, then click Add WAN Accelerator:

Select the e: drive we created in step 7 above, enter the maximum amount of disk space available, and finish:

14. Add a certificate:
This is a one time setup. SSL certificate is needed for authentication and tunnel encryption.
Note: This step requires Veeam Cloud Connect license. Without it, the Cloud Connect Infrastructure will be hidden in the Veeam Backup and Replication 8 GUI.

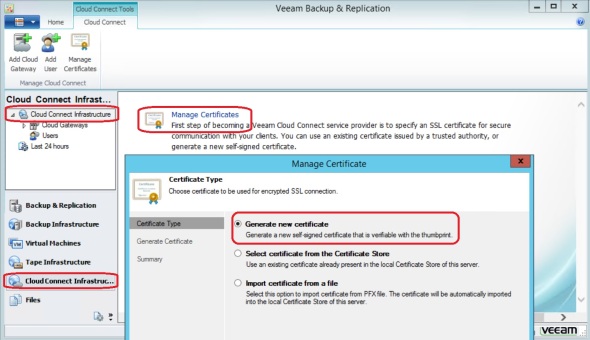
For production I recommend using a certificate from a public Certificate Authority. For this exercise I will generate a self signed certificate. In Cloud Connect Infrastructure, click Manage Certificates:

Click Generate new certificate

Type in a friendly name

Click “Copy to clipboard” and save this information. We will need the thumbprint when connecting from the client/tenant side. This is only needed because we’re using a self signed certificate. If we used a certificate issued by a public Certificate Authority we would not need that thumbprint.
15. Add Cloud Gateway:
This is also a one time step. Under Cloud Connect Infrastructure, click Add Cloud Gateway:

Pick a server,
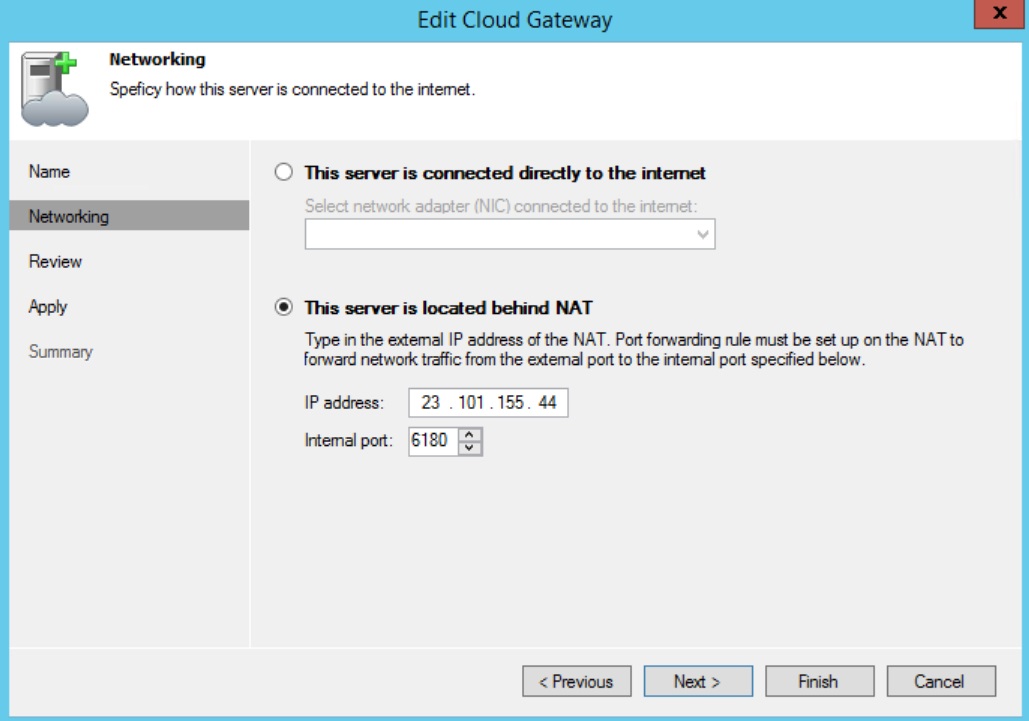
Use the Public IP of the Azure VM and the default port 6180.
Select its NIC,

and Finish.
16. Add a user/tenant:
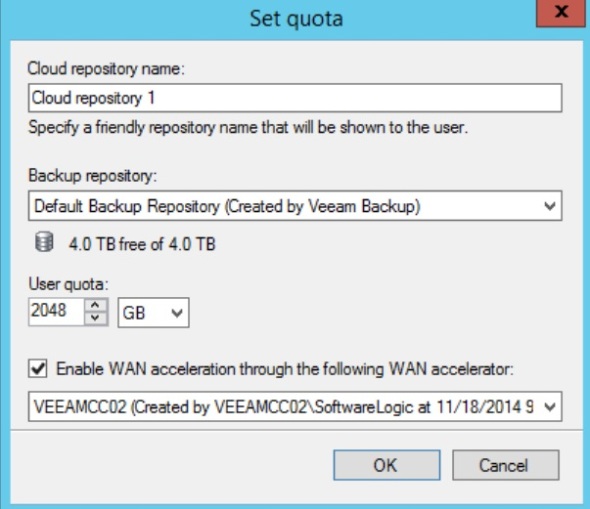
A user may represent a Cloud Connect client/tenant or a corporate site. It is associated with his/her own repository under the main repository, and a lease. The lease corresponds to a backup client/backup cloud provider agreement term.
Under Cloud Connect Infrastructure, click Add User

Enter a name, create a password, check Lease expires, and click Calendar to select a lease expiration date.

In the Resources tab, click Add, create a name for the user/client repository name, select a Backup Repository from the drop down menu, check to Enable WAN acceleration, and pick the WAN accelerator from its drop down menu.
From the client/corporate side, in Veeam Backup and Replication 8, under Backup Infrastructure, click the Service Providers node, and click Add a Service Provider:

Enter the IP address or DNS name of the Azure Veeam VM we created above, and click Next:

Since we used a self-signed certificate, we need to provide the thumbprint from step 14 above. Click Verify:

Notice that the certificate has been validated. The certificate will be used for both authentication and tunnel encryption. Click Add and add the user name and password created in step 16 above:

Click Next, and Finish.
Finally, create a new backup copy job using the Cloud Repository as a backup target:

