StorSimple 5k and 7k series
 StorSimple is a hybrid storage array by StorSimple Inc. which was a Santa Clara, California-based small company. In November 2012, Microsoft acquired StorSimple. The hardware portion of the solution is manufactured and distributed by Xyratex, a UK company, which was acquired by Seagate in December 2013.
StorSimple basics:

- 2 RU rack mount unit
- This is a block device that serves out storage via iSCSI only
- Dual controllers running in active/passive mode
- Dual hot swap power supply units
- 4x 1 Gbps NICs
- Capacity:

Main features:
- 3 storage tiers:
- SSD tier
- SAS teir
- Cloud tier
- Automated tiering.
- Inline automated deduplication
- Automated data compression
- Choice of cloud provider. Major cloud providers like AWS, Azure, and Google are supported
- Local and cloud snapshot. A snapshot is a point in time recovery point.
- Cloud clone. A cloud clone is the ability to perform a cloud snapshot to multiple clouds in a single operation
- Fast recovery. Upon restoring a volume group, only the volumes’ metadata is downloaded, and the volume is unmasked to the host(s). To the host, the volume and its files appear and can be used. As a file is opened by a user, StorSimple fetches its blocks from the cloud (3rd tier). This is much quicker than waiting many hours to download a 20 TB volume for example before any of its files can be accessed.
- SSL encryption for data in transit, and AES-256 bit encryption for data at rest (in the cloud – 3rd tier)
- Protection policies can be setup in StorSimple to use combinations of local and cloud snapshots to match the organization RPO, RTO, and DR (Recovery Point Objectives, Recovery Time Objectives, and Disaster Recovery)
- Easy administration via simple web interface
- No-downtime controller failover, allows for firmware/software updates with no down time.
- Authentication to admin interface can integrate with LDAP directories like Active Directory.
In summary, this compact array makes it easy to move 400 TB of rarely used files for example, and move them seamlessly to the cloud. Best part is that IT folks don’t have to redesign applications or do anything major, other than mount an iSCSI volume on an existing file server. This offloads expensive on-prem primary storage. It removes the need for secondary storage, tape backup, and off-site backup. This provides a significant return on investment.
Limitations:
- 1 Gbps NICs (no 10 Gbps NICs) put a limit on the throughput the array can deliver. At a maximum, 3 out of the 4 NICs can be configured for iSCSI providing an aggregate bandwidth of 3 Gbps or about 10k IOPS
- Maximum outbound useable bandwidth to the cloud is 100 Mbps
- When planning a use case for the device, tiering to the cloud must be considered. This is desirable for a workload like a file share, but not recommended for an active workload where the entire volume is active such as SQL or Hyper-V.
- Wish list items include:
- No central management point if you have several devices. Each device has its own web interface.
- No Powershell support
- No Operation Manager Management Pack. Monitoring is via email and SNMP only.
- No SMI-S provider (needed for Software-Defned storage in VMM for example)
You don’t need to hunt for Powershell modules anymore
Have you ever been in the situation where you need to run or test some Powershell commands on a server in your environment but you cannot because you don’t have the needed Powershell module? For example, you may need to run some Powershell commands against a SQL server, Exchange server, or Web server, but you don’t have the SQLPS Powershell module or the WebAdministration module, or.. One way was to resolve this issue was to find the installation media of the application like SQL, find the Powershell module bits on it, identify, download, and install all the prerequisites, then you can use the needed PS commands.
For example this script which truncates SQL logs uses the SQLPS module. If you don’t have it on your local machine, you need to download and install the following 3 components in order:
- Microsoft® System CLR Types for Microsoft® SQL Server® 2012 (SQLSysClrTypes.msi)
- Microsoft® SQL Server® 2012 Shared Management Objects (SharedManagementObjects.msi)
- Microsoft® Windows PowerShell Extensions for Microsoft® SQL Server® 2012 (PowerShellTools.msi)
and make sure you’re getting the right x86 or x64 version for your OS.
Implicit PS remoting gives us a much simpler option. We can import module commands from the server we’re trying to manage!
The Import-SessionCommands function in the SBTools module does just that. the SBTools module can be downloaded from the Microsoft Script Center Repository.
Let’s follow the same example, but this time using the Import-SessionCommands function:
In PS ISE, I typed in Get-Module You can see that SQLPS is not loaded.

Trying Get-Module -ListAvailable -Name *SQL*
shows that I don’t have it on my local machine.
Now, let’s import it from the SQL server we’re trying to manage:
First import the SBTools module: Import-Module SBTools

Next import the SQLPS module commands: Import-SessionCommands -ModuleName SQLPS -ComputerName v-2012R2-SQL1 -Keep

Finally, import the Imported-SQLPS module: Import-Module Imported-SQLPS – Remember that imported modules will be prefixed with “Imported-“

That’s it!
Now if you type in Get-Module, you’ll see that you have the Imported-SQLPS module which has all the cmdlets (functions) from the original SQLPS module:

Create simultaneous checkpoints of a group of related Virtual Machines
In some cases you may need to checkpoint a group of related VMs at exactly the time, such as a SharePoint farm, or a multi-tiered application. The process includes pausing, saving the VMs, creating checkpoints, restrating, and eventually restoring back to original state. Powershell can help automate the process:
1. Pause and Save:
# Input
$HVHost = “xHost16”
$VMs = “SSTest1″,”V-2012R2-Test1″,”v-2012R2-TW01”# Pause and Save
Stop-VM -Name $VMs -Save
# Confirm
Get-VM -ComputerName $HVHost -Name $VMs | Select VMName,State,ComputerName | FT -AutoSize

2. Checkpoint:
# Checkpoint
Checkpoint-VM -ComputerName $HVHost -Name $VMs
# Confirm
Get-VMSnapshot -ComputerName $HVHost -VMName $VMs | Select VMName, Name, ComputerName | FT -AutoSize

3. Restart:
# Restart
Start-VM -ComputerName $HVHost -Name $VMs
# Confirm
Get-VM -ComputerName $HVHost -Name $VMs | Select VMName, State, ComputerName | FT -AutoSize

Eventually, when it’s time to restore the group of VMs to their original state:
4. Remove all checkpoints:
# Later on, to remove all checkpoints:
Remove-VMSnapshot -ComputerName $HVHost -VMName $VMs -IncludeAllChildSnapshots
# Confirm
Get-VMSnapshot -ComputerName $HVHost -VMName $VMs | Select VMName, Name, ComputerName | FT -AutoSize
< no output>..

Hyper-V Virtual Machine checkpoints
In Windows Server 2012 R2 a VM checkpoint in Hyper-V captures a point in time state of a virtual machine’s memory, CPU, system state, and disk contents.
Checkpoints were called VM Snapshots in Server 2012 but that was confusing because it was too close to VSS volume snapshots for example, and it was also known as Checkpoint in VMM.
When a checkpoint is invoked, a .avhd file is created for each of the VM’s .vhd(x) files, and the .vhd(x) files becomes read-only. All changes are then written to the .avhd files preserving the state of the .vhd(x) files at the point of creating the checkpoint. If the VM attempts to access a file, Hyper-V will look for it in the .avhd file first, if not found, it will look for the parent .vhd file. This causes a performance degradation particularly if a number of nested checkpoints are created like:

In this example, The disk files can be observed in the VM folder:

where all the files are read-only except the latest .avhd file at the bottom. Only one checkpoint .avhd file is read-write at any given point in time. Each checkpoint has 1 parent check point. In Powershell, we can run the cmdlet:
Get-VMSnapshot -VMName vHost17
to identify each checkpoint’s parent checkpoint:

Removing a checkpoint merges its content (blocks) with its parent checkpoint. Checkpoints do not have to be removed in order. In this example, we can remove the 7:37:31 checkpoint using this Powershell cmdlet or from the Hyper-V Manager GUI:
Remove-VMSnapshot -VMName vHost17 -Name “vHost17 – (9/21/2014 – 7:37:31 PM)”
Hyper-V will merge the 7:37:31 checkpoint blocks with its parent RW checkpoint (7:37:43):


The entire tree of checkpoints can be deleted in one step by right clicking on the top checkpoint in Hyper-V Manager, and clicking ‘Delete Checkpoint Subtree’.
A checkpoint can be exported using the Export-VMSnapshot cmdlet. The resulting .vhd(x) file(s) can be used to create a clone of the original VM.
A checkpoint can be renamed in either Hyper-V Manager GUI or via Powershell cmdlet Rename-VMSnapshot.
A checkpoint can be applied (restored). This reverts the VM back to the point in time where the checkpoint was taken.
Configure Windows Updates on many computers with Powershell
This function can be used to configure Windows Updates on many computers. The script can be downloaded from the Microsoft Script Center Repository.
This Powershell function will change Windows Updates configuration on many computers to either disable updates, check only, download only, or download and automatically install updates.
To use it, download it, run it in Powershell_ISE for example, then run:
Set-WindowsUpdates
This will setup Windows Updates to ‘Install updates automatically’ on the local computer:

To set Windows Automatic Updates on computers listed in the file “.\Computers.txt” to ‘Download updates but let me choose whether to install them’:
Set-WindowsUpdates -ComputerName (Get-Content “.\Computers.txt”) -Options DownloadOnly -Verbose

To set Windows Automatic Updates on all computers in AD to ‘Install updates automatically’:
Set-WindowsUpdates -ComputerName ((Get-ADComputer -Filter * ).Name) -Options Install
To set Windows Automatic Updates on all running VMs on the Hyper-V Host “HVHost01” to ‘Check for updates but let me choose wether to download and install them’:
$VMs = (Get-VM -ComputerName “HVHost01” | Where { $_.State -eq “Running” }).VMName
Set-WindowsUpdates -ComputerName $VMs -Options CheckOnly
Powershell Script to report on VSS Writers on many computers
Backup of Windows machines uses VSS (Volume shadow Copy) to bring the files to a consistent state prior to performing the backup. VSS architecture is outlined in this diagram:
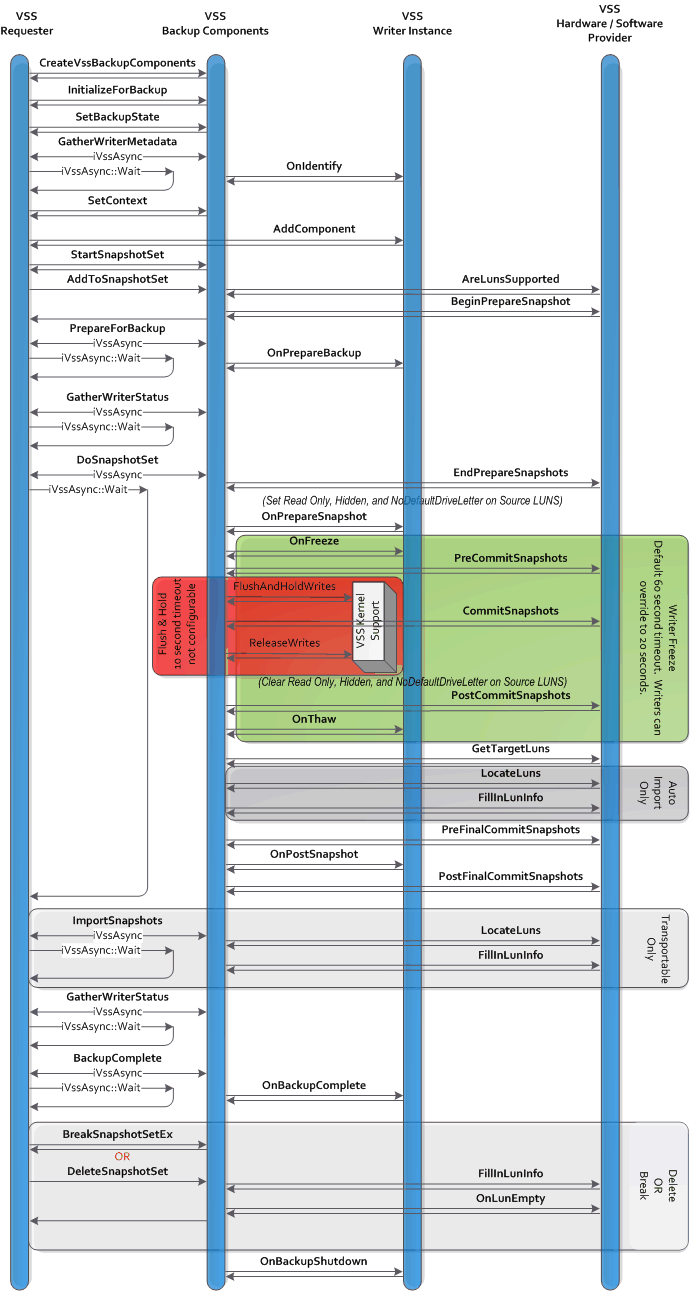
VSS call flow can be summarized in this chart:

Troubleshooting VSS often requires reporting on the status of VSS writers in the environment. This script can be used to report on VSS writers on many computers. The script is available in the Microsoft Script Center Repository.
For example:

This example gets VSS Writers on the list of $Computers, sort list by ComputerName:

and exports it to CSV file:
 Another example:
$Computers = Get-Content “.\MyComputerList.txt”
$VssWriters = Get-VssWriters $Computers -Verbose |
Where { $_.StateDesc -ne ‘Stable’ } | Sort “ComputerName”
$VssWriters | Out-GridView # Displays it in GridView
$VssWriters | Export-CSV “.\myReport.csv” -NoTypeInformation # Exports it to CSV
This reports any errors on VSS Writers on the computers listed in MyComputerList.txt, sorts list by ComputerName
The ever annoying DOT NET 3.5 on Server 2012, 2012 R2, Windows 8, and 8.1
High level summary:
- In Server 2012 or 2012 R2:
- Find and remove these 3 hot-fixes in Control panel: KB2966826, KB2966827, KB2966828
- Pop in the Windows DVD media, and install DOT NET 3.5 from the Server Manager/Add Roles and Features
- In Windows 8 or 8.1:
- Find and remove these 3 hot-fixes in Control panel: KB2966826, KB2966827, KB2966828
- Pop in the Windows DVD media, and run the command
Dism.exe /online /enable-feature /featurename:netfx3 /source:d:\sources\sxs /all
Windows Server 2012, 2012 R2, Windows 8, and 8.1 come with DOT NET 4 or 4.5 but not 3.5. DOT NET 3.5 came with Server 2008, 2008 R2, and Windows 7. It was easily installable as a standalone executable. A lot of older applications need DOT NET 3.5 to run.
With Server 2012/Windows 8 and up, we cannot just install DOT NET 3.5 from the executable. That errors out.
In Server 2012 and up, we’re supposed to install roles and features from Server Manager/Add Roles and Features:

First, go to control panel/uninstall a program/View installed updated, and remove any of these updates if you find them:
KB2966826
KB2966827
KB2966828
or, use this Powershell script:
$RemoveMe = @('KB2966826','KB2966827','KB2966828')
$HotFixes = (Get-HotFix | Sort HotFixID).HotFixID

Write-Host 'Hotfixes installed on this system are:' -ForegroundColor Green
$HotFixes

if ($HotFixes | Where { $RemoveMe -contains $_ }) {
 Write-Host 'Found matching Hotfixes:' -ForegroundColor Yellow
 $HotFixes | Where { $RemoveMe -contains $_ }
} else {
 Write-Host 'No matching Hotfixes Found' -ForegroundColor Green
}

# To remove:

<#
$HotFixes | Where { $RemoveMe -contains $_ } | % {
 "Removing Hotfix: $_"
 & “wusa.exe /uninstall /kb:$($_.Replace(‘KB’,'')) /norestart”
}
#>
Un-comment the lines at the bottom to remove.
Add DOT NET 3.5 as a feature:

That shows the warning that the media is missing:
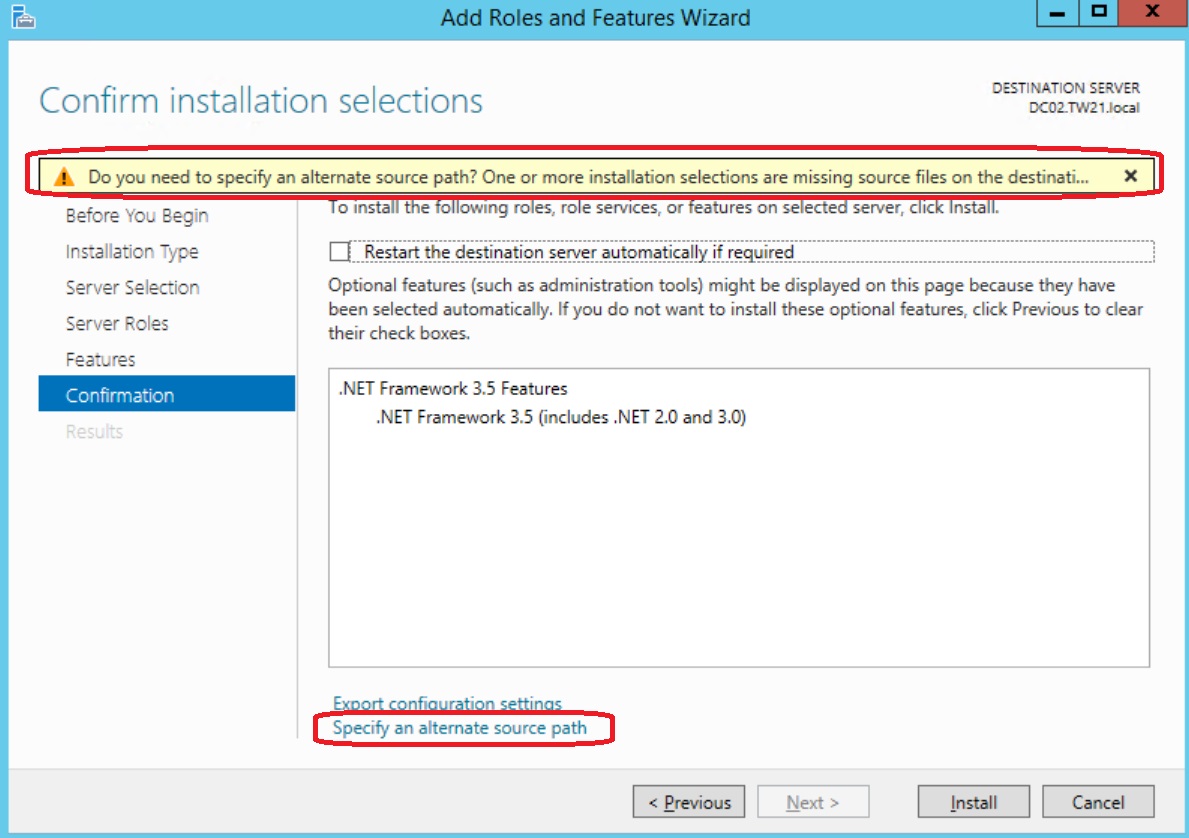
Click “Specify an alternative source path”

I popped in the Windows DVD in my drive D: and typed in d:\sources\sxs
That’s all.
In Windows 8 and above, we can use the DISM command to do the same:
Dism.exe /online /enable-feature /featurename:netfx3 /source:d:\sources\sxs /all
Again d: is your DVD drive letter
This has been shown to work like this example..
10/2/2014:
DOT NET 3.5 on Windows 10 Technical Preview seems to work fine.
Setting up Veeam 8 Cloud Connect on Azure
High level summary:
- Provision Azure VM with sufficient CPU cores, memory, and disk space.
- Configure Azure Storage account, and disk space on the VM for use as a Backup Repository and Global Deduplication Cache.
- Configure an End Point to allow Cloud Connect tenants access to the VM
- Install Veeam Backup and Replication 8 on the VM with additional Cloud Connect License
- Configure Veeam on the VM to act as Cloud Connect Gateway, WAN Accelerator, and house a Backup Repository in Azure blob storage.
- On the tenant side, add and configure a Service Provider, setup and run a backup copy job using the Cloud Repository as backup target.
1. Setup a Cloud Service:

In planning this deployment, select a region that’s geographically close to to your data center to have lowest latency.
2. Setup a Storage account:

Notes:
- Storage account must be in the same region as the Cloud Service.
- Geo-redundant replication will maintain 6 copies of the data in 2 geographically distant Azure data centers. This is the default, and can be changed later.
- Locally redundant replication will maintain 3 copies of the data in a single Azure data center. This costs 1/2 as much as geo-redundant replication, and provides twice the bandwidth.
- A Storage account has a 500TB maximum capacity.
3. Setup a Container under the Storage account:
Under Storage, select your Storage account, click the Containers link on top, then click Add at the bottom:

Containers are similar to file system folders.
4. Create a virtual machine from Gallery using the Server 2012 R2 Data Center image:

Configure as Basic A2 size. This size has 2 CPU cores, 3.5GB of memory, and can have a maximum of 4x 1TB disks in addition to the 127 GB boot disk and a 60 GB temporary disk.
 For Azure VM pricing details see this link.
 Configure the VM to use the Cloud Service and Storage account we created earlier:

5. Get the files needed to the new VM:
Once Azure is finished provisioning the new VM, click Connect at the bottom to connect to the new Azure VM via RDP. Enter the name and password used during the VM setup above.
I have prepared an Azure SMB share as shown in this post, and stored a number of files in it that we’ll need:

I will leverage that share and map a drive on the new Azure Veeam VM using this short script:
$Drive = net use * \\share01.file.core.windows.net\azureshare01 /u:share01 o73afb5eWZkhaaaatwHMus2wsxApQ==
if (-not (Test-Path -Path “c:\sandbox\Backup&Replication.8.0.0.592.BETA2.iso”)) {
New-Item -Path “c:\Sandbox” -ItemType Directory -ErrorAction SilentlyContinue
Copy-Item -Path “$($Drive[0].Split(“:”)[0].substring(6,1)):\Tools\Veeam 8 Beta 2\Backup&Replication.8.0.0.592.BETA2.iso” -Destination “c:\sandbox” -Force
}
Mount-DiskImage -ImagePath “c:\sandbox\Backup&Replication.8.0.0.592.BETA2.iso”
This maps a drive to the Azure share, copies the Veeam 8 iso to c:\sandbox on the VM, and mounts the iso:

These 2 drive mappings are not persistent (will not survive a VM reboot). This is OK since we only need them during setup.
6. Setup a persistent drive mapping to your Azure Storage account:
There’s a number of ways to make Azure storage available to the VM:
- Attach a number of local VHD disks. The problem with this approach is that the maximum we can use is 16TB, and we’ll have to use an expensive A4 sized VM.
- Attach a number of Azure File shares. There’s a number of issues with this approach:
The shares are not persistent although we can use CMDKEY tool as a workaround.
There’s a maximum of 5TB capacity per share, and a maximum of 1TB capacity per file. - Use a 3rd party tool such as Cloudberry Drive to make Azure block blob storage available to the Azure VM. This approach has the 500TB Storage account limit which is adequate for use with Veeam Cloud Connect. Microsoft suggests that the maximum NTFS volume size is between 16TB and 256TB on Server 2012 R2 depending on allocation unit size. Using this tool we get 128TB disk suggesting an allocation unit size of 32KB.
I’ve examined these 10 different tools and in my testing Cloudberry Drive provided the most functionality. To install it:
11/6/2014:
Veeam has released Veeam v8 today, so I can make this post public.
CloudBerry Drive has proved to be not a good fit for use with Veeam Cloud Connect because it caches files locally. For more details see this post. So, I recommend skipping CloudConnect installation and simply attach up to 16x 1TB drives to the Azure VM (may need to change VM size all the way up to Standard A4 to get the maximum of 16 disks), and set them up as a simple disk in the VM using Storage Spaces)
– Install C++ 2010 x64 Redistributable pre-requisite:

– Run CloudBerryDriveSetup, accept the defaults, and reboot. After reboot, run this command to mount the Veeam iso back:
Mount-DiskImage -ImagePath “c:\sandbox\Backup&Replication.8.0.0.592.BETA2.iso”
– In the Azure Management Portal, obtain your storage account access key (either one is fine):

– Back in the Azure VM, right-click on the Cloudberry icon in the system tray and select Options:

– Under the Storage Accounts tab, click Add, pick Azure Blob as your Storage Provider, enter your Azure Storage account name and key:

– Under the Mapped Drives tab, click Add, type-in a volume label, click the button next to Path, and pick a Container. This is the container we created in step 3 above:

– You can see the available volumes in Windows explorer or by running this command in Powershell:
Get-Volume | FT -AutoSize

7. Add VHD disks to the VM for the Veeam Global deduplication cache:
We will be setting up Veeam’s WAN Accelerator for Global Deduplication. This uses a folder for global deduplication cache. We’ll add VHD disks to the VM for that cache folder to have sufficient disk space and IOPS for the cache.

Highlight the Azure Veeam VM, click Attach at the bottom, and click Attach empty disk. Enter a name for the disk VHD file, and a size. The maximum size allowed is 1023 GB (as of September 2014). Repeat this process to add as many disks as allowed by your VM size. For example, an A1 VM can have a maximum of 2 disks, A2 max is 4, A3 max is 8, and A4 max is 16 disks.
In the Azure Veeam VM, I created a 2TB disk using Storage Spaces on the VM as shown:

This is setup as a simple disk for maximum disk space and IOPS, but it can be setup as mirrored disks as well.
8. Install Veeam prerequisites:
- In addition to C++ 2010 x64 Redistributable that we installed in step 6 above, install:
- Microsoft® System CLR Types for Microsoft® SQL Server® 2012 (SQLSysClrTypes.msi)
- Microsoft® SQL Server® 2012 Shared Management Objects (SharedManagementObjects.msi)
9. Install Veeam 8 Backup and Replication:
If you’re using a VM smaller than A2 with less than 2 CPU core, you’ll receive a warning during Veeam installation. This is safe to ignore.
Select to install the Veeam Powershell SDK
Accept the default installation location under c:\program files\Veeam\backup and replication
Click “Do not use defaults and configure product manually”

Change location of the Guest Catalog folder and vPower cache folder:

Veeam will automatically install SQL 2012 SP1 express on the VM:

10. Add an endpoint to the VM for TCP port 6180:
While Veeam is installing on the VM, let’s add an endpoint for Veeam Cloud Connect. In the Azure Management Portal, click on the VM, click Endpoints, and click Add at the bottom. Add a Stand Alone Endpoint:

Note that endpoint name follows the NetBIOS naming convention and cannot exceed 15 characters.
11. Veeam initial configuration:
Back in the VM, open Veeam Backup and Replication 8. Under Backup Infrastructure we need to see the Backup Repositories and WAN Accelerators nodes on the left:

However, these will be hidden in the GUI by design since we have not added any Hyper-V or VMWare server. To work around this issue we can run this SQL query to show the needed options in the GUI:
IF NOT EXISTS (SELECT * FROM [dbo].[Options] WHERE id = ’91BF2EB1-51AC-4C75-A472-22610288191D’)
BEGIN
INSERT INTO [dbo].[Options]
([id]
,[name]
,[value])
VALUES
(’91BF2EB1-51AC-4C75-A472-22610288191D’
,’WasViHostEverAdded’
,’True’)
END
ELSE
BEGIN
UPDATE [dbo].[Options] SET
[value] = ‘True’
WHERE
[id] = ’91BF2EB1-51AC-4C75-A472-22610288191D’END
GOIF NOT EXISTS (SELECT * FROM [dbo].[Options] WHERE id = ‘6B5FDC9C-6E1D-4533-B17C-5FECC304589F’)
BEGIN
INSERT INTO [dbo].[Options]
([id]
,[name]
,[value])
VALUES
(‘6B5FDC9C-6E1D-4533-B17C-5FECC304589F’
,’WasAnyHostEverAdded’
,’True’)
END
ELSE
BEGIN
UPDATE [dbo].[Options] SET
[value] = ‘True’
WHERE
[id] = ‘6B5FDC9C-6E1D-4533-B17C-5FECC304589F’
END
GO
Copy this query and in notepad save it as c:\sandbox\Show-UI.sql for example on the Azure Veeam VM. Then run this command:
SQLCMD.EXE -S localhost\VEEAMSQL2012 -d VeeamBackup -i c:\sandbox\Show-UI.sql -o c:\sandbox\Show-UI.log
Thanks to Veeam phenomenal support for the tip. Their quick response was very helpful.
12. Add a Backup Repository:
In Veeam Backup and Replication, click WAN Accelerators, then click Add WAN Accelerator:

Give it a name, select Shared Folder:

This is necessary as opposed to the first option for directly attached storage, because of the way CloudBerry presents the attached Azure blob storage.
Type in the Shared Folder name, enter credentials to access it. To get the share name you can run “net use” command to see its exact path.

Click Next:

Accept vPower NFS defaults, and finish.
13. Add a WAN Accelerator:
In Veeam Backup and Replication, click WAN Accelerators, then click Add WAN Accelerator:

Select the e: drive we created in step 7 above, enter the maximum amount of disk space available, and finish:

14. Add a certificate:
This is a one time setup. SSL certificate is needed for authentication and tunnel encryption.
Note: This step requires Veeam Cloud Connect license. Without it, the Cloud Connect Infrastructure will be hidden in the Veeam Backup and Replication 8 GUI.

For production I recommend using a certificate from a public Certificate Authority. For this exercise I will generate a self signed certificate. In Cloud Connect Infrastructure, click Manage Certificates:

Click Generate new certificate

Type in a friendly name

Click “Copy to clipboard” and save this information. We will need the thumbprint when connecting from the client/tenant side. This is only needed because we’re using a self signed certificate. If we used a certificate issued by a public Certificate Authority we would not need that thumbprint.
15. Add Cloud Gateway:
This is also a one time step. Under Cloud Connect Infrastructure, click Add Cloud Gateway:

Pick a server,
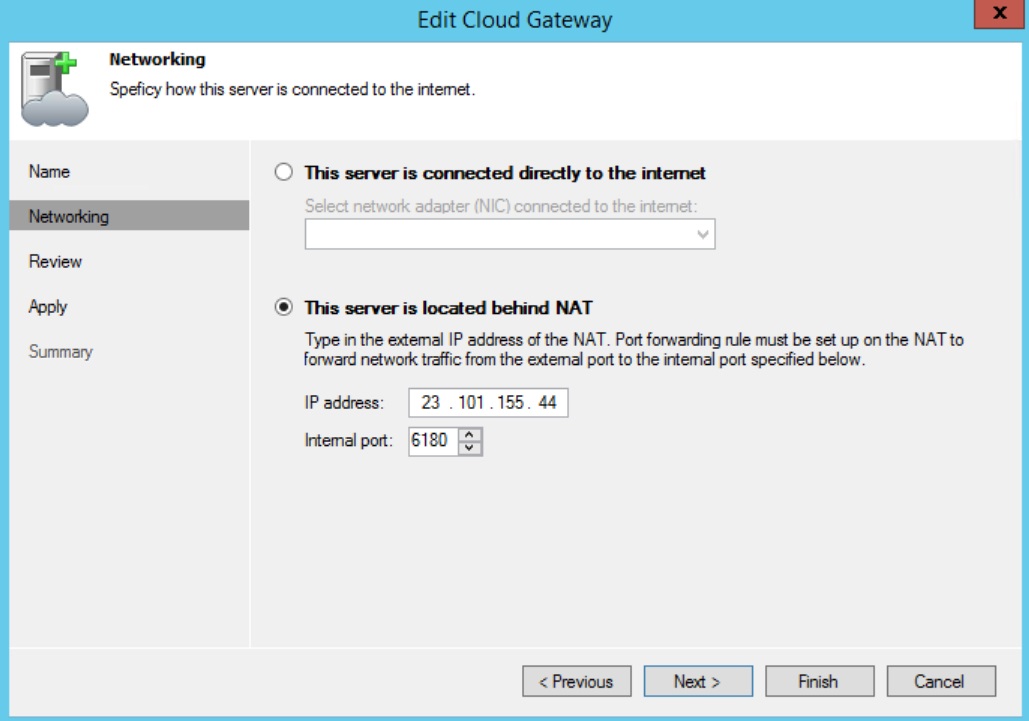
Use the Public IP of the Azure VM and the default port 6180.
Select its NIC,

and Finish.
16. Add a user/tenant:
A user may represent a Cloud Connect client/tenant or a corporate site. It is associated with his/her own repository under the main repository, and a lease. The lease corresponds to a backup client/backup cloud provider agreement term.
Under Cloud Connect Infrastructure, click Add User

Enter a name, create a password, check Lease expires, and click Calendar to select a lease expiration date.

In the Resources tab, click Add, create a name for the user/client repository name, select a Backup Repository from the drop down menu, check to Enable WAN acceleration, and pick the WAN accelerator from its drop down menu.
From the client/corporate side, in Veeam Backup and Replication 8, under Backup Infrastructure, click the Service Providers node, and click Add a Service Provider:

Enter the IP address or DNS name of the Azure Veeam VM we created above, and click Next:

Since we used a self-signed certificate, we need to provide the thumbprint from step 14 above. Click Verify:

Notice that the certificate has been validated. The certificate will be used for both authentication and tunnel encryption. Click Add and add the user name and password created in step 16 above:

Click Next, and Finish.
Finally, create a new backup copy job using the Cloud Repository as a backup target:

Creating and using an Azure StorSimple 1100 Virtual device (SVA)
 StorSimple 8000 series comes with new exiting features. One of them is the ability to have a virtual device. Microsoft offers the StorSimple 1100 virtual appliance as an Azure VM that can connect to a StorSimple 8000 series array’s Azure Storage account and make available its data in case of a physical array failure. There’s no cost for the StorSimple 1100 virtual device, but the VM compute and other IAAS costs are billed separately. So, the recommendation is to keep the StorSimple 1100 Azure VM powered up only when needed.
To setup a StorSimple 1100 virtual appliance:
1. In the Azure Management portal, click StorSimple on the left, then click on your StorSimple Manager service, click the Devices link on top, and click Create Virtual Device at the bottom:

Enter a name for the new StorSimple 1100 virtual device. Pick a Virtual Network and Subnet. Pick a Storage account for the new virtual device, or create a new one. Check the “I understand that Microsoft can access the data stored on my virtual device” box:

Notes:
- A Virtual Network and Subnet must be setup prior to starting to setup a StorSimple 1100 virtual appliance.
- It’s recommended to use a separate Storage account for your StorSimple 1100 virtual appliance. If you use the same Storage account as your StorSimple 8000 series array, the data stored there will be subtracted from your array’s Storage Entitlement (more costly than a separate Storage account)
- The “I understand that Microsoft can access the data stored on my virtual device” checkbox is a reminder that data is encrypted at rest only. That is when it resides in the Storage account associated with your StorSimple 8000 series array. Once this data is accessed and used by a StorSimple 1100 VM, it’s not encrypted. Stored data is encrypted, compute data is not. In other words, if data in your Storage account is accessed by unauthorized individuals, it’s still safe due to EAS-256 bit at-rest encryption. However, if data in your StorSimple 1100 VM is accessed by unauthorized individuals, it’s no longer safe since compute data cannot be encrypted.
- This can take up to 15 minutes
2. Back in the Devices page, we now have the newly provisioned StorSimple 1100 device:

Note: StorSimple 1100 virtual device has a maximum capacity limit of 30TB.
Click on it, then click on the Complete Device Setup, or click the Configure link on top:

Enter the Service Data Encryption Key for the StorSimple 8000 series obtained during setup:

Also enter the device Administrator and Snapshot Manager passwords.
3. Similar to a StorSimple 8000 series, setup Volume containers, volumes, Access Control Records
To use a StorSimple 1100 virtual appliance in case of a StorSimple 8000 device failure:
1. In the Azure Manage portal, click StorSimple on the left, then click on your StorSimple Manager service, click on your StorSimple 8000 device, and click Failover at the bottom:

2. Select one or more Volume Containers:

Note: It’s recommended to keep total volumes’ capacity in any given Volume Container under 30TB since a StorSimple 1100 virtual device has a 30TB maximum capacity.
3. Select the target StorSimple 1100 virtual device to fail to:

Check the summary screen, and check the box at the bottom:

This has created a failover job. Jobs can be viewed in the StorSimple Manager service page under the Jobs link on top.

Once this failover job is complete, we can see the Volume Container that used to be on the StorSimple 8000 series array, now on the SVA:

So far we’ve made available the StorSimple 8000 series array’s volumes on the SVA we just spun up. The volumes in this Volume Container on the SVA will have the same ACRs as the original volumes on the StorSimple 8000 series array, which will make the volumes available to the original on-prem servers.
This is how the topology looks like before the failover:

and here how it looks like after the failover:

Considerations and limitation:
- In this scenario of failover, we have to mount the new volumes presented from the SVA onto the file server, and recreate the SMB file shares.
- SVA has a maximum capacity of 30TB. So, volumes larger than 30TB cannot be recovered without a replacement physical StorSimple 8000 series array.
- More than one SVA may be needed to provide enough storage capacity for all volumes that need to be recovered.
- SVA has one vNIC. MPIO is not supported.
- SVA does not have controller redundancy. So maintenance that requires SVA reboot or down time will cause volumes to be unavailable.
- Data on the SVA is accessible to Microsoft. If the SVA is compromised data is unprotected.
- Volume access speed will be slower than usual due to WAN link latency
Microsoft suggests taking it a step further and creating new Azure VMs as file servers:

This recovery scenario suffers from all the above limitations in addition to:
- Need to remap drive letters on all client computers for all recovered volumes
- Need to reconfigure all applications that use UNC paths that point to the original servers to the new VMs
- Azure virtual file servers will have to join the domain
- Additional time, costs, and complexity of creating new Azure virtual file servers
Some of these steps may not be needed if a name space is used to access network drives.
Setting up Azure StorSimple 8000 series array

Unlike the 5000 and 7000 StorSimple Hybrid Storage arrays where most of the setup was done in the array’s local web interface, the Azure StorSimple 8000 series array setup is done in the familiar Azure Management web interface.
1. Create a StorSimple Manager service under Storage:

- Pick a name for the array. name can contain upper case, lower case letters, numbers, and the dash.
- Pick a location from the list of Azure data centers on the drop down menu. It’s recommended to choose an Azure data center that’s closest geographically to the physical site where your StorSimple 8000 array is installed. You can do a latency test from your data center using one of free online services like this one. What’s missing here is a choice of Geo-redundant/Locally redundant/Zone redundant storage. While we had that choice when setting up an Azure Storage account for a StorSimple 5000 or 7000 series, we don’t have that choice anymore with the 8000 series. It’s Geo-redundant storage for StorSimple 8000 series, and its cost is bundled into the Storage Entitlement that comes with the array purchase. We can go back after the StorSimple Manager service is created, and edit its associated Azure Storage account to use Locally redundant storage, but there will be no cost benefit to that.
- Pick a subscription if you have access to more than one.
This creates an Azure StorSimple Manager service and a corresponding Azure Storage account.
2. Get your StorSimple Manager Service Registration key:

Copy that key and save it. We will use it to configure the StorSimple 8000 series array.
3. From a computer connected to the array via serial cable or via telnet:

Enter 1, and type in the password to continue. The default password is Password1
4. Run the Invoke-HcsSetupWizard cmdlet to continue. Enter or update the array’s IP information including: IP address, subnet mask, default gateway, DNS server, and NTP server:

5. Reset the administrator password. This follows the IP configuration setup and is part of the Invoke-HcsSetupWizard cmdlet. Enter new array Administrator password. It must be between 8 and 15 characters long and follow minimum password complexity shown below:

6. Reset the Snapshot Manager password. Still in the Invoke-HcsSetupWizard cmdlet:

7. Finally, enter the StorSimple Manager Service Registration key obtained from step 2 above:

Copy the encryption key and save it in a secure location. This key will be needed when creating a StorSimple 1100 virtual device.
Note: In Putty, highlight the encryption key, this will automatically copy it to the clipboard. Do NOT use CTRL-C, as that will exit the Putty session.
Back in the Azure Management Portal, we can see the StorSimple array:

8. Complete device configuration:

Edit device name, time zone, secondary DNS server IP address (required), and iSCSI interfaces:

Enter the Controller 0 and Controller 1 fixed IP addresses:

9. Create a Volume Container:
In Azure Management Portal, click on the StorSimple Manager service on the left, click Devices, then click on your StorSimple device:

In the Device screen, click on Volume Containers, then click Add a Volume Container link, or the Add link at the bottom:

Enter a name, a Storage account, bandwidth, and Cloud Storage (at rest) encryption key:

Note:
- It’s strongly recommended to use the Storage account that was automatically created at the time the StorSimple Manager service was created in step 1 above. If you use another storage account that has existing data in it, that data will be instantly subtracted from your StorSimple device Storage Entitlement. ($7,500/5TB increment for overages)
- It’s strongly recommended to leave bandwidth as Unlimited (default)
- It’s recommended to use a long and complex encryption key
10. Create a volume:
In the Device screen, we now have a volume container:

Click on the Volume Container to browse to the Volume Container screen. Similarly, click Add a Volume, or the Add link at the bottom:

Type in a Volume name, size in GB or TB, and select either Primary or Archive under Usage Type:

Note: It’s strongly recommended to keep total volumes’ capacity in any given Volume Container under 30TB since a StorSimple 1100 virtual device has a 30TB maximum capacity. As a best practice, it’s recommended to keep one volume in a volume group.
Next, add one or more Access Control Records (ACRs) for the volume. StorSimple uses the ACRs to unmask the volume to specific host(s). This is not unlike settings on the 5000 or 7000 StorSimple series.
Note: If you enter more than 1 ACR for the same volume, make sure the hosts are running some clustering software such as Failover Clustering, otherwise the volume will get corrupted.

Get the IQN from the host’s iSCSI initiator Properties/configuration tab:

It’s recommended to uncheck the “Enable a default backup for this volume” box since we’ll be setting up comprehensive backup policies.
11. In the host(s), setup the iSCSI initiator, install and setup MPIO. In a Windows 2012 R2 server for example, in the iSCSI initiator properties/Discovery tab, make sure the StorSimple array is visible by its IP address and the default iSCSI port 3260.

Under the Targets tab, the StorSimple array will appear under Discovered Targets section.

Click Connect, then click advanced, and enter each iSCSI Target/Initiator combination to setup multipathing. For example, if your host had 2 iSCSI NICs (10.10.10.15 and 10.10.10.16 for example) and your StorSimple 8000 series array had 2 of its interfaces configured for iSCSI (10.10.10.121 and 10.10.10.122 for example), you need to setup 4 paths by clicking Connect/Advanced 4 times and picking a different initiator/target combination every time such as (10.10.10.15 to 10.10.10.121, 10.10.10.15 to 10.10.10.122, 10.10.10.16 to 10.10.10.121, and 10.10.10.16 to 10.10.10.122)
Finally, online, partition, and format the volume in Computer Management/Disk Management as usual. Similar to StorSimple 5000 and 7000 series, it’s strongly recommended to:
- Select 64KB allocation unit size when formatting the volume
- Select NTFS file system
- Quick formatting
12. Setup backup policies:
In the Device screen, click Backup Policies, and click Add at the bottom:

Enter a policy name, and select the volume(s) to be associated with this policy:

Notice that the screen shows existing backup policies associated with each volume listed.
It’s not uncommon to have a volume associated with multiple backup policies. For example, a policy for local daily snapshots, and a policy for weekly cloud snapshots.
Note: In the StorSimple 5000 and 7000 series arrays protection policies are associated with Volume Groups not volumes. On the other hand, in the StorSimple 8000 series arrays, backup policies are associated with Volumes not Volume Containers.
Enter backup schedule details:

Pick a Local or Cloud snapshot, schedule information, and retention detail.
It’s recommended to craft a group of backup policies to meet your organization’s RPO, RTO, and DR objectives.
Note: Cloud Clone is a snapshot option that would snapshot a Volume Group to multiple cloud providers in StorSimple 5000 and 7000 series. This feature is not available in StorSimple 8000 series. Also, absent is the option to use a cloud provider other than Azure.
To take a manual backup, browse to the Device screen, click Backup Policies, select a policy that is associated with the volume you like to backup, and click Take Backup at the bottom, select Local or Cloud Snapshot option:

Backup jobs can be viewed in the StorSimple Manager service page, click Jobs:

Azure Blob Storage Scalability
The following is the current (September 2014) hierarchy of Azure Services with a focus on Azure Blob Storage:
- Azure Enterprise Portal. This can be accessed via https://ea.windowsazure.com. This is available only to those with an Enterprise Agreement.
- Azure Account. This can be accessed from the Account Portal via https://account.windowsazure.com
 This is where you can see your subscriptions, billing information, view and sign up for Preview features, and download usage reports.
- Within a subscription, we can setup Storage Accounts. We can do so on the Management Portal https://manage.windowsazure.com

This a summary of Azure portals:

- You can have up to
50100 (as of 12/2014) Storage accounts in an Azure Subscription. A storage account has a maximum capacity of 500TB. A Storage Account has the following properties: URL (name), location, replication:

- Pick a name for your storage account in the URL field. It must be lower case letters and numbers.
- Pick a location from the drop down list of Azure data centers. If you’re going to use the files in this Storage Account with an Azure VM, pick a the same location where the VM resides. Location cannot be changed after a storage account is created. Moving files between Storage Accounts will incur costs.
- Pick a replication level. Replication is done automatically by Microsoft among different Azure data centers. Locally redundant replication keeps 3 replicas of your data in a single data center. Geo-redundant replication keeps 6 copies in 2 geographically distant data centers. Zone redundant keeps 6 copies in 2 geographically clode data centers. Replication affects storage costs. Replication can be changed after Storage Account creation.
Within a Storage Account, we can create “Containers”. A Container is a similar to a folder. Within a container we can copy/delete/snapshot files. Files in an Azure Storage account can be copied as either:
- Block Blobs: no file size limit, no snapshot feature
- Page Blobs: a page blob file has a limit of 1TB (1023 GB). It has the benefit of snapshot feature. For example, Azure VM disks as saved as page blobs in Azure Storage.
In summary:

Azure Files feature provides 5TB SMB file shares to Azure Virtual Machines
Microsoft has announced a new “Azure Files” feature in May 2014 that provides SMB file shares to Azure VMs:

This feature provides 5TB file shares, with a maximum 1TB file size. This feature is currently in Preview, and can be accessed by signing up in this page. When you sign up the preview page will show that you’re Active:
 You need to create a new storage account AFTER Azure Files feature has been activated. It won’t be available for existing storage accounts. You can see it as a new service in the Storage Account dashboard:

To use this feature, you need AzureStorageFile Powershell module. Extract it, and run the following Powershell commands:
Get-ChildItem -Path .\* -Force -Recurse | Unblock-File
if ((Get-Module).Name -eq “Azure”) { Remove-Module Azure }
Import-Module .\AzureStorageFile.psd1
To create a new Azure file share, run the following Powershell commands:
$StorageAccountName = “share01”
$StorageAccountKey = “o73/fb5eWZkhH6CaaaaaaaaaaaaaaaHgBtwHMus2wsxApQ==”
$ShareName = “azureshare01” # must be lower case
$AzureStorageContext = New-AzureStorageContext -StorageAccountName $StorageAccountName -StorageAccountKey $StorageAccountKey
New-AzureStorageShare -Name $ShareName -Context $AzureStorageContext
Replace the first 3 lines with a share name of your choice, and your storage account name and its access key. Make sure that the Storage account is provisioned in the same Azure data center where the VM(s) are located.
The share is now ready and can be used by one or more VMs. On a VM run:
$StorageAccountName = “share01”
$StorageAccountKey = “o73/fb5eWZkhH6CkfWIUHbbbbbbbbbbbbbbbbbbbbbbbbbbbbbbbrHgBtwHMus2wsxApQ==”
$ShareName = “azureshare01” # must be lower case
net use * “\\$StorageAccountName.file.core.windows.net\$ShareName /u:$StorageAccountName $StorageAccountKey”
This will map a drive letter to the new Azure share:

One last wrinkle: this drive mapping will be lost when the VM reboots. To persist the drive mapping, use CMDKEY tool as shown in the post.
Azure VM Storage limitation – using Azure blob storage as backup target
One of the frustrating limitations I’ve come across when using Azure Virtual Machines is the limited disk space amount you can have. This limitation is particularly a hurtle when considering Azure storage as a backup target. The maximum amount of disk space you can have on an Azure VM is 16TB. This limitation stems from 3 issues:
- Maximum 1,023 GB per disk. Azure VM disks are stored as Page Blobs in Azure storage accounts. A Page Blob has a maximum of 1TB.
- Maximum 16 disks per VM. This is in spite of the fact that the VM OS may support 256 disks per SCSI controller, such as Server 2012 R2.
- Maximum 2,040 GB per disk. Although this limitation is superseded by the 1TB page blob limitation, it’s worth noting. This limitation stems from the fact that Azure VMs must use VHD disk format which has a maximum of 2TB/disk, in spite of the fact that the VM operating system may support disks as large as 64TB each, such as Server 2012 R2.
Although we can store large files in Azure as Block Blobs, many backup applications require a VM in the cloud to do WAN acceleration, multi-site deduplication, and similar functions.
Another annoying feature is the artificial coupling of VM CPU, memory, and disk space resources in Azure VMs. For example, to have a VM with with the maximum allowed 16TB disk space, one must use one of the 5 large VM sizes:

This is the output from this Powershell command:
Get-AzureRoleSize | where { $_.MaxDataDiskCount -gt 15 } | Select InstanceSize,Cores,MemoryInMB,MaxDataDiskCount | Out-GridView
For example, the Basic A4 VM annual cost is about $5,500 compared to about $700 for a Small A1 VM which is all is needed for backup.
A VM with 16TB disk space can be setup from the Azure web interface or via Powershell. I’ve used this script to create and attach 16 disks to an A4 sized VM:
$SubscriptionName = “Visual Studio Premium with MSDN”
$StorageAccountName = “portalvhds1brcsk975g4fq”
Set-AzureSubscription -SubscriptionName $SubscriptionName -CurrentStorageAccountName $StorageAccountNamefor ($i=0; $i -lt 16; $i++) {
$i
Get-AzureVM -ServiceName “v2012r2-az1” -Name “v2012r2-az1” |
Add-AzureDataDisk -CreateNew -DiskSizeInGB 1023 -DiskLabel “Disk$i” -LUN $i |
Update-AzureVM
}
The output looked like:

Back to the Azure VM, I created a disk pool, 1 vDisk, and 1 volume using all the 16 TB space, formatted with 64KB blocks:

The 16 disks before and after setting them up as a single vDisk using Storage Spaces
There may be changes coming down the pipeline that would allow up to 30TB/VM or more. For example, the StorSimple 1100 virtual appliance, which is an Azure VM associated with a StorSimple series 8000 storage array has a maximum capacity of 30TB.
Resuming timed out uploads/downloads to/from Azure blob storage with azCopy
 AzCopy is a command line tool by Microsoft that allows for easy uploads/downloads to/from Azure storage. In addition of offering a non-programmatic way of transferring files from/to Azure storage, it provides the flexibility of choice between page and block blobs in Azure blob storage. Page blobs have a maximum of 1TB size. Azure VMs’ VHD files for example are implemented as page blobs and suffer from the same limitation. azCopy tool also offers an important feature which is the ability to resume timed-out or interrupted uploads/downloads.
To get started, see this post to get Azure Powershell module and this post to setup a certificate.
Here’s an example of uploading files to Azure blob storage using Powershell:
$azPath = “C:\Program Files (x86)\Microsoft SDKs\Azure\AzCopy”
Set-Location $azPath$StorageAccountName = “samscorner1”
$StorageAccountKey = “Nk48Iljv0AHbbbbbbbbbbbbbbbbbbbbbbbbbbyEkRwbd+BTqew==”
$ContainerName = “copiedvhds”$SourceFolder = “e:\vhd”
$DestURL = “https://$StorageAccountName.blob.core.windows.net/$ContainerName “
$Result = .\AzCopy.exe $SourceFolder $DestURL /BlobType:block /destkey:$StorageAccountKey /Y
$Result
This will upload all files in the “e:\vhd” folder to the “copiedvhds” container in the “samscorner1” Azure Storage account.
The script output may look like:
 You can also see the files in your manage.windowsazure.com interface:


Sometimes, the upload/download my be interrupted or time-out, especially if transferring a large file that takes hours or days. A timed-out transfer may produce output like:
e:\vhd\v2012R2-AZ1-v2012R2-AZ1-0906-2b.vhd: The client could not finish the operation within specified timeout.

To resume the transfer, just run the same .\azCopy.exe command or use a script like:
[int]$Failed = $Result[5].Split(“:”)[1].Trim()
$Journal = “$env:LocalAppData\Microsoft\Azure\AzCopy”
$i=1
while ($Failed -gt 0) {
$i++
[int]$Failed = $Result[5].Split(“:”)[1].Trim()
$Result = .\AzCopy.exe /Z:$Journal
$Result
$i
}
This script will continue to run the same .azCopy.exe command until “Transfer Failed” output is down to zero.
azcopy tool stores 2 journal files under %\AppData%\Local\Microsoft\Azure\AzCopy like C:\Users\samb\AppData\Local\Microsoft\Azure\AzCopy folder. It looks them up upon starting to detect if this is a transfer that did not complete and resumes it.
Output will look like:

Using Azure Storage with Powershell – Initial computer setup
To be able to use Powershell to run commands, lookup file and container (folder ) lists, transfer files from your computer to your Azure storage account, you need some initial setup. This is a one time setup that uses certificates for authentication.
Azure Powershell cmdlets are part of the Azure PS module. Follow this link to get it.
Before this initial setup, if you try to use the Azure cmdlets like:
Get-AzureStorageAccount
You’ll get an error similar to:
Get-AzureStorageAccount : No current subscription has been designated. Use Select-AzureSubscription
-Current <subscriptionName> to set the current subscription.
At line:1 char:1
+ Get-AzureStorageAccount
+ ~~~~~~~~~~~~~~~~~~~~~~~
+ CategoryInfo : NotSpecified: (:) [Get-AzureStorageAccount], Exception
+ FullyQualifiedErrorId : System.Exception,Microsoft.WindowsAzure.Commands.ServiceManagement.Stor
ageServices.GetAzureStorageAccountCommand

To get started, we need a certificate. A self signed certificate is OK.
- Follow this link to download and install SDK for Windows 8. We need this SDK because it contains the makecert.exe tool that we’ll use in the next step. Alternatively, you can make and export a certificate manually in certmgr.msc
- Use makecert.exe tool and the following Powershell commands to create a certificate. Change the first line to reflect the certificate name of your choice:
$certName = “SamAzure1”
$makecertPath = “C:\Program Files (x86)\Windows Kits\8.0\bin\x64”
Set-Location $makecertPath
.\makecert.exe -sky exchange -r -n “CN=$certName” -pe -a sha1 -len 2048 -ss My “$certName.cer” - Next, upload the resulting .cer file to your Azure account. In Azure Management Interface, click settings on the bottom left, Management Certificates tab, Upload a management certificate:
 Browse to “C:\Program Files (x86)\Windows Kits\8.0\bin\x64” folder, and the .cer file created in step 2 above. It will be named after the $certName value above.
 - Next, get your subscription name and ID, under settings:

- Finally, run the following Powershell commands:
$certName = “SamAzure1”
$SubscriptionID = “91e711e4-1620-4e5b-a64b-92a190101010”
$SubscriptionName = “Visual Studio Premium with MSDN”
$Cert = Get-ChildItem -Path Cert:\CurrentUser\My | Where { $_.Subject -like “CN=$certName” }
Set-AzureSubscription -SubscriptionName $SubscriptionName -SubscriptionId $SubscriptionID -Certificate $Cert
Change the first 3 lines to match your subscription details. $certName must be the same name from step 2 above.


You’re done. This setup remains valid as long as your subscription is active and you haven;t deleted the certificate from your Azure account.
To test, run cmdlets like:
Get-AzureStorageAccount
Get-AzureSubscription
Get-AzureVMImage
