Veeam Cloud Connect on Azure – take 2
2 Months ago in early September 2014, I tested setting up Veeam Cloud Connect on Azure. That was with Veeam version 8 beta 2. Now that Veeam version 8 general availability was November 6th, 2014, I’m revisiting some of the testing with Veeam v8. I’ve also been testing the same with a number of cloud providers who have their own infrastructure. This is helpful to compare performance, identify bottlenecks, and possible issues that may increase or reduce costs.
Summary of steps:
In Azure Management Portal:
- Create a Cloud Service
- Create a Storage Account
- Create a VM: standard A2 with Windows 2012 R2 DC as the OS. Standard A2 is an Azure VM size that comes with 2 (hyperthreaded) processor cores, 3.5 GB of RAM, and up to 4x 1TB page blob disks @ 500 IOPS each. Prior testing with several providers have shown that cloud connect best features such as WAN accelerator need CPU and IOPS resources at the cloud connect provider end.
- Added an endpoint for TCP 6180

- Attached 4x disks to the VM, using max space possible of 1023 GB and RW cache


On the VM:
- I RDP’d to the VM at the port specified under Endpoints/Remote Desktop
- I ran this small script to create a storage space out of the 4x 1TB disks available:
# Script to create simple disk using all available disks
# This is tailored to use 4 physical disks as a simple space
# Sam Boutros – 11/18/2014 – v1.0
$PoolName = "VeeamRepo1"
$vDiskName = "VeeamvDisk1"
$VolumeLabel = "VeeamRepo1"
New-StoragePool -FriendlyName $PoolName -StorageSubsystemFriendlyName “Storage Spaces*” -PhysicalDisks (Get-PhysicalDisk -CanPool $True) |
New-VirtualDisk -FriendlyName $vDiskName -UseMaximumSize -ProvisioningType Fixed -ResiliencySettingName Simple -NumberOfColumns 4 -Interleave 256KB |
Initialize-Disk -PassThru -PartitionStyle GPT |
New-Partition -AssignDriveLetter -UseMaximumSize |
Format-Volume -FileSystem NTFS -NewFileSystemLabel $VolumeLabel -AllocationUnitSize 64KB -Confirm:$false
The GUI tools verified successful completion:

 This storage space was created to provide best possible performance for Veeam Cloud Connect:
- Fixed provisioning used instead of thin which is slightly faster
- Simple resiliency – no mirroring or parity, provides best performance. Fault Tolerance will be subject of future designs/tests
- Number of Columns and Interleave size: Interleave * Number Of Columns ==> the size of one stripe. The settings selected make the stripe size 1MB. This will help align the stripe size to the Block size used by Veeam.
- Allocation Unit 64KB for better performance
- Installed Veeam 8.0.0.817 Backup and Replication, using the default settings which installed SQL 2012 Express SP1, except that I changed default install location to drive f:\ which is the drive created above
- I ran the SQL script to show the GUI interface as in the prior post (under 11. Initial Veeam Configuration)
- The default backup Repository was already under f:

- Created a WAN Accelerator – cache size 400GB on drive f: created above
- Installed the additional Cloud Connect License
- Added a self-signed certificate similar to step 14 in the prior post.
- Added a Cloud Gateway


- Added a user/tenant


That’s it. Done setting up Veeam Cloud Connect on the provider side.
Options for using a Veeam Backup Repository on an Azure Virtual Machine
January 2015 update:
In December 2014, Microsoft announced the Public Preview Availability release of Azure Premium Storage. See this post for details on Azure Premium Storage features. What does that mean in terms of using Azure for a Veeam Backup Repository, or for Veeam Cloud Connect?
- Maximum disk capacity per VM remains a bottleneck at 32 TB.
- Only D14 VM size at this time can have 32x 1TB Page Blob disks. It comes with 16 cores, 112 GB RAM, 127 GB SAS system disk, 800 GB SSD non-persistent temporary drive ‘d’ that delivers 768 MB/s read or 384 MB/s write throughput. Base price for this VM is $1,765/month
- If using 32 Standard (spinning SAS) disks, set as a 16-column single simple storage space for maximum space and performance, we get a 32 TB data disk that delivers 960 MB/s throughput or 8k IOPS (256 KB block size).
- 32x 1TB GRS Standard (HDD) Page Blobs cost $2,621/month
- 32x 1TB LRS Standard (HDD) Page Blobs cost $1,638/month
- If using 32 Premium (SSD) disks, set as a 16-column single simple storage space for maximum space and performance, we get a 32 TB data disk that delivers 3,200 MB/s throughput or 80k IOPS (256KB block size). Premium SSD storage is available as LRS only. The cost for 32x 1TB disks is 2,379/month
- If using a D14 size VM with Cloud Connect, setting up the Veeam Backup and Replication 8, WAN Accelerator, and CC Gateway on the same VM:
- 16 CPU cores provide plenty adequate processing for the WAN Accelerator which is by far the one component here that uses most CPU cycles. It’s also plenty good for SQL 2012 Express used by Veeam 8 on the same VM.
- 112 GB RAM is an overkill here in my opinion. 32 GB should be plenty.
- 800 GB SSD non-persistent temporary storage is perfect for the WAN Accelerator global cache. WAN Accelerator global cache disk must be very fast. The only problem is that it’s non-persistent, but this can be overcome by automation/scripting to maintain a copy of the WAN Accelerator folder on the ‘e’ drive 32 TB data disk or even on an Azure SMB2 share.
- In my opinion, cost benefit analysis of Premium SSD Storage for the 32-TB data disk versus using Standard SAS Storage shows that Standard storage is still the way to go for Veeam Cloud Connect on Azure. It’s $740/month cheaper (31% less) and delivers 960 MB/s throughput or 8k IOPS at 256KB block size which is plenty good for Veeam.

10/20/2014 update:
Microsoft announced a new “Azure Premium Storage”. Main features:
- SSD-based storage (persistent disks)
- Up to 32 TB of storage per VM – This is what’s relevant here. I wonder why not extend that capability to ALL Azure VMs??
- 50,000 IOPS per VM at less than 1 ms latency for read operations
- Not in Azure Preview features as of 10/21/2014. No preview or release date yet.
High level Summary:
Options for using Veeam Backup Repository on an Azure Virtual Machine include:
- Use Standard A4 VM with 16TB disk and about 300 Mbps throughput (VM costs about $6.5k/year)
- Use a small Basic A2 VM with several Azure Files SMB shares. Each is 5 TB, with 1 TB max file size, and 300 Mbps throughput.
Not an option:
- Use CloudBerry Drive to make Azure Block Blob storage available as a drive letter. This was a promising option, but testing showed it fails with files 400 GB and larger. It also has a caching feature that makes it not adequate for this use case.
An Azure subscription can have up to 50 Storage Accounts (as of September 2014), (100 Storage accounts as of January 2015) at 500TB capacity each. Block Blob storage is very cheap. For example, the Azure price calculator shows that 100TB of LRS (Locally Redundant Storage) will cost a little over $28k/year. LRS maintains 3 copies of the data in a single Azure data center.

However, taking advantage of that vast cheap reliable block blob storage is a bit tricky.
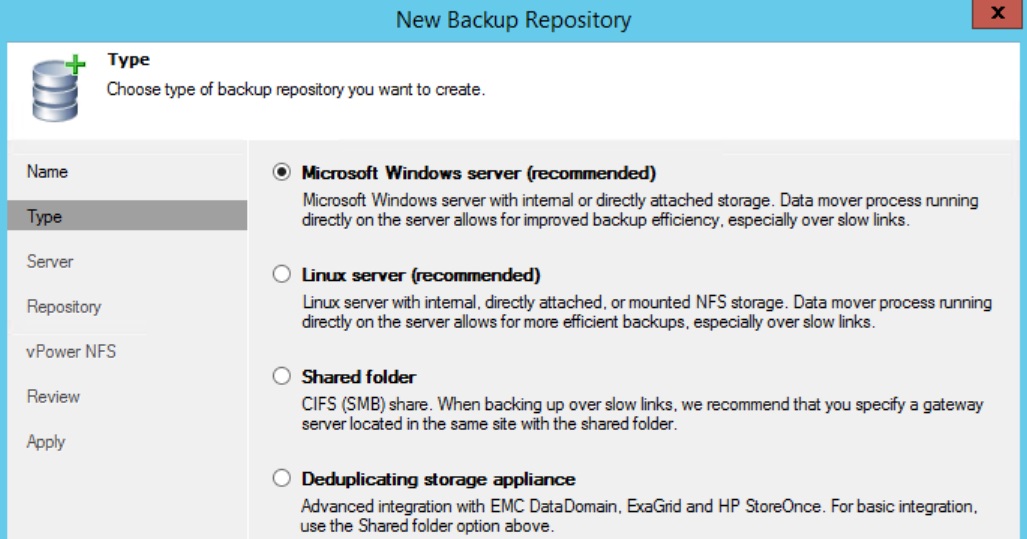
Veeam accepts the following types of storage when adding a new Backup Repository:
I have examined the following scenarios of setting up Veeam Backup Repositories on an Azure VM:
1. Locally attached VHD files:
In this scenario, I attached the maximum number of 2 VHD disks to a Basic A1 Azure VM, and set them up as a Simple volume for maximum space and IOPS. This provides a 2TB volume and 600IOPS according to Virtual Machine and Cloud Service Sizes for Azure. Using 64 KB block size:

This short script shows block size (allocation unit) for drive e: used:
$DriveLetter = "e:"
$BlockSize = (Get-WmiObject -Query "SELECT BlockSize FROM Win32_Volume WHERE DriveLetter='$DriveLetter'").BlockSize/1KB
Write-Host "Allocation unit size on Drive $DriveLetter is $BlockSize KB" -ForegroundColor Green
This should come to 4.7 MB/s (37.5 Mbps) using the formula
IOPS = BytesPerSec / TransferSizeInBytes
But actual throughtput was about 2.5 MB/s (20 Mbps) as shown on the VM:

and in the Azure Management Portal:

Based on these results, I expect a Standard A4 Azure VM when configured with 16TB simple (striped) disk, with max 8k IOPS will actually deliver about 35 MB/s or 300 Mbps.

2. Using Azure Files:
Azure Files is a new Azure feature that provides SMB v2 shares to Azure VMs with 5TB maximum per share and 1TB maximum per file.
Testing showed that throughput upwards of 100 Mbps. Microsoft suggests that Azure Files throughput is up to 60 MB/s per share.

Although this option provides adequate bandwidth, its main problem is that it has maximum 1 TB file size which means maximum backup job is not to exceed 1 TB which is quite limiting in large environments.
Setting up Veeam 8 Cloud Connect on Azure
High level summary:
- Provision Azure VM with sufficient CPU cores, memory, and disk space.
- Configure Azure Storage account, and disk space on the VM for use as a Backup Repository and Global Deduplication Cache.
- Configure an End Point to allow Cloud Connect tenants access to the VM
- Install Veeam Backup and Replication 8 on the VM with additional Cloud Connect License
- Configure Veeam on the VM to act as Cloud Connect Gateway, WAN Accelerator, and house a Backup Repository in Azure blob storage.
- On the tenant side, add and configure a Service Provider, setup and run a backup copy job using the Cloud Repository as backup target.
1. Setup a Cloud Service:

In planning this deployment, select a region that’s geographically close to to your data center to have lowest latency.
2. Setup a Storage account:

Notes:
- Storage account must be in the same region as the Cloud Service.
- Geo-redundant replication will maintain 6 copies of the data in 2 geographically distant Azure data centers. This is the default, and can be changed later.
- Locally redundant replication will maintain 3 copies of the data in a single Azure data center. This costs 1/2 as much as geo-redundant replication, and provides twice the bandwidth.
- A Storage account has a 500TB maximum capacity.
3. Setup a Container under the Storage account:
Under Storage, select your Storage account, click the Containers link on top, then click Add at the bottom:

Containers are similar to file system folders.
4. Create a virtual machine from Gallery using the Server 2012 R2 Data Center image:

Configure as Basic A2 size. This size has 2 CPU cores, 3.5GB of memory, and can have a maximum of 4x 1TB disks in addition to the 127 GB boot disk and a 60 GB temporary disk.
 For Azure VM pricing details see this link.
 Configure the VM to use the Cloud Service and Storage account we created earlier:

5. Get the files needed to the new VM:
Once Azure is finished provisioning the new VM, click Connect at the bottom to connect to the new Azure VM via RDP. Enter the name and password used during the VM setup above.
I have prepared an Azure SMB share as shown in this post, and stored a number of files in it that we’ll need:

I will leverage that share and map a drive on the new Azure Veeam VM using this short script:
$Drive = net use * \\share01.file.core.windows.net\azureshare01 /u:share01 o73afb5eWZkhaaaatwHMus2wsxApQ==
if (-not (Test-Path -Path “c:\sandbox\Backup&Replication.8.0.0.592.BETA2.iso”)) {
New-Item -Path “c:\Sandbox” -ItemType Directory -ErrorAction SilentlyContinue
Copy-Item -Path “$($Drive[0].Split(“:”)[0].substring(6,1)):\Tools\Veeam 8 Beta 2\Backup&Replication.8.0.0.592.BETA2.iso” -Destination “c:\sandbox” -Force
}
Mount-DiskImage -ImagePath “c:\sandbox\Backup&Replication.8.0.0.592.BETA2.iso”
This maps a drive to the Azure share, copies the Veeam 8 iso to c:\sandbox on the VM, and mounts the iso:

These 2 drive mappings are not persistent (will not survive a VM reboot). This is OK since we only need them during setup.
6. Setup a persistent drive mapping to your Azure Storage account:
There’s a number of ways to make Azure storage available to the VM:
- Attach a number of local VHD disks. The problem with this approach is that the maximum we can use is 16TB, and we’ll have to use an expensive A4 sized VM.
- Attach a number of Azure File shares. There’s a number of issues with this approach:
The shares are not persistent although we can use CMDKEY tool as a workaround.
There’s a maximum of 5TB capacity per share, and a maximum of 1TB capacity per file. - Use a 3rd party tool such as Cloudberry Drive to make Azure block blob storage available to the Azure VM. This approach has the 500TB Storage account limit which is adequate for use with Veeam Cloud Connect. Microsoft suggests that the maximum NTFS volume size is between 16TB and 256TB on Server 2012 R2 depending on allocation unit size. Using this tool we get 128TB disk suggesting an allocation unit size of 32KB.
I’ve examined these 10 different tools and in my testing Cloudberry Drive provided the most functionality. To install it:
11/6/2014:
Veeam has released Veeam v8 today, so I can make this post public.
CloudBerry Drive has proved to be not a good fit for use with Veeam Cloud Connect because it caches files locally. For more details see this post. So, I recommend skipping CloudConnect installation and simply attach up to 16x 1TB drives to the Azure VM (may need to change VM size all the way up to Standard A4 to get the maximum of 16 disks), and set them up as a simple disk in the VM using Storage Spaces)
– Install C++ 2010 x64 Redistributable pre-requisite:

– Run CloudBerryDriveSetup, accept the defaults, and reboot. After reboot, run this command to mount the Veeam iso back:
Mount-DiskImage -ImagePath “c:\sandbox\Backup&Replication.8.0.0.592.BETA2.iso”
– In the Azure Management Portal, obtain your storage account access key (either one is fine):

– Back in the Azure VM, right-click on the Cloudberry icon in the system tray and select Options:

– Under the Storage Accounts tab, click Add, pick Azure Blob as your Storage Provider, enter your Azure Storage account name and key:

– Under the Mapped Drives tab, click Add, type-in a volume label, click the button next to Path, and pick a Container. This is the container we created in step 3 above:

– You can see the available volumes in Windows explorer or by running this command in Powershell:
Get-Volume | FT -AutoSize

7. Add VHD disks to the VM for the Veeam Global deduplication cache:
We will be setting up Veeam’s WAN Accelerator for Global Deduplication. This uses a folder for global deduplication cache. We’ll add VHD disks to the VM for that cache folder to have sufficient disk space and IOPS for the cache.

Highlight the Azure Veeam VM, click Attach at the bottom, and click Attach empty disk. Enter a name for the disk VHD file, and a size. The maximum size allowed is 1023 GB (as of September 2014). Repeat this process to add as many disks as allowed by your VM size. For example, an A1 VM can have a maximum of 2 disks, A2 max is 4, A3 max is 8, and A4 max is 16 disks.
In the Azure Veeam VM, I created a 2TB disk using Storage Spaces on the VM as shown:

This is setup as a simple disk for maximum disk space and IOPS, but it can be setup as mirrored disks as well.
8. Install Veeam prerequisites:
- In addition to C++ 2010 x64 Redistributable that we installed in step 6 above, install:
- Microsoft® System CLR Types for Microsoft® SQL Server® 2012 (SQLSysClrTypes.msi)
- Microsoft® SQL Server® 2012 Shared Management Objects (SharedManagementObjects.msi)
9. Install Veeam 8 Backup and Replication:
If you’re using a VM smaller than A2 with less than 2 CPU core, you’ll receive a warning during Veeam installation. This is safe to ignore.
Select to install the Veeam Powershell SDK
Accept the default installation location under c:\program files\Veeam\backup and replication
Click “Do not use defaults and configure product manually”

Change location of the Guest Catalog folder and vPower cache folder:

Veeam will automatically install SQL 2012 SP1 express on the VM:

10. Add an endpoint to the VM for TCP port 6180:
While Veeam is installing on the VM, let’s add an endpoint for Veeam Cloud Connect. In the Azure Management Portal, click on the VM, click Endpoints, and click Add at the bottom. Add a Stand Alone Endpoint:

Note that endpoint name follows the NetBIOS naming convention and cannot exceed 15 characters.
11. Veeam initial configuration:
Back in the VM, open Veeam Backup and Replication 8. Under Backup Infrastructure we need to see the Backup Repositories and WAN Accelerators nodes on the left:

However, these will be hidden in the GUI by design since we have not added any Hyper-V or VMWare server. To work around this issue we can run this SQL query to show the needed options in the GUI:
IF NOT EXISTS (SELECT * FROM [dbo].[Options] WHERE id = ’91BF2EB1-51AC-4C75-A472-22610288191D’)
BEGIN
INSERT INTO [dbo].[Options]
([id]
,[name]
,[value])
VALUES
(’91BF2EB1-51AC-4C75-A472-22610288191D’
,’WasViHostEverAdded’
,’True’)
END
ELSE
BEGIN
UPDATE [dbo].[Options] SET
[value] = ‘True’
WHERE
[id] = ’91BF2EB1-51AC-4C75-A472-22610288191D’END
GOIF NOT EXISTS (SELECT * FROM [dbo].[Options] WHERE id = ‘6B5FDC9C-6E1D-4533-B17C-5FECC304589F’)
BEGIN
INSERT INTO [dbo].[Options]
([id]
,[name]
,[value])
VALUES
(‘6B5FDC9C-6E1D-4533-B17C-5FECC304589F’
,’WasAnyHostEverAdded’
,’True’)
END
ELSE
BEGIN
UPDATE [dbo].[Options] SET
[value] = ‘True’
WHERE
[id] = ‘6B5FDC9C-6E1D-4533-B17C-5FECC304589F’
END
GO
Copy this query and in notepad save it as c:\sandbox\Show-UI.sql for example on the Azure Veeam VM. Then run this command:
SQLCMD.EXE -S localhost\VEEAMSQL2012 -d VeeamBackup -i c:\sandbox\Show-UI.sql -o c:\sandbox\Show-UI.log
Thanks to Veeam phenomenal support for the tip. Their quick response was very helpful.
12. Add a Backup Repository:
In Veeam Backup and Replication, click WAN Accelerators, then click Add WAN Accelerator:

Give it a name, select Shared Folder:

This is necessary as opposed to the first option for directly attached storage, because of the way CloudBerry presents the attached Azure blob storage.
Type in the Shared Folder name, enter credentials to access it. To get the share name you can run “net use” command to see its exact path.

Click Next:

Accept vPower NFS defaults, and finish.
13. Add a WAN Accelerator:
In Veeam Backup and Replication, click WAN Accelerators, then click Add WAN Accelerator:

Select the e: drive we created in step 7 above, enter the maximum amount of disk space available, and finish:

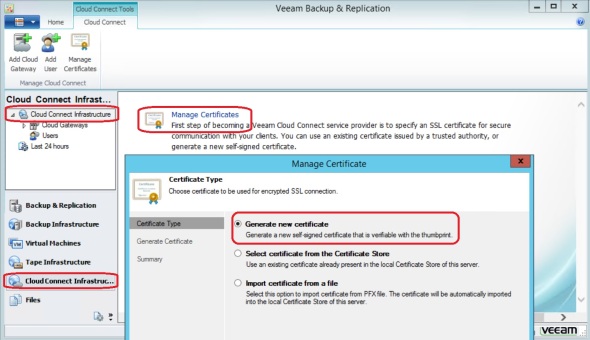
14. Add a certificate:
This is a one time setup. SSL certificate is needed for authentication and tunnel encryption.
Note: This step requires Veeam Cloud Connect license. Without it, the Cloud Connect Infrastructure will be hidden in the Veeam Backup and Replication 8 GUI.

For production I recommend using a certificate from a public Certificate Authority. For this exercise I will generate a self signed certificate. In Cloud Connect Infrastructure, click Manage Certificates:

Click Generate new certificate

Type in a friendly name

Click “Copy to clipboard” and save this information. We will need the thumbprint when connecting from the client/tenant side. This is only needed because we’re using a self signed certificate. If we used a certificate issued by a public Certificate Authority we would not need that thumbprint.
15. Add Cloud Gateway:
This is also a one time step. Under Cloud Connect Infrastructure, click Add Cloud Gateway:

Pick a server,
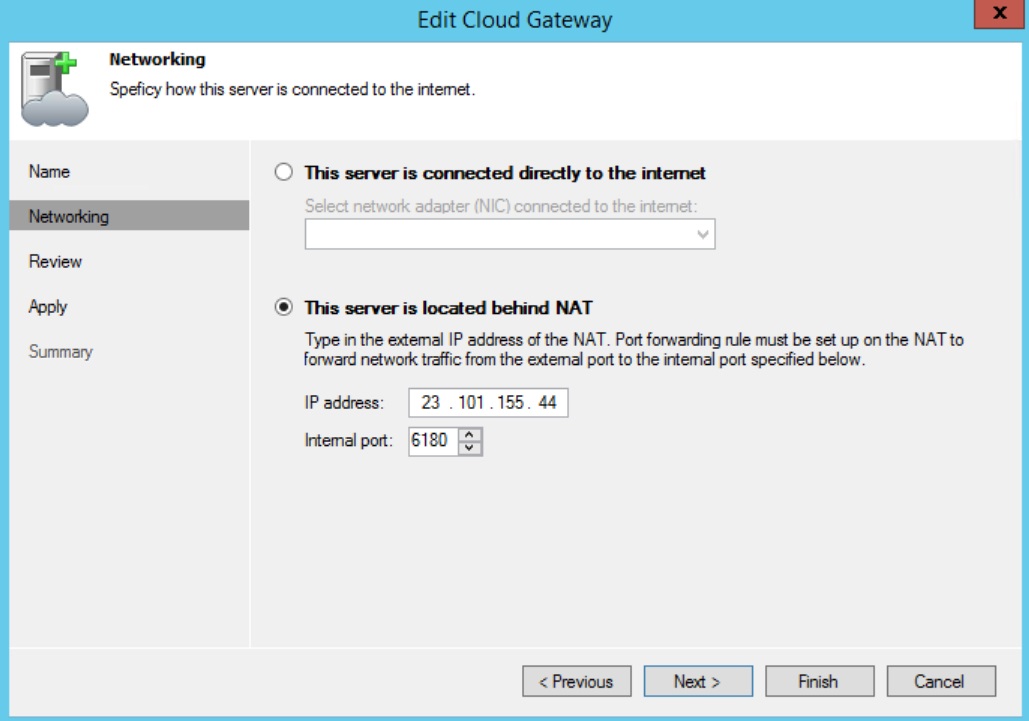
Use the Public IP of the Azure VM and the default port 6180.
Select its NIC,

and Finish.
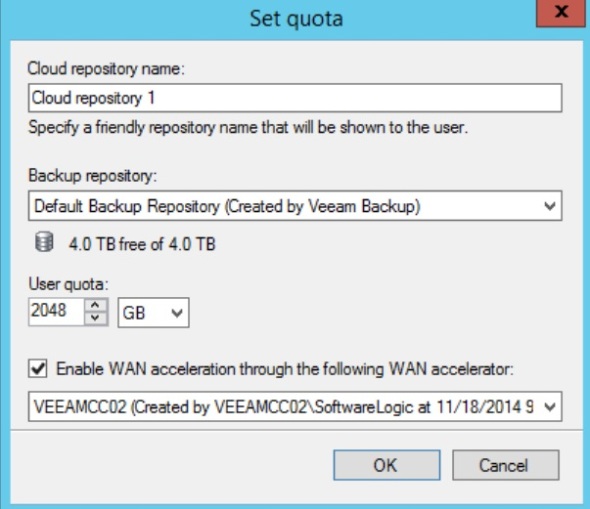
16. Add a user/tenant:
A user may represent a Cloud Connect client/tenant or a corporate site. It is associated with his/her own repository under the main repository, and a lease. The lease corresponds to a backup client/backup cloud provider agreement term.
Under Cloud Connect Infrastructure, click Add User

Enter a name, create a password, check Lease expires, and click Calendar to select a lease expiration date.

In the Resources tab, click Add, create a name for the user/client repository name, select a Backup Repository from the drop down menu, check to Enable WAN acceleration, and pick the WAN accelerator from its drop down menu.
From the client/corporate side, in Veeam Backup and Replication 8, under Backup Infrastructure, click the Service Providers node, and click Add a Service Provider:

Enter the IP address or DNS name of the Azure Veeam VM we created above, and click Next:

Since we used a self-signed certificate, we need to provide the thumbprint from step 14 above. Click Verify:

Notice that the certificate has been validated. The certificate will be used for both authentication and tunnel encryption. Click Add and add the user name and password created in step 16 above:

Click Next, and Finish.
Finally, create a new backup copy job using the Cloud Repository as a backup target:

