Configuring Storage Spaces for Azure SQL IaaS
One way to use SQL in Azure is to deploy SQL IaaS by installing SQL on an Azure VM. This post goes over provisioning disk system in Azure optimized for SQL. In this demo we’re using a DS14v2 size VM, but any VM size that supports 16 data disks is OK. To see the VM SKU’s that support 16 or more disks in a given Azure location we can use the PowerShell cmdlet:
Get-AzureRmVMSize -Location 'eastus' |
    where MaxDataDiskCount -GE 16 | sort MaxDataDiskCount
and we’ll see a list like

We deployed a VM using the Microsoft Gallery image of the latest 2016 server version, using an unmanaged OS disk in a storage account configured as:
- Premium
- LRS
- GPv2
- Hot
Attach 16 disks:
Next we provision and attach 16 one TB unmanaged SSD disks (page blobs) using the following PowerShell code:
$VMName = 'myVMName'
$RGName = 'myResourceGroupName'
0..15 | foreach {
    $VM = Get-AzureRmVM -ResourceGroupName $RGName -Name $VMName
    $DataDiskName = "$VMName-DataDisk-$_"
    $OSDiskUri    = $VM.StorageProfile.OsDisk.Vhd.Uri
    $DataDiskUri  = "$($OSDiskUri | Split-Path)\$DataDiskName.vhd".Replace('\','/')
    $ParameterSet = @{
        VM           = $VM
        Name         = $DataDiskName
        Caching      = 'ReadWrite'
        DiskSizeInGB = 1023
        Lun          = $_
        VhdUri       = $DataDiskUri
        CreateOption = 'Empty'
    }
    $VM = Add-AzureRmVMDataDisk @ParameterSet
    Update-AzureRmVM -ResourceGroupName $RGName -VM $VM
}
Create Storage Pool:
Next we RDP to the VM and provision a storage pool. In Server Manager under File and Storage Service/Volumes/Storage Pools we should see the 16 disks under the default ‘Primordial’ pool. We can right click on that and create new pool. The important thing here is to select ‘Manual’ disk allocation for each of the 16 disks. This is important since this is an all-SSD pool. The default setting will cause the system to reserve all 16 disks for Journal and we won’t be able to create any virtual disks.
The same task can be performed via PowerShell as follows:
$PoolName = 'SQLPool'
$ParameterSet = @{
    FriendlyName = $PoolName
    StorageSubSystemFriendlyName = (Get-StorageSubSystem).FriendlyName
    PhysicalDisks = Get-PhysicalDisk –CanPool $True
}
New-StoragePool @ParameterSet
Get-PhysicalDisk -FriendlyName 'Msft Virtual Disk' |
    Set-PhysicalDisk -Usage ManualSelect # otherwise all SSD disks will be reserved for journal
Create Virtual disks and volumes:
Finally we create virtual disks and volumes as follows:

This particular configuration uses 8 out of the 16 TB in the pool leaving 8 TB for future virtual disk growth. A Virtual disk can be expanded in Server Manager, to be followed by volume expansion in Disk Management tool.
The virtual disks in this configuration can survive a single disk failure being in a 2-way mirror. Although this is almost not a practical concern given that the 16 disks are triple redundant (each block of each disk is synchronously written to 3 physical underlying disks)
2 way-mirrored virtual disks also enhance read performance since read operations occur against one of the 2 disks in a mirrored space.
In the data/log/temp virtual disks, the Interleave size has been dropped to 64KB down from the default 256KB since SQL writes are 8-32KB. With 8 columns, this makes the data stripe size (64 * 8) 512KB
Resizing managed VM disks in Azure
Executive summary:
- As of 7 March 2019, Microsoft allows resizing data and OS managed disks up via PowerShell and the Azure Portal
- Microsoft does not allow resizing managed disks down
- Disk resizing requires VM shutdown and restart
Microsoft charges for the entire amount of allocated disk space of managed disks.

Also see the example in this post.
This is a major difference compared to unmanaged disks where Microsoft charges only for used disk space. IT professionals now have to walk a tight rope in terms of disk capacity in Azure. On one hand you need a minimum amount of free disk space on each disk to guard against running out of disk space scenarios, on the other hand you need to keep the overall disk size as small as possible to avoid the high disk cost. Currently Microsoft charges for managed disk capacity as follows (East US, standard LRS)

For example, if we have a VM with 100 GB data disk – 50 GB are used, we’re billed for S10 which is the next size up in the amount of $5.89/month.
As data grows over time, we may need to expand this disk. We can resize a managed data disk using Powershell as follows:
First we declare the needed variables, and authenticate to our Azure subscription:
#Requires -Version 5
#Requires -Modules AzureRM,AZSBTools

# Install-Module AZSBTools

$LoginName           = 'myname@domain.com'
$SubscriptionName    = 'my subscription name'
$Location            = 'EastUS'
$UseCase             = 'TestMD2'

$VMParameterList = @{
    Name                = "$UseCase-VM"
    ResourceGroupName   = "$UseCase-RG"
    Location            = $Location
    VirtualNetworkName  = "$UseCase-Vnet"
    SubnetName          = "$UseCase-Subnet"
    PublicIpAddressName = "$UseCase-PiP"
    OpenPorts           = @(80,3389)
    Credential          = (Get-SBCredential 'myVMAdmin')
    Size                = 'Standard_D1_v2'       # Get-AzureRmVMSize -Location $Location
    DataDiskSizeInGb    = 128
}

Login-AzureRmAccount -Credential (Get-SBCredential $LoginName) | Out-Null # -Environment AzureCloud
Get-AzureRmSubscription -SubscriptionName $SubscriptionName -WA 0 |
    Set-AzureRmContext | Out-Null
Next we provision our test VM:
$Duration = Measure-Command { $VM = New-AzureRmVM @VMParameterList }
Write-Log 'Done in',"$($Duration.Hours):$($Duration.Minutes):$($Duration.Seconds) hh:mm:ss" Green,Cyan
Write-Log ' OS Disk (Managed): size',"$($VM.StorageProfile.OsDisk.DiskSizeGB) GB",'- Underlying storage',$VM.StorageProfile.OsDisk.ManagedDisk.StorageAccountType Green,Cyan,Green,Cyan
$VM.StorageProfile.DataDisks | foreach {
    Write-Log ' Data Disk (Managed): Lun',$_.Lun,'- size',"$($_.DiskSizeGB) GB" Green,Cyan,Green,Cyan
}
and we get output like:

Next we RDP to the test VM and write test data to the data disk:
$IPv4Address = (Get-AzureRmPublicIpAddress -ResourceGroupName $VM.ResourceGroupName -Name "$UseCase-PiP").IpAddress
mstsc /v:$IPv4Address
After login to the VM, we partition and format the data disk:

and write test data to drive f:

Back in Powershell, we resize the data disk. This requires stopping the VM and starting it back up:
$DataDisk = Get-AzureRmDisk -ResourceGroupName $VM.ResourceGroupName -DiskName $VM.StorageProfile.DataDisks[0].Name
Write-Log 'Data disk size:',"$($DataDisk.DiskSizeGB) GB",'stopping VM..' Green,Cyan,Green -NoNew
$VM | Stop-AzureRmVM -Force | Out-Null
do { Start-Sleep -Seconds 10 } while (
    (Get-AzureRmVM -ResourceGroupName $VM.ResourceGroupName -Name $VM.Name -Status).Statuses[1].DisplayStatus -ne 'VM deallocated'
)
Write-Log 'Done' Cyan
Write-Log 'Resizing disk',$VM.StorageProfile.DataDisks[0].Name,'to 250 GB' Green,Cyan,Green -NoNew
New-AzureRmDiskUpdateConfig -DiskSizeGB 250 | Update-AzureRmDisk -ResourceGroupName $VM.ResourceGroupName -DiskName $VM.StorageProfile.DataDisks[0].Name
Write-Log 'Done' Cyan
$DataDisk = Get-AzureRmDisk -ResourceGroupName $VM.ResourceGroupName -DiskName $VM.StorageProfile.DataDisks[0].Name
Write-Log 'New data disk size:',"$($DataDisk.DiskSizeGB) GB" Green,Cyan
Write-Log 'Starting VM',$VM.Name Green,Cyan -NoNew
$VM | Start-AzureRmVM | Out-Null
Write-Log 'Done' Green
mstsc /v:$IPv4Address
and we get output like

Back in the VM we see the new disk size:

We extend the volume to use all provisioned space:

And validate the data.
We cannot however use the same process in reverse to down size a disk.
We can resize the volume down inside the VM:
In Computer Management/Disk Management, we shrink the volume down to 60 GB

Note: To reduce storage cost, shrink the volume to a size that’s just below a billing size. The current billing disk sizes are 32 GB, 64 GB, 128 GB, 256 GB, 512 GB, 1 TB, 2 TB, 4 TB, 8 TB, 16 TB, and 32 TB
Shrinking the disk in Windows:


Back in PowerShell, after shutting down and deallocating the VM, if we try resize the disk down:

We can also resize the OS disk up but not down:

Remove-AzureRMVMBackup function added to AZSBTools PowerShell module
Remove-AzureRMVMBackup function has been added to the AZSBTools PowerShell module to simplify the task of locating and deleting Azure VM backups. The function also disables backup for the provided VM. This function works with both ARM and classic ASM VMs
This is helpful to do before deleting a retired Azure VM.
Remove-AzureRMVMBackup
This function will disable backup of the provided VM. It will also delete existing backups (recovery points – files) of the VM.
Example:
$ParameterList = @{
    LoginName = 'sam@dmain.com'
    SubscriptionName = 'my subscription name'
    VMName = 'Widget3VM'
}
Remove-AzureRMVMBackup @ParameterList

To use the AZSBTools PowerShell module which is available in the PowerShell Gallery, you need PowerShell 5. To view your PowerShell version, in an elevated PowerShell ISE window type
$PSVersionTable

To download and install the latest version of AZSBTools from the PowerShell Gallery and its dependencies, type
Set-PSRepository -Name PSGallery -InstallationPolicy Trusted
To trust the Microsoft PowerShell Gallery repository, then
Install-Module AZSBTools,AZ -Force -AllowClobber
AZSBTools contains functions that depend on AZ modules, and they’re typically installed together.
To load the AZSBTools, and AZ modules type:
Import-Module AZSBTools,AZ -DisableNameChecking
To view a list of cmdlets/functions in AZSBTools, type
Get-Command -Module AZSBTools
To view the built-in help of one of the AZSBTools functions/cmdlets, type
help <function/cmdlet name> -show
such as
help New-SBAZServicePrincipal -show

Unmanaged Azure Disk Snapshot functions added to AZSBTools PowerShell module to View, Add, Delete
3 new functions have been added to the AZSBTools PowerShell module to view, add, and delete snapshots of unmanaged Azure disks
The AzureRM.Compute PowerShell module (v 5.9.1 as of 1 Jan 2019) provides the Get-AzureRmSnapshot, New-AzureRmSnapshot, and Remove-AzureRmSnapshot cmdlets to handle disk snapshots of managed disks. Although the same snapshot capabilities are available for unmanaged disks, there are no PS cmdlets to provide similar functionality for unmanaged disk snapshots.
Managed versus unmanaged disks
Managed Disks handle the storage account creation/management to avoid hitting the 20k IOPS standard storage account limit for example (no more than 40 standard disks in the same Storage Account @ 500 IOPS each). This is a pretty nice feature but it comes at a steep price. Consider Standard LRS USEast region pricing for example. A 1 TB data disk (S30) is $40.96/month

If we use 10 GB of this disk we pay $41/month even if we power off and deallocate the VM. We still pay the $41/month for this 1 TB disk including the 990 GB unused space.
In comparison, the same 1 TB unmanaged disk using the same 500 IOPS with 10 GB of used space costs $0.45/month (10 GB * $0.045 per GB).

This is because we’re billed only for the 10 GB used space not the 1023 GB allocated space, whether the VM is up and running or powered off and deallocated.
In short, managed disks come at the cost of paying for allocated space not used space. Given that used space is often as little as 1% of the allocated space, I highly recommend against using managed disks at this time (1 Jan 2019)
Well, using my own advise I find it hard to use unmanaged disks via PowerShell to perform routine Azure infrastructure management tasks such as:
- Determine the amount of used disk space (separate post on that)
- Manage disk snapshots; list, create, delete (the subject of this post)
- Convert managed to unmanaged disk (separate post on that)
The functions Get-AzureRMUnmanagedDiskSnapshot, New-AzureRMUnmanagedDiskSnapshot, and Remove-AzureRMUnmanagedDiskSnapshot have been added to the AZSBTools module to simplify management of unmanaged disk snapshots via PowerShell. These functions do not affect the VM lease on its disk(s), do not require VM shutdown, and do not interfere with VM operation.
Get-AzureRMUnmanagedDiskSnapshot
This function will list disk snapshots for a given unmanaged disk. This applies to unmanaged ARM disk snapshots only not classic ASM disks or managed ARM disks. This function depends on the AzureRM and Azure PowerShell modules available in the PowerShell Gallery. To install required module: Install-Module AzureRM, Azure
Example:
$ParameterList = @{
    LoginName = 'sam@dmain.com'
    SubscriptionName = 'my subscription name'
    StorageAccountName = 'storfluxwidget3vm'
    ContainerName = 'vhds'
    BlobName = 'Widget3VM-20181226-093810.vhd'
}
Get-AzureRMUnmanagedDiskSnapshot @ParameterList

To list snapshots in a given time frame, we filter on the SnapshotTime property of the output provided by this function. This function returns objects of type Microsoft.WindowsAzure.Storage.Blob.CloudPageBlob for each snapshot found that matches the provided storageaccount/container/blob parameters. The SnapshotTime property is of type DateTimeOffset which cannot be compared directly to DateTime type. To do the required filtering/comparison, we use the [DateTimeOffset].ToLocalTime{() method as in:
Get-AzureRMUnmanagedDiskSnapshot @ParameterList |
    where { [DateTime]$_.SnapshotTime.ToLocalTime().ToString() -GE [DateTime]'2019-01-02 8:45' }
This will list snapshots taken at or after 2 Jan 2019 8:45 (am local time)
New-AzureRMUnmanagedDiskSnapshot
This function will create new disk snapshot for a given unmanaged disk.
Example:
$ParameterList = @{
    LoginName = 'sam@dmain.com'
    SubscriptionName = 'my subscription name'
    StorageAccountName = 'storfluxwidget3vm'
    ContainerName = 'vhds'
    BlobName = 'Widget3VM-20181226-093810.vhd'
}
New-AzureRMUnmanagedDiskSnapshot @ParameterList

Remove-AzureRMUnmanagedDiskSnapshot
This function will remove one or more disk snapshots for a given unmanaged disk. In addition to the 5 parameters LoginName, SubscriptionName, StorageAccountName, ContainerName, and BlobName that this group of functions take, this function also takes 2 additional parameters; FromDate and ToDate. These 2 parameters allow us to delete snapshots taken duing a given time frame.
Example:
$ParameterList = @{
    LoginName = 'sam@dmain.com'
    SubscriptionName = 'my subscription name'
    StorageAccountName = 'storfluxwidget3vm'
    ContainerName = 'vhds'
    BlobName = 'Widget3VM-20181226-093810.vhd'
}
Remove-AzureRMUnmanagedDiskSnapshot @ParameterList
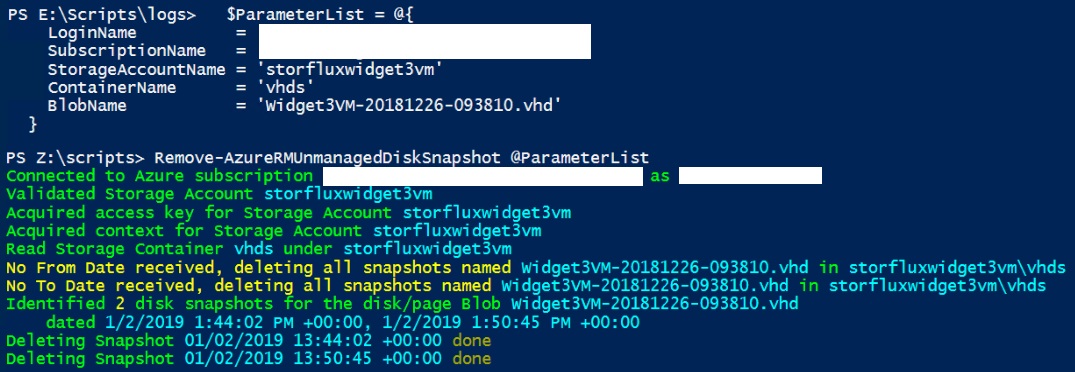
This deletes all disk snapshots for the provided unmanaged disk in the provided StorageAccount/Container
To use the AZSBTools PowerShell module which is available in the PowerShell Gallery, you need PowerShell 5. To view your PowerShell version, in an elevated PowerShell ISE window type
$PSVersionTable
To download and install the latest version of AZSBTools from the PowerShell Gallery and its dependencies, type
Set-PSRepository -Name PSGallery -InstallationPolicy Trusted
To trust the Microsoft PowerShell Gallery repository, then
Install-Module AZSBTools,AzureRM -Force -AllowClobber
AZSBTools contains functions that depend on AzureRM modules, and they’re typically installed together.
To load the AZSBTools, and AzureRM modules type:
Import-Module AZSBTools,AzureRM -DisableNameChecking
To view a list of cmdlets/functions in AZSBTools, type
Get-Command -Module AZSBTools
To view the built-in help of one of the AZSBTools functions/cmdlets, type
help <function/cmdlet name> -show
such as
help New-SBAZServicePrincipal -show
Azure storage – features and pricing – June 2018
In the ever evolving Azure storage list of offerings, it may be hard to fully realize the available Azure storage offerings and their general cost structure at a given point in time. This post lays out a general summary of Azure storage offerings and costs, from the prospective of a consultant trying to make a recommendation to a large client as what storage type/options to use for which workload and why.
Storage account type
Classic storage
- This is of type ‘Microsoft.ClassicStorage/storageAccounts’
- This is considered legacy and should be migrated to GPv1 which provides backward compatibility to Azure classic (ASM) services
General purpose v1 (GPv1)
- This is of type ‘Microsoft.Storage/storageAccounts’, kind ‘Storage’
- Does not support Cool and Archive access tier attributes
- Lower read/write transaction cost compared to GPv2
- Can be used with Azure classic (ASM) services
General purpose v2 (GPv2)
- This is of type ‘Microsoft.Storage/storageAccounts’, kind ‘StorageV2’
- Supports Cool and Archive access tier attributes
- Access Tier attribute (Hot/Cool) is exposed at the account level
- Cannot be used with Azure classic (ASM) services
- Compared to Blob Storage account: GPv2 charge for Cool early deletion but not Cool data writes (per GB)
Blob storage
- This is of type ‘Microsoft.Storage/storageAccounts’, kind ‘BlobStorage’
- This is a sub-type of GPv2 that supports only Block Blobs – not Page Blobs, Azure files, …
- Minor pricing difference: charge for Cool data writes (per GB) but not Cool early deletion
- Features similar to GPv2:
- Supports Cool and Archive access tier attributes
- Access Tier attribute (Hot/Cool) is exposed at the account level
- Cannot be used with Azure classic (ASM) services
GPv1 and Blob Block accounts can be upgraded to a GPv2 account. This change cannot be reversed.
Set-AzureRmStorageAccount -ResourceGroupName <resource-group> -AccountName <storage-account> -UpgradeToStorageV2
Data Access Tiers
Data Access Tiers are Hot, Cool, and Archive. They represent 3 different physical storage platforms.
For the purpose of simplification, I will refer to LRS pricing in US East Azure region in US dollars for the next 450TB/month.
- Data Access Tiers are supported in GPv2 accounts only (and the Block Blob storage sub-type) not GPv1
- A blob cannot be read directly from the Archive tier. To read a blob in Archive, it must first be moved to Hot or Cool.
- Data in Cool tier is subject to minimum stay period of 30 days. So, moving 1 TB of data to Cool tier for example, obligates the client to paying for that storage for 30 days at a minimum even if the data is moved or deleted before the end of the 30 days. This is implemented via the ‘Early deletion charge’ which is prorated.
- Data in Archive tier is subject to minimum stay period of 180 days.
Hot
- This is the regular standard tier where data can be routinely read and written
- Storage cost is 2 cents per GB per month
- Lowest read and write IO charges (5 cents per 10k write, 0.4 cents per 10k read)
- No data retrieval charge (This is the cost to copy data to Hot tier from another tier before it can be read – already in Hot tier)
Cool
- 25% cheaper storage cost down to 1.5 cents per GB per month
- More costly read and write IO charges (10 cents per 10k write = 200% Hot, 1 cent per 10k read = 250% Hot)
- 1 cent per GB data retrieval charge (this is the cost to copy the data to Hot tier, which is a required interim step to read data that resides in Cool tier)
Archive
- 90% cheaper storage cost down to 0.2 cents per GB per month
- Most costly read and write IO charges (10 cents per 10k write = 200% Hot, 5 dollars per 10k read = 125,000% Hot)
- 2 cent per GB data retrieval charge (this is the cost to copy the data to Hot tier, which is a required interim step to read data that resides in Archive tier)
- The archive tier can only be applied at the blob level, not at the storage account level
- Blobs in the archive storage tier have several hours of latency (Is this tier using tape not disk!?)
Geo-replication
Geo-replication refers to automatically keeping a copy of a given Storage Account data in another Azure region that’s 400 miles or more away from the primary site. The primary Azure site is the Azure region where the Storage account resides and where the usual read/write transactions occur. The choice of a secondary site is a constant determined by Microsoft and is available if the client chooses the geo-replication feature of a Storage Account. The following is the list of the Azure region pairs as of 18 June 2018

Data in the secondary Azure region cannot be accessed. It is only used under the following conditions:
- Microsoft declares a region-wide outage. For example East US. This is a Microsoft triggered – not client triggered event
- Microsoft will first try to restore the service in that region. During that time data is not accessible for read or write. It’s unclear how long will Microsoft pursue this effort before moving to geo-failover.
- Microsoft initiates geo-failover from the primary to secondary region. That’s all data of all tenants in the primary region.
- This is essentially a DNS change to re-point the storage end points’ fully qualified domain names to the secondary region
- The RPO (Recovery Point Objective) is 15 minutes. That’s to say up to 15 minutes worth of data may be lost.
- The RTO (Recovery Time Objective) is unclear. That’s the time between primary site outage to data availability for read and write on the secondary site
- At the end of the geo-failover, read/write access is restored (for geo-replicated storage accounts only of course)
- At a later time, Microsoft will perform a geo-failback which is the same process in the reverse direction
- This is a process that never happened before. No Azure data center ever sustained a complete loss.
- It’s unclear when failback will be triggered, whether it will include down-time, or another 15 minute data loss.
A storage account can be configured in one of several choices with respect to geo-replication:
LRS (Locally redundant storage)
When a write request is sent to Azure Storage Account, the transaction is fully replicated on three different physical disks across three fault domains and upgrade domains inside the primary location, then success is returned back to the client.
GRS (Geo-redundant storage)
In addition to triple synchronous local writes, GRS adds triple asynchronous remote writes of each data block. Data is asynchronously replicated to the secondary Azure site within 15 minutes.
ZRS (Zone-redundant storage)
ZRS is similar to LRS but it provides slightly more durability than LRS (12 9’s instead of 11 9’s for LRS over a given year).
It’s ony available to GPv2 accounts.
RA-GRS (Read access geo-redundant storage)
RA-GRS is similar to GRS but it provides read access to the data in the secondary Azure site.
Benchmarking Azure VM storage
Azure Standard tier virtual machines come with an optional number of persistent page blob disks, up to 1 terabyte each. These disks are expected to deliver 500 IOPS or 60 MB/s throughput each. 
Let’s see if we can make that happen.
I started by creating a new Standard Storage account. This is to make sure I’m not hitting the limitation of 20k IOPS/Standard Storage account during testing.
I created a new Standard A3 VM.

From my on-premises management machine, I used Powershell to create and attach 8x 1TB disks to the VM. To get started with Powershell for Azure see this post.
# Input
$SubscriptionName = '###Removed###'
$StorageAccount = 'testdisks1storageaccount'
$VMName = 'testdisks1vm'
$ServiceName = 'testdisks1cloudservice'
$PwdFile = ".\$VMName-###Removed###.txt"
$AdminName = '###Removed###'
# Initialize
Set-AzureSubscription -SubscriptionName $SubscriptionName -CurrentStorageAccount $StorageAccount
$objVM = Get-AzureVM -Name $VMName -ServiceName $ServiceName
$VMFQDN = (Get-AzureWinRMUri -ServiceName $ServiceName).Host
$Port = (Get-AzureWinRMUri -ServiceName $ServiceName).Port
# Create and attach 8x 1TB disks
0..7 | % { $_
  $objVM | Add-AzureDataDisk -CreateNew -DiskSizeInGB 1023 -DiskLabel "Disk$_" -LUN $_ | Update-AzureVM
}
Next I used Powershell remoting to create a Storage Space optimized for 1 MB writes. The intend is to use the VM with Veeam Cloud Connect. This particular workloads uses 1 MB write operations.
This code block connects to the Azure VM:
# Remote to the VM
# Get certificate for Powershell remoting to the Azure VM if not installed already
Write-Verbose "Adding certificate 'CN=$VMFQDN' to 'LocalMachine\Root' certificate store.."
$Thumbprint = (Get-AzureVM -ServiceName $ServiceName -Name $VMName |
  select -ExpandProperty VM).DefaultWinRMCertificateThumbprint
$Temp = [IO.Path]::GetTempFileName()
(Get-AzureCertificate -ServiceName $ServiceName -Thumbprint $Thumbprint -ThumbprintAlgorithm sha1).Data | Out-File $Temp
$Cert = New-Object System.Security.Cryptography.X509Certificates.X509Certificate2 $Temp
$store = New-Object System.Security.Cryptography.X509Certificates.X509Store "Root","LocalMachine"
$store.Open([System.Security.Cryptography.X509Certificates.OpenFlags]::ReadWrite)
$store.Add($Cert)
$store.Close()
Remove-Item $Temp -Force -Confirm:$false
# Attempt to open Powershell session to Azure VM
Write-Verbose "Opening PS session with computer '$VMName'.."
if (-not (Test-Path -Path $PwdFile)) {
  Write-Verbose "Pwd file '$PwdFile' not found, prompting to pwd.."
  Read-Host "Enter the pwd for '$AdminName' on '$VMFQDN'" -AsSecureString |
    ConvertFrom-SecureString | Out-File $PwdFile
}
$Pwd = Get-Content $PwdFile | ConvertTo-SecureString
$Cred = New-Object -TypeName System.Management.Automation.PSCredential -ArgumentList $AdminName, $Pwd
$Session = New-PSSession -ComputerName $VMFQDN -Port $Port -UseSSL -Credential $Cred -ErrorAction Stop
Now I have an open PS session with the Azure VM and can execute commands and get output back.
Next I check/verify available disks on the VM:
$ScriptBlock = { Get-PhysicalDisk -CanPool $True }
$Result = Invoke-Command -Session $Session -ScriptBlock $ScriptBlock
$Result | sort friendlyname | FT -a
Then I create an 8-column simple storage space optimized for 1 MB stripe size:
$ScriptBlock = {
  $PoolName = "VeeamPool3"
  $vDiskName = "VeeamVDisk3"
  $VolumeLabel = "VeeamRepo3"
  New-StoragePool -FriendlyName $PoolName -StorageSubsystemFriendlyName “Storage Spaces*” -PhysicalDisks (Get-PhysicalDisk -CanPool $True) |
    New-VirtualDisk -FriendlyName $vDiskName -UseMaximumSize -ProvisioningType Fixed -ResiliencySettingName Simple -NumberOfColumns 16 -Interleave 64KB |
      Initialize-Disk -PassThru -PartitionStyle GPT |
        New-Partition -AssignDriveLetter -UseMaximumSize |
          Format-Volume -FileSystem NTFS -NewFileSystemLabel $VolumeLabel -AllocationUnitSize 64KB -Confirm:$false
  Get-VirtualDisk | select FriendlyName,Interleave,LogicalSectorSize,NumberOfColumns,PhysicalSectorSize,ProvisioningType,ResiliencySettingName,Size,WriteCacheSize
}
$Result = Invoke-Command -Session $Session -ScriptBlock $ScriptBlock
$Result | FT -a
Next I RDP to the VM, and run IOMeter using the following settings:
- All 4 workers (CPU cores)
- Maximum Disk Size 1,024,000 sectors (512 MB test file)
- # of Outstanding IOs: 20 per target. This is make sure the target disk is getting plenty of requests during the test
- Access specification: 64KB, 50% read, 50% write
I’m expecting to see 4K IOPS and 320 MB/s throughput. (8 disks x 500 IOPS or 60 MB/s each). But this is what I get:

I got about 1.3 K IOPS instead of 4K, and about 90 MB/s throughput instead of 480 MB/s.
This VM and storage account are in East US 2 region.
This is consistent with other people’s findings like this post.
I also tested using the same 8 disks as a striped disk in Windows. I removed the volume, vDisk, Storage Space, then provisioned a traditional RAID 0 striped disk in this Windows Server 2012 R2 VM. Results were slightly better:

This is still far off the expected 4k IOPS or 480 MB/s I should be seeing here.
I upgraded the VM to Standard A4 tier, and repeated the same tests:

Standard A4 VM can have a maximum of 16x 1TB persistent page blob disks. I used powershell to provision and attach 16 disks. Then create a storage space with 16 columns optimized for 1 MB stripe:

Then I benchmarked storage performance on drive e: using same exact IOMeter settings as above:

Results are proportionate to the Standard A3 VM test, but they still fall far short.
I’m seeing 2.7 K IOPS instead of the expected 8K IOPS, and about 175 MB/s throughput instead of the expected 960 MB/s
The IOmeter ‘Maximum I/O response Time’ is extremely high (26+ seconds). This has been a consistent finding in all Azure VM testing. This leads me to suspect that the disk requests are being throttled (possibly by the hypervisor).
Azure Premium Storage
In December 2014, Microsoft announced the Public Preview Availability release of Azure Premium Storage. Here are the features of Azure Premium Storage (as of January 2015):
Limited Public Preview:
This means you have to sign up for it, and wait to get approved before you can use it. 
We also must use the new Azure Portal to manage it. It’s available in West US, East US 2, and West Europe only.
Premium Storage account
This is required for Azure Premium Storage. It has a 32 TB capacity limit, 50K IOPS limit, and can contain Page blobs only.

On the other hand a Standard Storage account has a 500 TB capacity limit, 20k IOPS limit, and can contain both page blobs and block blobs.
Durable/Persistent:
This means it’s available to the Azure VM as it live-migrates from one Hyper-V host to another.
This is unlike the A-Series Azure VM drive ‘d’ which is SAS local temporary storage on the Hyper-V host. It provides a ‘scratch volume’ where we can take advantage of IO operations but data can be lost as the VM is live-migrated from one host to another during planned Azure maintenance or unplanned host failure. The D-Series and DS-Series Azure VMs have SSD local temporary storage drive ‘d’.
SSD:
Solid State Disk based, as opposed to Azure Standard Storage which is SAS spinning hard disk based.
Available to DS series VMs only:
So, we can provision Premium Storage as Page blobs (not block blobs), with the current limitations (maximum size per file is 1,023 GB, must be VHD format not VHDX). Each page blob is a VHD disk file that can be attached to an Azure VM.
Maximum 32 disks per VM:
We can attach up to 32 of these data disks to a single DS-Series VM. For example, using the following Powershell cmdlet:
Get-AzureRoleSize | where { $_.MaxDataDiskCount -gt 15 } |
Select RoleSizeLabel,Cores,MemoryInMB,MaxDataDiskCount | Out-GridView

Redundancy:
Locally Redundant. 3 copies of each block are maintained synchronously in the same Azure facility.
Size, Performance:

- IO/s are calculated based on 256KB block size.
- Throughput limits include both read and write operations. So, for a P10 it’s 100MB/s for both read and write operations combined, not each of read and write operations
- Exceeding disk type maximum IO/s or Throughput will result in throttling, where the VM will appear to freeze.
- Less than 1 ms latency for read operations
- Read-caching is set by default on each disk but can be changed to None or Read-Write using Powershell.
Cost:
The only VM size that allows 32 TB of data disk space is the Standard_D14, which currently costs $,1765/month

Each 1TB Premium Storage disk costs $74/month

This adds up to almost $50k/year for a single VM

That would be a VM with
- 16 CPU cores
- 112 GB RAM
- 32 TB LRS SSD data disk with 6.25 TB/s throughput (160k IOPS)
- 127 GB system/boot disk
- 800 GB SSD local (non-persistent) temporary storage
To put that in perspective relative to the cost of other Azure storage options:

Block Blobs cannot be attached to VMs as disks of course, only Page Blobs can. Also, the D14 size VM is the only one that can have 32 disks currently.
The local SSD temporary non-persistent storage on the D14 VM provides 768 MB/s read throughput

or 384 MB/s write throughput

Creating new Azure Storage Account using Powershell
To get started with Azure Powershell see this post.
In Powershell ISE run these cmdlets:
$Params = @{
    StorageAccountName = "swa2east"
    Location = "East Us"
    Type = "Standard_LRS"
}
if (Test-AzureName -Storage -Name $StorageAccountName) {
    "Storage account name '$StorageAccountName' is already taken, try another one"
} else {
    New-AzureStorageAccount @Params
}
Azure Storage Account can have up to 500 TB of data, and we can have up to 100 Storage Accounts per Subscription (December 2014). Most importantly in my opinion is that Azure Storage Account has 20k IOPS limit. This is a lot, but must be considered when planning Azure deployments. At 500 IOPS per disk, this means we should keep a maximum of 40 disks in any given Storage Account. We should also keep other storage such as block blob storage in separate Storage Account.
Storage Account needs:
Name:
Must be globally unique, 3-24 characters, lowercase letters & numbers only
Location (as of December 2014): (Get-AzureLocation).Name
West Europe
North Europe
East US 2
Central US
South Central US
West US
East US
Southeast Asia
East Asia
Japan West
Type:
Standard_LRS
Standard_ZRS
Standard_GRS
Standard_RAGRS
For more information on Azure Storage Accounts see this link.
Veeam Cloud Connect on Azure – take 2
2 Months ago in early September 2014, I tested setting up Veeam Cloud Connect on Azure. That was with Veeam version 8 beta 2. Now that Veeam version 8 general availability was November 6th, 2014, I’m revisiting some of the testing with Veeam v8. I’ve also been testing the same with a number of cloud providers who have their own infrastructure. This is helpful to compare performance, identify bottlenecks, and possible issues that may increase or reduce costs.
Summary of steps:
In Azure Management Portal:
- Create a Cloud Service
- Create a Storage Account
- Create a VM: standard A2 with Windows 2012 R2 DC as the OS. Standard A2 is an Azure VM size that comes with 2 (hyperthreaded) processor cores, 3.5 GB of RAM, and up to 4x 1TB page blob disks @ 500 IOPS each. Prior testing with several providers have shown that cloud connect best features such as WAN accelerator need CPU and IOPS resources at the cloud connect provider end.
- Added an endpoint for TCP 6180

- Attached 4x disks to the VM, using max space possible of 1023 GB and RW cache


On the VM:
- I RDP’d to the VM at the port specified under Endpoints/Remote Desktop
- I ran this small script to create a storage space out of the 4x 1TB disks available:
# Script to create simple disk using all available disks
# This is tailored to use 4 physical disks as a simple space
# Sam Boutros – 11/18/2014 – v1.0
$PoolName = "VeeamRepo1"
$vDiskName = "VeeamvDisk1"
$VolumeLabel = "VeeamRepo1"
New-StoragePool -FriendlyName $PoolName -StorageSubsystemFriendlyName “Storage Spaces*” -PhysicalDisks (Get-PhysicalDisk -CanPool $True) |
New-VirtualDisk -FriendlyName $vDiskName -UseMaximumSize -ProvisioningType Fixed -ResiliencySettingName Simple -NumberOfColumns 4 -Interleave 256KB |
Initialize-Disk -PassThru -PartitionStyle GPT |
New-Partition -AssignDriveLetter -UseMaximumSize |
Format-Volume -FileSystem NTFS -NewFileSystemLabel $VolumeLabel -AllocationUnitSize 64KB -Confirm:$false
The GUI tools verified successful completion:

 This storage space was created to provide best possible performance for Veeam Cloud Connect:
- Fixed provisioning used instead of thin which is slightly faster
- Simple resiliency – no mirroring or parity, provides best performance. Fault Tolerance will be subject of future designs/tests
- Number of Columns and Interleave size: Interleave * Number Of Columns ==> the size of one stripe. The settings selected make the stripe size 1MB. This will help align the stripe size to the Block size used by Veeam.
- Allocation Unit 64KB for better performance
- Installed Veeam 8.0.0.817 Backup and Replication, using the default settings which installed SQL 2012 Express SP1, except that I changed default install location to drive f:\ which is the drive created above
- I ran the SQL script to show the GUI interface as in the prior post (under 11. Initial Veeam Configuration)
- The default backup Repository was already under f:

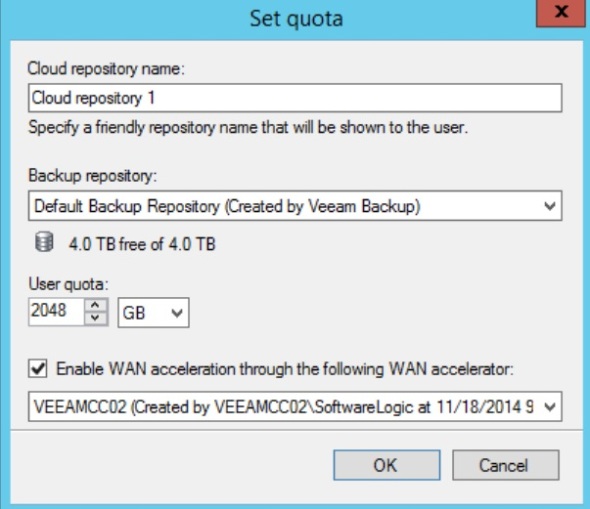
- Created a WAN Accelerator – cache size 400GB on drive f: created above
- Installed the additional Cloud Connect License
- Added a self-signed certificate similar to step 14 in the prior post.
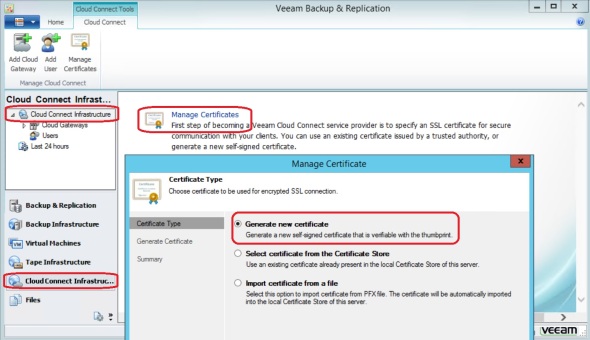
- Added a Cloud Gateway


- Added a user/tenant


That’s it. Done setting up Veeam Cloud Connect on the provider side.
Options for using a Veeam Backup Repository on an Azure Virtual Machine
January 2015 update:
In December 2014, Microsoft announced the Public Preview Availability release of Azure Premium Storage. See this post for details on Azure Premium Storage features. What does that mean in terms of using Azure for a Veeam Backup Repository, or for Veeam Cloud Connect?
- Maximum disk capacity per VM remains a bottleneck at 32 TB.
- Only D14 VM size at this time can have 32x 1TB Page Blob disks. It comes with 16 cores, 112 GB RAM, 127 GB SAS system disk, 800 GB SSD non-persistent temporary drive ‘d’ that delivers 768 MB/s read or 384 MB/s write throughput. Base price for this VM is $1,765/month
- If using 32 Standard (spinning SAS) disks, set as a 16-column single simple storage space for maximum space and performance, we get a 32 TB data disk that delivers 960 MB/s throughput or 8k IOPS (256 KB block size).
- 32x 1TB GRS Standard (HDD) Page Blobs cost $2,621/month
- 32x 1TB LRS Standard (HDD) Page Blobs cost $1,638/month
- If using 32 Premium (SSD) disks, set as a 16-column single simple storage space for maximum space and performance, we get a 32 TB data disk that delivers 3,200 MB/s throughput or 80k IOPS (256KB block size). Premium SSD storage is available as LRS only. The cost for 32x 1TB disks is 2,379/month
- If using a D14 size VM with Cloud Connect, setting up the Veeam Backup and Replication 8, WAN Accelerator, and CC Gateway on the same VM:
- 16 CPU cores provide plenty adequate processing for the WAN Accelerator which is by far the one component here that uses most CPU cycles. It’s also plenty good for SQL 2012 Express used by Veeam 8 on the same VM.
- 112 GB RAM is an overkill here in my opinion. 32 GB should be plenty.
- 800 GB SSD non-persistent temporary storage is perfect for the WAN Accelerator global cache. WAN Accelerator global cache disk must be very fast. The only problem is that it’s non-persistent, but this can be overcome by automation/scripting to maintain a copy of the WAN Accelerator folder on the ‘e’ drive 32 TB data disk or even on an Azure SMB2 share.
- In my opinion, cost benefit analysis of Premium SSD Storage for the 32-TB data disk versus using Standard SAS Storage shows that Standard storage is still the way to go for Veeam Cloud Connect on Azure. It’s $740/month cheaper (31% less) and delivers 960 MB/s throughput or 8k IOPS at 256KB block size which is plenty good for Veeam.

10/20/2014 update:
Microsoft announced a new “Azure Premium Storage”. Main features:
- SSD-based storage (persistent disks)
- Up to 32 TB of storage per VM – This is what’s relevant here. I wonder why not extend that capability to ALL Azure VMs??
- 50,000 IOPS per VM at less than 1 ms latency for read operations
- Not in Azure Preview features as of 10/21/2014. No preview or release date yet.
High level Summary:
Options for using Veeam Backup Repository on an Azure Virtual Machine include:
- Use Standard A4 VM with 16TB disk and about 300 Mbps throughput (VM costs about $6.5k/year)
- Use a small Basic A2 VM with several Azure Files SMB shares. Each is 5 TB, with 1 TB max file size, and 300 Mbps throughput.
Not an option:
- Use CloudBerry Drive to make Azure Block Blob storage available as a drive letter. This was a promising option, but testing showed it fails with files 400 GB and larger. It also has a caching feature that makes it not adequate for this use case.
An Azure subscription can have up to 50 Storage Accounts (as of September 2014), (100 Storage accounts as of January 2015) at 500TB capacity each. Block Blob storage is very cheap. For example, the Azure price calculator shows that 100TB of LRS (Locally Redundant Storage) will cost a little over $28k/year. LRS maintains 3 copies of the data in a single Azure data center.

However, taking advantage of that vast cheap reliable block blob storage is a bit tricky.
Veeam accepts the following types of storage when adding a new Backup Repository:
I have examined the following scenarios of setting up Veeam Backup Repositories on an Azure VM:
1. Locally attached VHD files:
In this scenario, I attached the maximum number of 2 VHD disks to a Basic A1 Azure VM, and set them up as a Simple volume for maximum space and IOPS. This provides a 2TB volume and 600IOPS according to Virtual Machine and Cloud Service Sizes for Azure. Using 64 KB block size:

This short script shows block size (allocation unit) for drive e: used:
$DriveLetter = "e:"
$BlockSize = (Get-WmiObject -Query "SELECT BlockSize FROM Win32_Volume WHERE DriveLetter='$DriveLetter'").BlockSize/1KB
Write-Host "Allocation unit size on Drive $DriveLetter is $BlockSize KB" -ForegroundColor Green
This should come to 4.7 MB/s (37.5 Mbps) using the formula
IOPS = BytesPerSec / TransferSizeInBytes
But actual throughtput was about 2.5 MB/s (20 Mbps) as shown on the VM:

and in the Azure Management Portal:

Based on these results, I expect a Standard A4 Azure VM when configured with 16TB simple (striped) disk, with max 8k IOPS will actually deliver about 35 MB/s or 300 Mbps.

2. Using Azure Files:
Azure Files is a new Azure feature that provides SMB v2 shares to Azure VMs with 5TB maximum per share and 1TB maximum per file.
Testing showed that throughput upwards of 100 Mbps. Microsoft suggests that Azure Files throughput is up to 60 MB/s per share.

Although this option provides adequate bandwidth, its main problem is that it has maximum 1 TB file size which means maximum backup job is not to exceed 1 TB which is quite limiting in large environments.
Azure Blob Storage Scalability
The following is the current (September 2014) hierarchy of Azure Services with a focus on Azure Blob Storage:
- Azure Enterprise Portal. This can be accessed via https://ea.windowsazure.com. This is available only to those with an Enterprise Agreement.
- Azure Account. This can be accessed from the Account Portal via https://account.windowsazure.com
 This is where you can see your subscriptions, billing information, view and sign up for Preview features, and download usage reports.
- Within a subscription, we can setup Storage Accounts. We can do so on the Management Portal https://manage.windowsazure.com

This a summary of Azure portals:

- You can have up to
50100 (as of 12/2014) Storage accounts in an Azure Subscription. A storage account has a maximum capacity of 500TB. A Storage Account has the following properties: URL (name), location, replication:

- Pick a name for your storage account in the URL field. It must be lower case letters and numbers.
- Pick a location from the drop down list of Azure data centers. If you’re going to use the files in this Storage Account with an Azure VM, pick a the same location where the VM resides. Location cannot be changed after a storage account is created. Moving files between Storage Accounts will incur costs.
- Pick a replication level. Replication is done automatically by Microsoft among different Azure data centers. Locally redundant replication keeps 3 replicas of your data in a single data center. Geo-redundant replication keeps 6 copies in 2 geographically distant data centers. Zone redundant keeps 6 copies in 2 geographically clode data centers. Replication affects storage costs. Replication can be changed after Storage Account creation.
Within a Storage Account, we can create “Containers”. A Container is a similar to a folder. Within a container we can copy/delete/snapshot files. Files in an Azure Storage account can be copied as either:
- Block Blobs: no file size limit, no snapshot feature
- Page Blobs: a page blob file has a limit of 1TB (1023 GB). It has the benefit of snapshot feature. For example, Azure VM disks as saved as page blobs in Azure Storage.
In summary:

Azure Files feature provides 5TB SMB file shares to Azure Virtual Machines
Microsoft has announced a new “Azure Files” feature in May 2014 that provides SMB file shares to Azure VMs:

This feature provides 5TB file shares, with a maximum 1TB file size. This feature is currently in Preview, and can be accessed by signing up in this page. When you sign up the preview page will show that you’re Active:
 You need to create a new storage account AFTER Azure Files feature has been activated. It won’t be available for existing storage accounts. You can see it as a new service in the Storage Account dashboard:

To use this feature, you need AzureStorageFile Powershell module. Extract it, and run the following Powershell commands:
Get-ChildItem -Path .\* -Force -Recurse | Unblock-File
if ((Get-Module).Name -eq “Azure”) { Remove-Module Azure }
Import-Module .\AzureStorageFile.psd1
To create a new Azure file share, run the following Powershell commands:
$StorageAccountName = “share01”
$StorageAccountKey = “o73/fb5eWZkhH6CaaaaaaaaaaaaaaaHgBtwHMus2wsxApQ==”
$ShareName = “azureshare01” # must be lower case
$AzureStorageContext = New-AzureStorageContext -StorageAccountName $StorageAccountName -StorageAccountKey $StorageAccountKey
New-AzureStorageShare -Name $ShareName -Context $AzureStorageContext
Replace the first 3 lines with a share name of your choice, and your storage account name and its access key. Make sure that the Storage account is provisioned in the same Azure data center where the VM(s) are located.
The share is now ready and can be used by one or more VMs. On a VM run:
$StorageAccountName = “share01”
$StorageAccountKey = “o73/fb5eWZkhH6CkfWIUHbbbbbbbbbbbbbbbbbbbbbbbbbbbbbbbrHgBtwHMus2wsxApQ==”
$ShareName = “azureshare01” # must be lower case
net use * “\\$StorageAccountName.file.core.windows.net\$ShareName /u:$StorageAccountName $StorageAccountKey”
This will map a drive letter to the new Azure share:

One last wrinkle: this drive mapping will be lost when the VM reboots. To persist the drive mapping, use CMDKEY tool as shown in the post.
Azure VM Storage limitation – using Azure blob storage as backup target
One of the frustrating limitations I’ve come across when using Azure Virtual Machines is the limited disk space amount you can have. This limitation is particularly a hurtle when considering Azure storage as a backup target. The maximum amount of disk space you can have on an Azure VM is 16TB. This limitation stems from 3 issues:
- Maximum 1,023 GB per disk. Azure VM disks are stored as Page Blobs in Azure storage accounts. A Page Blob has a maximum of 1TB.
- Maximum 16 disks per VM. This is in spite of the fact that the VM OS may support 256 disks per SCSI controller, such as Server 2012 R2.
- Maximum 2,040 GB per disk. Although this limitation is superseded by the 1TB page blob limitation, it’s worth noting. This limitation stems from the fact that Azure VMs must use VHD disk format which has a maximum of 2TB/disk, in spite of the fact that the VM operating system may support disks as large as 64TB each, such as Server 2012 R2.
Although we can store large files in Azure as Block Blobs, many backup applications require a VM in the cloud to do WAN acceleration, multi-site deduplication, and similar functions.

Another annoying feature is the artificial coupling of VM CPU, memory, and disk space resources in Azure VMs. For example, to have a VM with with the maximum allowed 16TB disk space, one must use one of the 5 large VM sizes:

This is the output from this Powershell command:
Get-AzureRoleSize | where { $_.MaxDataDiskCount -gt 15 } | Select InstanceSize,Cores,MemoryInMB,MaxDataDiskCount | Out-GridView
For example, the Basic A4 VM annual cost is about $5,500 compared to about $700 for a Small A1 VM which is all is needed for backup.
A VM with 16TB disk space can be setup from the Azure web interface or via Powershell. I’ve used this script to create and attach 16 disks to an A4 sized VM:
$SubscriptionName = “Visual Studio Premium with MSDN”
$StorageAccountName = “portalvhds1brcsk975g4fq”
Set-AzureSubscription -SubscriptionName $SubscriptionName -CurrentStorageAccountName $StorageAccountNamefor ($i=0; $i -lt 16; $i++) {
$i
Get-AzureVM -ServiceName “v2012r2-az1” -Name “v2012r2-az1” |
Add-AzureDataDisk -CreateNew -DiskSizeInGB 1023 -DiskLabel “Disk$i” -LUN $i |
Update-AzureVM
}
The output looked like:

Back to the Azure VM, I created a disk pool, 1 vDisk, and 1 volume using all the 16 TB space, formatted with 64KB blocks:

The 16 disks before and after setting them up as a single vDisk using Storage Spaces
There may be changes coming down the pipeline that would allow up to 30TB/VM or more. For example, the StorSimple 1100 virtual appliance, which is an Azure VM associated with a StorSimple series 8000 storage array has a maximum capacity of 30TB.
Using Azure Storage with Powershell – Getting started
- You’ll need an Azure subscription. You can get a free trial here.
- I’m using a Server 2012 R2 machine. First, download and install Microsoft Web Platform Installer

- After installation, type in Azure in the search field, click the search icon, then click Install to see installed modules on top:

- Close the Microsoft Web Platform Installer. To get back to it to add/remove modules you can use the icon:

- Notice the new Azure set of icons added:

- I’ve pinned the Azure Powershell icon to the task bar. Open it by right clicking on it, then right click on Windows Azure Powershell and click Run as administrator

- To connect to your Azure account, type in Add-AzureAccount

- Azure Powershell displays a message similar to:

- Check your subscription(s) using the command: Get-AzureSubscription

- If you have more than one subscription under your Azure account, you may want to switch to a specific subscription. Use this command to switch a given subscription and make it the default subscription: Select-AzureSubscription -SubscriptionName “Visual Studio Premium with MSDN” -Default
Substitute “Visual Studio Premium with MSDN” with SubscriptionName as shown from the Get-AzureSubscription command

If you don’t have a storage account setup under your Azure subscription, you can create one from your Azure portal. Click Storage on the left, then click New at the bottom:

Type in a name for the new account you wish to create – must be lower case letter only. Pick an Azure data center – typically one that’s physically close to your location to get better latency. Pick a subscription. Pick a replication setting. Locally-redundant give you 3 copies of your data in the data center you selected. Geo-redundant gives you 3 additional copies in another Azure data center. Geo-redundant is typically twice the cost of locally-redundant storage account, and is the default option.
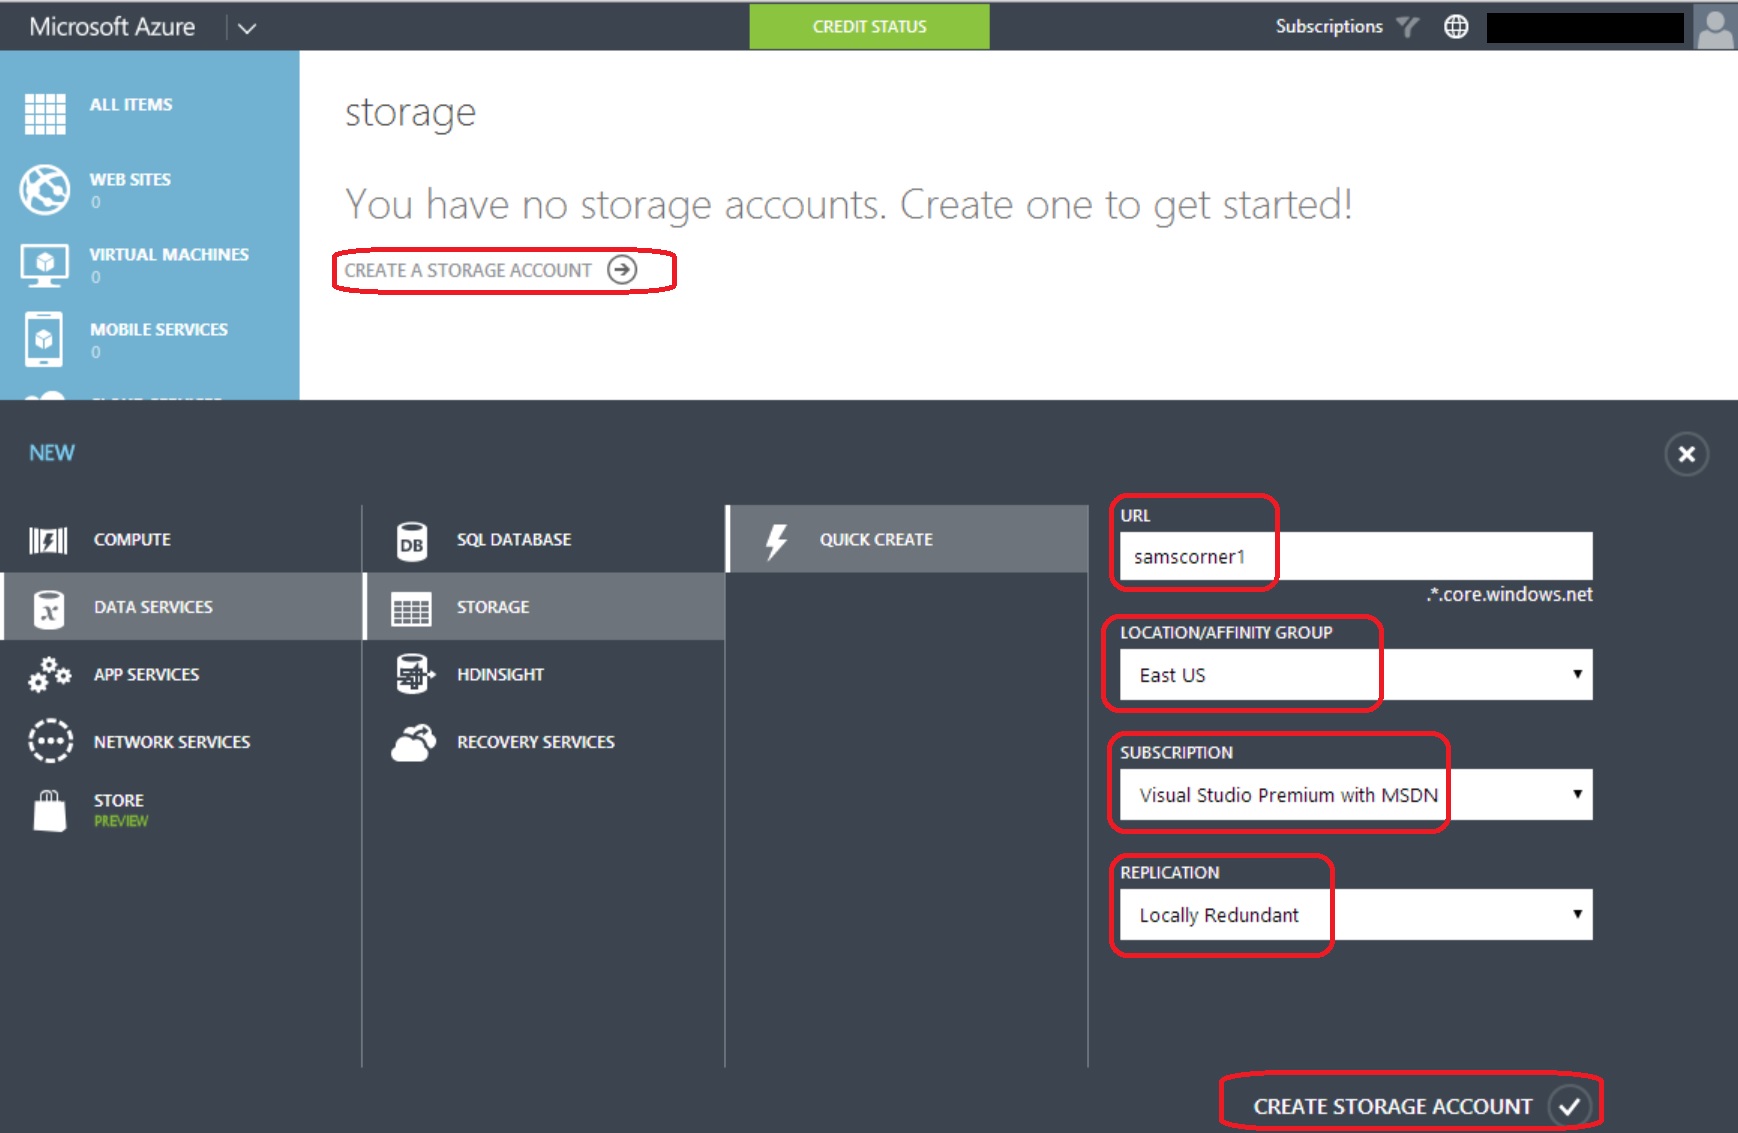
In a minute or 2 Azure will finish creating the storage account. click on the account name:

Next click Dashboard, and click Manage Access Keys at the bottom:

Copy the account name and the primary access key. You will need them to use your storage account via Powershell later.
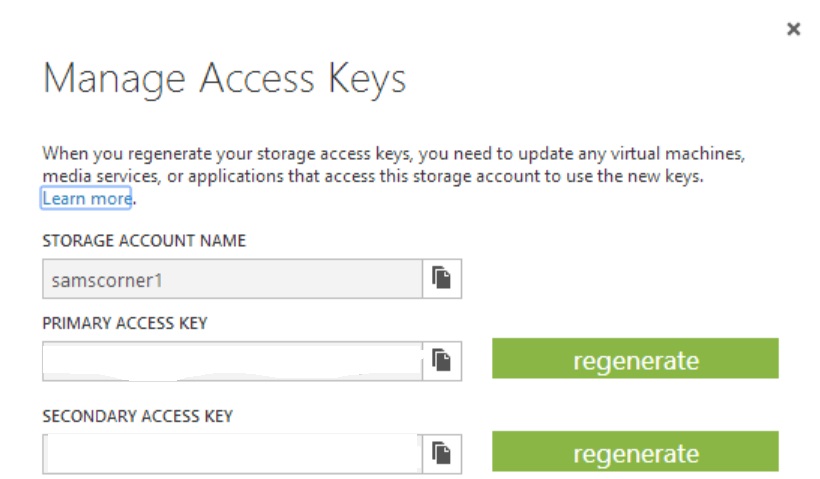
Secure this information because it provides access to your Azure data. Data can be accessed by using either the primary or secondary keys. Each key is 88 characters long and is made up of alphanumeric upper and lower case letters and special characters. The availability of 2 keys allows us to change keys without losing access by applications or machines that use the account. For example in case of key compromise, and you’re using the primary key in an application or machine, you can:
- Regenerate the secondary key
- Replace the key in the script/application/machine using the storage account (no access interruption)
- Regenerate the primary key
Now you have changed your account keys without any service interruption
