Powershell remoting to Windows 2003 from Server 2012 R2 or Windows 8.1
With Windows Server 2003 end of life coming up in July 14, 2015, many organizations are busy trying to migrate from Server 2003 to Server 2012 R2. Some try to do in-place migration to Server 2008 R2 then another in-place migration to server 2012 R2. I don’t think this is good idea. It inherits all the issues from the old 2003 system, and I’m sure there are many. This post goes over Powershell remoting into Windows 2003 servers which is first step in many automation/migration processes.
Install Powershell 2 on Server 2003
Download and install PS2 for Server 2003 x86 or x64 version. This is part of Windows Management Framework (Windows PowerShell 2.0, WinRM 2.0, and BITS 4.0)
Create shortcut to PS2 on Server 2003
%SystemRoot%\system32\WindowsPowerShell\v1.0\powershell.exe

Make sure WinRM and WinMgmt services are running
In the GUI Computer Management under Services and applications/services or using Powershell:
Get-Service -Name Win*

Make sure the following 2 services are running and startup is set to ‘automatic’
- WinMgmt (Windows Management Instrumentation)
- WinRM (Windows Remote Management)
Enable Powershell Remoting on Server 2003
In Powershell run
Enable-PSRemoting -Force -Verbose

That’s it on the Server 2003 side.
Test connectivity
On a Server 2012 R2 or Windows 8.1 workstation with RSAT installed, which is typically running Powershell 4, add the Server 2003 computer to the trusted hosts list if need be. This is often needed if the managing machine and the managed server are not in the same domain:
winrm s winrm/config/client "@{TrustedHosts=""My2003Server""}"
 Finally, use a cmdlet like Enter-PSSession to test connectivity:
Enter-PSSession -ComputerName 192.168.23.10

You can now execute commands on the remote Windows 2003 computer from your Server 2012 R2 or Windows 8.1 management station.
For more information see Secrets of Powershell Remoting ebook by Dave Jones, Tobias Weltner, Dave Wyatt, and Aleksandar Nikolic
Powershell script to monitor and protect Azure VM against Denial of Service attacks
To get started with Azure Powershell see this post.
Public facing web sites are increasingly getting exposed to distributed denial of service attacks. This controller script puts together a couple of tools/scripts that extract IPs from HTTPErr logs based on frequency and set/update Azure VM Endpoint Access Control List. This script is available on the Microsoft Script Center Repository.
The script will:
- Check if the computer running it has Internet access
- Open a PS session to the Azure VM
- Collect a group of web counters
- Download HTTPErr log files if any
- Archive those log files to a local folder on the Azure VM
- Parse the downloaded files, extract IPs, identify those that appear more than $Threshold times
- Retrieve the VM web Endpoint ACL
- Update the VM web Endpoint ACL by adding offending IPs
- Check if a given URL is online
Example:
E:\Install\Scripts\Azure\AZ-MonitorAndRepair.ps1 -SubscriptionName SB01-Subscription -VMName SB01 -AdminName Samb -PwdFile d:\sandbox\Cred.txt -EndPointName HTTP -URL http://mysitehere.com -Verbose
This example runs the script once. This can be used to generate the d:\sandbox\Cred.txt encrypted password file if it does not exist.

In this example, 5 HTTPErr log file were found, archived, downloaded, processed for IPs showing up more than 500 times. The 6th file is the current log file. No IPs were found that showed up more than 500 times, and the ACL was not changed.
If IPs were found that showed up more than 500 times (default $Threshold) in any of the logs, the script will update the VM ACL:

Example:
$RepeatEvery = 300 # seconds
$ScriptPath = 'E:\Install\Scripts\Azure\AZ-MonitorAndRepair.ps1'
$Params = @{
  SubscriptionName = 'SB01-Subscription'
  VMName = 'SB01'
  AdminName = 'Samb'
  PwdFile = 'd:\sandbox\Cred.txt'
  EndPointName = 'HTTP'
  URL = 'http://mysite.com'
  Verbose = $true
}
While ($true) { # Repeat until CTRL-C
  "Start at $(Get-Date)"
  $D = Measure-Command { & $ScriptPath @Params }
  "End at $(Get-Date)"
  " done in $($D.Minutes):$($D.Seconds) mm:ss, waiting for $RepeatEvery seconds"
  Start-Sleep -Seconds $RepeatEvery
}
In this example the script runs every 5 minutes and displays progress on the console screen.

Example:
$R = 300 # seconds
$ScriptPath = 'E:\Install\Scripts\Azure\AZ-MonitorAndRepair.ps1'
$ScriptLog = "D:\Docs\EG\Azure\Mitigate-DDOS_$(Get-Date -format yyyyMMdd).txt"
$Params = @{
 SubscriptionName = 'SB01-Subscription'
 VMName = 'SB01'
 AdminName = 'Samb'
 PwdFile = 'd:\sandbox\Cred.txt'
 EndPointName = 'HTTP'
 URL = 'http://mysite.com'
 Verbose = $true
}
While ($true) { # Repeat until CTRL-C
 "Start at $(Get-Date)" *>> $ScriptLog
 $D = Measure-Command { & $ScriptPath @Params *>> $ScriptLog }
 "End at $(Get-Date)" *>> $ScriptLog
 " done in $($D.Minutes):$($D.Seconds) mm:ss, waiting for $R seconds" *>> $ScriptLog
 Start-Sleep -Seconds $R
}
This is a similar example. The script runs every 5 minutes and logs all output to log file $ScriptLog
Example:
$ScriptPath = 'E:\Install\Scripts\Azure\AZ-MonitorAndRepair.ps1'
$ScriptLog = "D:\Docs\EG\Azure\Mitigate-DDOS_$(Get-Date -format yyyyMMdd).txt"
$Params = @{
 SubscriptionName = 'SB01-Subscription'
 VMName = 'SB01'
 AdminName = 'Samb'
 PwdFile = 'd:\sandbox\Cred.txt'
 EndPointName = 'HTTP'
 URL = 'http://mysite.com'
 Verbose = $true
}
"Start at $(Get-Date)" *>> $ScriptLog
$Duration = Measure-Command { & $ScriptPath @Params *>> $ScriptLog }
"End at $(Get-Date)" *>> $ScriptLog
" done in $($Duration.Minutes):$($Duration.Seconds) mm:ss" *>> $ScriptLog
This example runs once and logs all output to $ScriptLog file.
When saved as E:\Install\Scripts\Mitigate-DDOS4.ps1 for example, this short script can be scheduled to run every 5 minutes:
$a = New-JobTrigger -Once -At (Get-Date) -RepetitionInterval (New-TimeSpan -Seconds 300) -RepetitionDuration ([TimeSpan]::MaxValue)
Register-ScheduledJob -Name DDOS4 -FilePath E:\Install\Scripts\Mitigate-DDOS4.ps1 -Trigger $a
Powershell Script to move VHD(x) from one Hyper-V VM to another
This script will detach a VHD(x) disk from one Hyper-V VM and attach it to another. If the guest OS is Windows 2012 or above, this is safe to do directly (obviously not with system\boot partition). Older guest Windows OS’s will blue-screen if a disk is yanked without off-lining it first in the guest OS. The script can be downloaded from the Microsoft Script Center Repository.
For example:
Move-VHD -SourceVM vHost22 -TargetVM v-2012R2-G2a -VHDX ‘vHost01d(Web)-D.vhdx’ -Verbose
Will detach the VHDx disk ‘vHost01d(Web)-D.vhdx’ from vHost22 VM and attach it to v-2012R2-G2a VM

This script uses the RegexSafe Powershell function described here.
Function/tool to return Regex-safe version of input string
Some of Powershell comparison operators use Regular Expressions, such as -match, -notmatch, and -replace operators. This poses a problem when trying to match against a string that contains Regex metacharacters. This function tools solves this issue by accepting an input string as input and returning a Regex-safe version of the same string where every Regex metacharacter in the input string is escaped.
The script can be downloaded from the Microsoft Script Center Repository. To use this function download it, unblock the file, and run it to load the function.
Example:
Imagine you wish to make a PS script to detach a VHD(X) disk from one Hyper-V VM and attach it to another. The script may start like this:
# Input:
$SourceVM = ‘v-2012R2-G2a’
$TargetVM = ‘vHost22’
$VHDX = ‘vHost01d(Web)-D.vhdx’
This next section will show current attached disks:
“Before:”
Get-VMHardDiskDrive -VMName $SourceVM
Get-VMHardDiskDrive -VMName $TargetVM

At this point, if we try to identify the disk that needs to be detached from one VM and attached to another using the input data:
Get-VMHardDiskDrive -VMName $SourceVM | Where { $_.Path -match $VHDX }
This cmdlet returns no matches. This is because the string we’re comparing to ‘vHost01d(Web)-D.vhdx’ contains 3 Regex metacharacters, namely ‘().’
This issue can be remedied by the use of this RegexSafe function:
Get-VMHardDiskDrive -VMName $SourceVM | Where { $_.Path -match (RegexSafe $VHDX) }

The full script to move a VHD(x) disk from one VM to another can be found here.
Powershell ErrorAction
In Powershell ErrorAction is very useful. The following are some of my notes on ErrorAction:
Part of Common Parameters
You can only use ErrorAction on cmdlets or functions that support Common Parameters.
You cannot use ErrorAction with if statement or switch statement because they do not support Common Parameters. For example:
$Duration = Measure-command { $e = Get-ChildItem -Path e:\ -Recurse -Force }
“Got $($e.Count) files in $($Duration.Minutes):$($Duration.Seconds) mm:ss”
that will produce error if it cannot read some files like:
Get-ChildItem : Access to the path ‘E:\System Volume Information’ is denied.
At line:1 char:36
+ $Duration = Measure-command { $e = Get-ChildItem -Path e:\ -Recurse -Force }
+ ~~~~~~~~~~~~~~~~~~~~~~~~~~~~~~~~~~~~~~~
+ CategoryInfo : PermissionDenied: (E:\System Volume Information:String) [Get-ChildItem], UnauthorizedAccessException
+ FullyQualifiedErrorId : DirUnauthorizedAccessError,Microsoft.PowerShell.Commands.GetChildItemCommand
Options

Ignore: can only be used as a cmdlet/function parameter and not as an ErrorAction Preference.
Suspend: applies to workflows only
Inquire: very similar to the -Debug parameter. It offers the options to continue, suspend, or halt the cmdlet/function.
There’s no ErrorAction option to stop without giving an error message.
Applies to one cmdlet/function
You must use the -ErrorAction parameter with the cmdlet/function where the error happens. For example:
$Duration = Measure-command { $e = Get-ChildItem -Path e:\ -Recurse -Force } -ErrorAction Ignore
“Got $($e.Count) files in $($Duration.Minutes):$($Duration.Seconds) mm:ss”
If the intent is to suppress the error message, this won’t work because the error was generated by the Get-ChildItem cmdlet not the Measure-Command cmdlet. However, this example will suppress the error:
$Duration = Measure-command { $e = Get-ChildItem -Path e:\ -Recurse -Force -ErrorAction Ignore }
“Got $($e.Count) files in $($Duration.Minutes):$($Duration.Seconds) mm:ss”
Default ErrorAction
Default ErrorAction is Continue. This is controlled by the $ErrorActionPreference Preference Variable. For example:
$Push_Pop = $ErrorActionPreference
$ErrorActionPreference = “SilentlyContinue”
$Duration = Measure-command { $e = Get-ChildItem -Path e:\ -Recurse -Force }
“Got $($e.Count) files in $($Duration.Minutes):$($Duration.Seconds) mm:ss”
$ErrorActionPreference = $Push_Pop
will suppress the error. .
Terminating versus non-terminating errors
A terminating error stops execution. Specifically, a cmdlet/function calls the ThrowTermiatingError method. It permanently stops the execution of the pipeline.
A non-terminating error writes to the error pipeline. Specifically, a cmdlet/function simply calls the WriteError method which writes the error message to the error pipeline.
In almost all cases, a cmdlet/function produces a non-terminating error to write to the error pipeline before a terminating error to stop execution.
Why does that matter? Because we can use it to handle non-terminating errors in a script.
Take this example:
Get-Item -Path .\iis1.txt,.\not-there1.txt,.\iis2.txt,.\not-there2.txt,.\iis3.txt

The first, third, and fifth files exist, and the Get-Item cmdlet had no problem processing these. The second and forth files do not exist, and the Get-Item cmdlet performed the default ErrorAction by writing a Normal View error to the error pipeline. Note that since these 2 errors were non-terminating errors, Get-Item cmdlet continued to execute. If we add further cmdlets to the pipeline, they will execute as well.
If you want to stop execution if ANY error occurs and not process any subsequent files:
Get-Item -Path .\iis.txt,.\not-there.txt,.\iis.txt,.\not-there.txt,.\iis.txt -ErrorAction Stop

In a sense, “-ErrorAction Stop” here turns a non-terminating error into a terminating error. Note that the first file was processed, the second file was not (file does not exist), and execution stopped. Files 3,4,5 were not processed.
What if we want to process all files that do exist, yet be able to act individually on those that do not. One way to do that is to read data from the Error pipeline:
$Error.Clear()
Get-Item -Path .\iis1.txt,.\not-there1.txt,.\iis2.txt,.\not-there2.txt,.\iis3.txt
$MyErrors = @()
If ($Error) {
$Error | % {
$Props = [ordered]@{
Name = $_.CategoryInfo.TargetName
Category = $_.CategoryInfo.Category
Exception = $_.Exception | Out-String
}
$MyErrors += New-Object -TypeName PSObject -Property $Props
}
}
$MyErrors | FT -Auto
In this example, I cleared the Error pipeline, ran the Get-Item cmdlet, then read through the Error records, extracted information I need and may want to act on, and saved them to members of $MyErrors array.

Best Practices
In my opinion these are some of the best practices with ErrorAction:
- Do not change the $ErrorActionPreference. This is because you lose the granularity of identifying where an error happened which makes debugging and troubleshooting harder than it needs to be.
- Keep in mind that ErrorAction applies to an individual cmdlet/function not an entire script, pipeline, or scriptblock.
- A try/catch block only catches terminating errors.
For example:
$Error.Clear()
try {
Get-Item -Path .\iis1.txt,.\not-there1.txt,.\iis2.txt,.\not-there2.txt,.\iis3.txt
} catch {
$_
}
Will catch nothing. However, this example:
$Error.Clear()
try {
Get-Item -Path .\iis1.txt,.\not-there1.txt,.\iis2.txt,.\not-there2.txt,.\iis3.txt -ErrorAction Stop
} catch {
$_
}
Will stop at the first error and run the “catch” block. Files 3,4,5 will not be processed as explained above.
Powershell function/tool to detect if computer has Internet access
This tiny function makes it very easy to check if the computer running a script has Internet access or not. This becomes handy in controller scripts that monitor other computers or services on the Internet. The script can be downloaded from the Microsoft Script Center Repository.
For example:
if (IamOnline) { "I'm online" } else { "I'm offline" }
If any of the 3 default input URLs returns a status code, it’s considered online and function returns a positive result.
In the following example, I use the function in two different ways. The first ‘if’ statement checks if the computer running the script is online, while the second ‘if’ statement checks if $MyURL is online:
$MyURL = 'http://mycustomurl.com/abc/cde/page.html'
if (IamOnline) {
    If (IamOnline $MyURL) {
        Write-Host "$MyURL is online" -Fore Green
    } else {
        Write-Host "$MyURL is offline" -Fore Yellow
    }
} else {
    Write-Host "I'm offline" -Fore Yellow
}

Powershell function/tool to set/update Azure VM Endpoint Access Control List
One of the nice new features (2014) introduced is Access Control List (ACL) for Azure VM Endpoints. I think of it as a free virtual firewall for each Azure VM. This is a really nice feature because it can be managed and automated from Powershell. It’s also scoped to a single VM which is another nice design feature to minimize possible effects in case of error/mis-configuration.
See this page on How to Set Up Endpoints to a Virtual Machine.
The script can be downloaded from the Microsoft Script Center Repository.
To see a VM Endpoint ACL in Azure management interface:
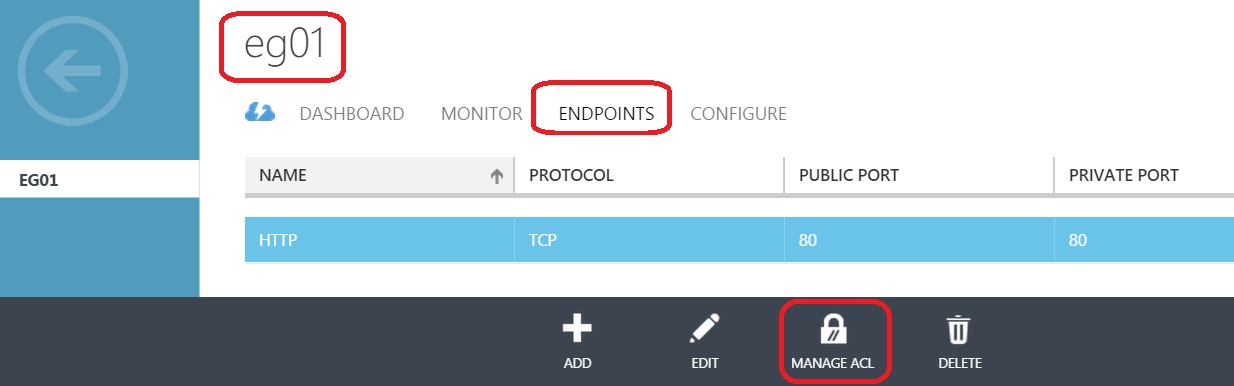
where you can view/edit rules in the VM Endpoint ACL manually.

To get started with Azure Powershell see this post.
This Powershell cmdlet can also be used to show ACL rules (substitute the VM name and Endpoint name as needed of course):
Get-AzureAclConfig -EndpointName 'HTTP' -VM (Get-AzureVM |
    where { $_.Name -eq 'EG01' }) | FT -Auto

The script uses as input an object with 2 properties: IP and Date. Date is used by the script to populate the Description of the rule.
A list of the IPs to block can be obtained from the Get-IPsFromLogs function/tool. This can be used with this function/tool to automate the process of obtaining a list of IPs where a DDOS attack is originating and configure the VM Endpoint ACL to block those IPs. Alternative, the same IP list can be used to configure the Azure VM Windows firewall to block those IPs. I prefer using the VM Endpoint ACL as opposed to the VM Windows firewall since the rule processing happens outside the VM. This offloads the VM processor and other precious resources.
Here’s an example script that puts the Get-IPsFromLogs and Set-AzACL tools together:
$IntakeFolder = "D:\Docs\EG\Intake"
$DoneFolder = "D:\Docs\EG\Done"
$SubscriptionName = "YourSubscription"
$VMName = "EG01"
$EndpointName = "HTTP"
$Threshold = 400
$BlockList = Get-IPsFromLogs -Logs (Get-ChildItem -Path $IntakeFolder).FullName `
-Threshold $Threshold -Verbose
$BlockList | FT -AutoSize
try {
    $Error.Clear()
    Set-AzACL -IPList $BlockList -SubscriptionName $SubscriptionName `
    -VMName $VMName -EndPointName $EndpointName -Verbose -ErrorAction stop
    Get-ChildItem -Path $IntakeFolder | Move-Item -Destination $DoneFolder
} catch {
    Write-Warning $Error[0]
}
The folder d:\docs\EG\Intake in this example starts with a group of log files from the C:\Windows\System32\LogFiles\HTTPERR folder.

2 hours and 15 minutes later, the script found total 2 offending IPs:
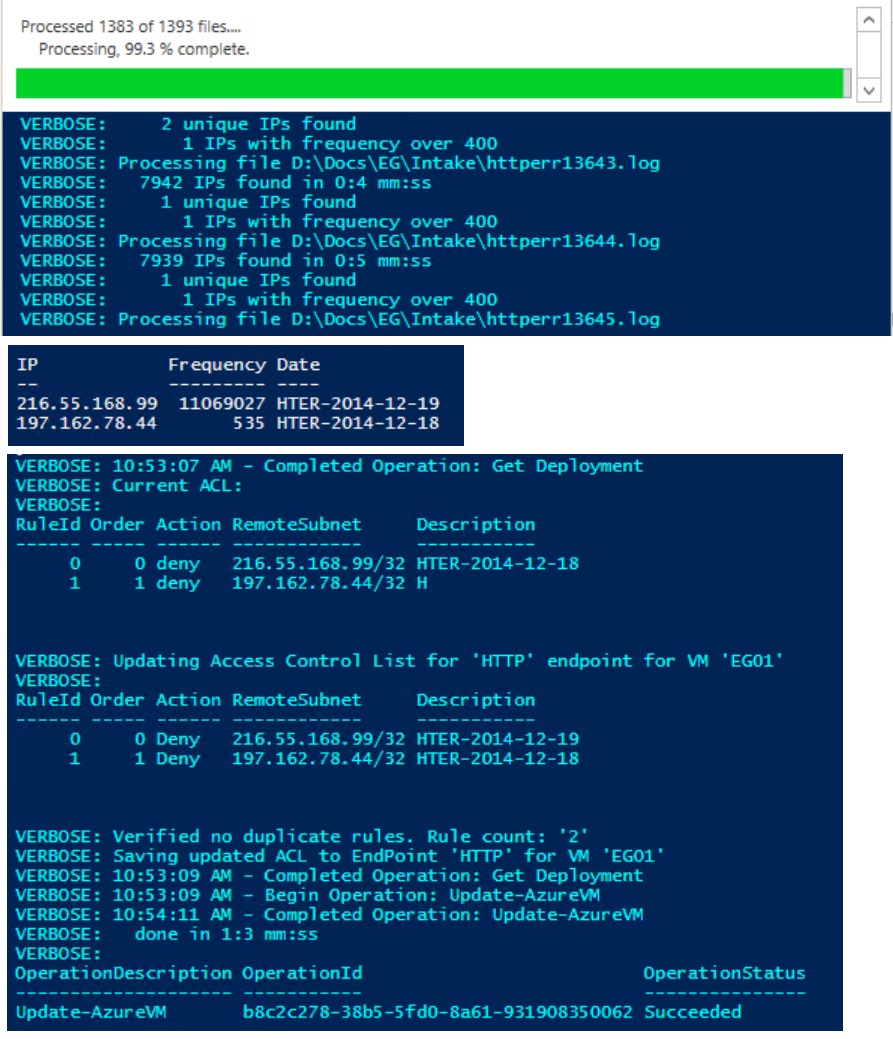 One of them put out 11 million requests in under 10 hours.
Note: the last step of updating the ACL takes about 60 seconds, during which access to the VM is interrupted.
I ran the first 12 lines of the short controller script above on another group of log files – 613 of them, and got results like:

To be cautious, I will only add the top 2 IPs to the ACL:
Set-AzACL -IPList ($BlockList |Select -First 2) -SubscriptionName $SubscriptionName -VMName $VMName -EndPointName $EndpointName -Verbose

Powershell function/tool to get IPs from HTTPErr logs based on frequency
Public facing web sites are increasingly getting exposed to distributed denial of service attacks. This tool is a link in a chain of measures to detect and mitigate DDOS. It can be downloaded from the Microsoft Script Center Repository. It analyses one or more HTTPErr log files and compiles a list of IPs that appear more than a given number of times. That number is 500 by default. These log files are located under C:\Windows\System32\LogFiles\HTTPERR by default.
To use this script, download it, adjust your PS execution policy as needed, unblock it, run it to load the function, and use in a controller script.
Sample usage and output:
Get-IPsFromLogs -Logs (Get-ChildItem -Path D:\Docs\EG\Sample).FullName -Verbose | FT -AutoSize
This example will parse each file in the D:\Docs\EG\Sample folder and output a master list of IPs that appeared more than 500 times in any file.

Output can be saved to CSV for archiving or further processing:
Get-IPsFromLogs -Logs (Get-ChildItem -Path D:\Docs\EG\Sample).FullName |
Export-Csv D:\Docs\EG\BlockList.csv -NoType

and the resulting CSV file:
 The Threshold parameter provides the option to adjust the sensitivity of the tool. For example, to capture more IPs, lower the threshold to 400:
Get-IPsFromLogs -Logs (Get-ChildItem -Path D:\Docs\EG\Sample).FullName -Threshold 400 -Verbose | FT -AutoSize

Using the same log files, lowering the threshold to 400 captured one additional IP address.
Lowering the threshold too much will increase the likelihood of false positives where you’re capturing IPs that are not part of DDOS attack.
Raising the threshold too much will result in failure to capture IPs that are participating in a DDOS attack.
One approach is to start with a high threshold, add the resulting IPs to the firewall block list (subject of future posts), and see if that mitigates the attack. If not, lower the threshold a bit more to capture more IPs. Repeat until DDOS is mitigated.
Google service interruption?
I’m starting to see a number of issues with different Google services today (December 15, 2014) including GMail, Google Apps, DNS, …
The site DownDetector.com is showing a large spike of reports around 12 noon (Eastern = GMT-5) 
Although Google Apps Status Dashboard is not showing anything for the 15th

Powershell function to get IPs and Subnets for one or more domains
1/15/2015 update: released version 1.1 – Powershell version 2 compatible.
You may be in a situation where you need to block incoming network traffic from one or more domains. Firewalls typically need IP addresses or subnets to configure firewall rules. This Powershell script has a function that accepts one or more domains and returns their IP addresses and subnets. It uses the Get-Whois function that was written by Joel Bennett in June 2013. To use this function, download the script from the Microsoft Center Repository, unblock it, run it, then use as shown in the examples. Example:
Get-DomainIPs amazonaws.com
Outputs a PS object with domain, IPs, & CIDR properties of amazonaws.com domain Example:
Get-DomainIPs (Get-Content .\Domains.txt)
Outputs an array of PS objects, each having domain, IPs, & CIDR properties of the domains listed in the file .\Domains.txt Example:
log (Get-DomainIPs (Get-Content .\Domains.txt) | FT -Auto | Out-String) -LogFile .\log.txt
 Outputs an array of PS objects, each having domain, IPs, & CIDR properties of the domains listed in the file .\Domains.txt It uses log function to display output and save it to log file .\log.txt
Example: $BlockList = Get-DomainIPs (Get-Content .\Domains.txt) $BlockList | FT -Auto $BlockList | Out-Gridview $BlockList | Export-Csv -Path “.\BlockList.$(Get-Date -format yyyyMMdd_hhmmsstt).csv” -NoType
The first line in this example obtains a list of the IPs and subnets of domains in .\Domains.txt file The second line displays the list on the console screen The third line displays it in Powershell ISE gridview  The forth line exports it to CSV file. Note: if any IP or CIDR has multiple values, it will not save properly to CSV. Use Export-Clixml and Import-Clixml instead to save as XML
Creating new Azure Storage Account using Powershell
To get started with Azure Powershell see this post.
In Powershell ISE run these cmdlets:
$Params = @{
    StorageAccountName = "swa2east"
    Location = "East Us"
    Type = "Standard_LRS"
}
if (Test-AzureName -Storage -Name $StorageAccountName) {
    "Storage account name '$StorageAccountName' is already taken, try another one"
} else {
    New-AzureStorageAccount @Params
}
Azure Storage Account can have up to 500 TB of data, and we can have up to 100 Storage Accounts per Subscription (December 2014). Most importantly in my opinion is that Azure Storage Account has 20k IOPS limit. This is a lot, but must be considered when planning Azure deployments. At 500 IOPS per disk, this means we should keep a maximum of 40 disks in any given Storage Account. We should also keep other storage such as block blob storage in separate Storage Account.
Storage Account needs:
Name:
Must be globally unique, 3-24 characters, lowercase letters & numbers only
Location (as of December 2014): (Get-AzureLocation).Name
West Europe
North Europe
East US 2
Central US
South Central US
West US
East US
Southeast Asia
East Asia
Japan West
Type:
Standard_LRS
Standard_ZRS
Standard_GRS
Standard_RAGRS
For more information on Azure Storage Accounts see this link.
Getting Started with Azure Powershell
1/14/2015 update:
Microsoft has made this even easier. Here’s a high level overview of the steps to take to use Azure with Powershell:
- To start you need an Azure Subscription. You can sign up for a free subscription here.
- Install Azure DSK from the Web Platform Installer.
- Run Powershell command (to login in the pop-up windows to your Azure account): Add-AzureAccount
- Run Powershell command (and download publish settings file from the browser that will pop-up): Get-AzurePublishSettingsFile
- Run Powershell command: Import-AzurePublishSettingsFile ‘C:\Path-to-my\file-credentials.publishsettings’


Get an Azure Subscription
To start you need an Azure Subscription. You can sign up for a free subscription here.
Install Azure SDK
I’m testing on Windows 8.1 and Server 2012 R2 machines.
Next install Azure DSK from the Web Platform Installer.

After installation, type in Azure in the search field, click the search icon, then click Install to see installed modules on top:

Get Azure publish settings
Open Powershell ISE, and run the cmdlets:
Import-module "C:\Program Files (x86)\Microsoft SDKs\Azure\
PowerShell\ServiceManagement\Azure"
$AzureLogin = "myaccount@mydomain.com"
Remove-AzureAccount -Name $AzureLogin -Confirm:$false -Force
Get-AzureAccount -Name $AzureLogin
Get-AzurePublishSettingsFile

Save it to c:\temp\MyAccount-12-10-2014-credentials.publishsettings for example
Run the Powershell cmdlet
Import-AzurePublishSettingsFile c:\temp\MyAccount-12-10-2014-credentials.publishsettings
Test settings
That’s it. To test access to your account runs Powershell cmdlets against it like
Get-AzureSubscription
or
Get-AzureStorageAccount
To see Azure cmdlets from the Azure PS module, run:
Get-Command *Azure*
I’m counting 443 cmdlets! (Azure PS module version 0.8.11 tested December 11, 2014)
Nasuni Filer initial setup
Nasuni provides managed storage service that offers interesting functionality in the cloud integrated storage space. After installing the Nasuni Filer VM, and browsing to the IP address of the VM:
1. Expand the Nasuni Virtual Filer Cache size:
The default cache of the local filer is 64GB. This is implemented as a dynamic VHDX file. 
This disk will house all volumes provisioned on this Filer or brought down from other Filers in this or other sites to make remote shares available to users of this site.
To increase the size of this file – local cache size of this Filer:
- Stop the Nasuni Filer VM. For example, use the Powershell cmdlet Stop-VM, or right-click on the Filer VM in Hyper-V Manager and select shutdown.
- Expand the cache.vhdx file either via Powershell cmdlet from the VM settings in Hyper-V Manager
- Start the Nasuni Filer VM
The Nasuni Filer detects the new cache disk size and expands the cache size accordingly:

Expanding the cache size will be an IO intensive process:
 At the end of this process, which takes several minutes, the cache size reflects the new cache.vhdx file size
  It’s unlcear why the actual cache.vhdx file size takes 110.7 GB on disk for a 500GB cache, while the same file took 1.5GB on disk for 64GB cache. There seems to be no linear correlation..
2. Remove/adjust the default bandwidth restriction:
Since I’m managing the 3 filers in this demo using NMC (Nasuni Management Console), I have to do this step in NMC. In the NMC, click Filers on top, then Quality of Service on the left, check the box next to the desired filer, and click Edit

Click the button next to the QoS rule to edit:

Enter ‘0’ to remove the default 2 Mbps limit, update and save it.

Powershell script to install Nasuni Filer on Windows Hyper-V 2012 R2
Nasuni provides managed storage service that offers interesting functionality in the cloud integrated storage space. The Nasuni Filer Virtualization Guide suggests to import the Nasuni Filer VM from the unzipped files from filer-hyperv-6.1.1-99.zip. Before using this script you need to obtain the Filer.vhd file – see this post for more details.
This script automates and streamlines the process of installing the Nasuni Filer Virtual Machine on Hyper-V 2012 R2. It can be downloaded from the Microsoft Script Center Repository.
In this example,
- I’ve stored the script as \\rd06\scripts$\Install-Nasuni-Filer.ps1
- I’m running the script on a Hyper-V host
- I will storing the VM files under C:\ClusterStorage\Volume1 – this can be any local path on the Hyper-V host
- The path for the needed Filer.vhd file is \\rd06\d$\Nasuni\Filer.vhd
- In this particular environment, guest networking is on VLAN 5. If you’re not using VLANs you can omit this parameter
- I will call this VM “Nasuni-Demo2”
Dot source the script with parameters similar to:
. \\rd06\scripts$\Install-Nasuni-Filer.ps1 -VMPath C:\ClusterStorage\Volume1 -VHDPath \\rd06\d$\Nasuni\Filer.vhd -VLAN 5 -VMName Nasuni-Demo2

The script creates a subfolder with the VM name under the VMPath
It converts the Filer.vhd to VHDX format. VHDX format has many performance and other enhancements over VHD.
It creates the Nasuni Filer VM as Gen 1 VM.
It detects the host’s first external vSwitch and attaches the VM vNIC to it. If you have more than 1 external vSwitch on this Hyper-V host, you can spell out which one to use in the command line by using the -vSwitch parameter
It sets the VM startup memory to 6GB as recommended by the Nasuni Filer Virtualization Guide.
It assigns the VM 4 CPU vCores. This can be adjusted by the optional parameter -ProcessorCount
It sets VM automatic start action to “start”. This ensures the VM is started when the host is rebooted.
It sets the VM memory to static. This VM does not have the Hyper-V Linux Integration Service and cannot use dynamic memory.
It assigns the VM vNIC a static MAC address. This is necessary for live-migration. Otherwise the VM will lose its IP settings when live-migrated.
It assigns the vNIC VLAN ID if the -VLAN parameter is used
It creates and adds the Cache.vhdx and COW.vhdx disks and attaches them to the VM. They’re attached to SCSI controller 0 / LUN 0, and controller 1 / LUN 1. This is to mirror setup suggested by Nasuni. It’s not clear why the Cow.vhdx disk needs to be on a separate SCSI controller or why it needs LUN 1 specifically. By default, the second SCSI disk added will go on controller 0 / LUN 1.
Finally the script starts the VM.

As usual, the script leave a log file behind on the folder where it ran. Log file lists steps taken and will look like:
2014.12.05 06:50:23 AM:

 Directory: C:\ClusterStorage\Volume1

Mode LastWriteTime Length Name
---- ------------- ------ ----
d---- 12/5/2014 6:50 AM Nasuni-Demo2

2014.12.05 06:50:23 AM: VM Path 'C:\ClusterStorage\Volume1\Nasuni-Demo2' has been verified/created
2014.12.05 06:50:23 AM: Converting file '\\rd06\d$\Nasuni\Filer.vhd' to 'C:\ClusterStorage\Volume1\Nasuni-Demo2\Filer.vhdx'..
2014.12.05 06:55:13 AM: done in 50 seconds
2014.12.05 06:55:13 AM: Creating VM 'Nasuni-Demo2' on host 'HV02-A'..
2014.12.05 06:55:16 AM: done in 2 seconds
2014.12.05 06:55:17 AM: Configured VM 'Nasuni-Demo2' with '4' CPU cores
2014.12.05 06:55:17 AM: Configured VM 'Nasuni-Demo2' to automatically start upon host bootup
2014.12.05 06:55:50 AM:
VMName VMNetworkAdapterName Mode VlanList
------ -------------------- ---- --------
Nasuni-Demo2 Network Adapter Access 5

2014.12.05 06:55:50 AM: Set VLAN ID for vNIC 'Network Adapter' to '5' on VM 'Nasuni-Demo2'
2014.12.05 06:55:51 AM:

ComputerName : HV02-A
Path : C:\ClusterStorage\Volume1\Nasuni-Demo2\Cache.VHDX
VhdFormat : VHDX
VhdType : Dynamic
FileSize : 4194304
Size : 68719476736
MinimumSize :
LogicalSectorSize : 512
PhysicalSectorSize : 4096
BlockSize : 33554432
ParentPath :
DiskIdentifier : dcf132e9-6e97-4523-b6cf-7cd2944372b1
FragmentationPercentage : 0
Alignment : 1
Attached : False
DiskNumber :
Key :
IsDeleted : False
Number :

2014.12.05 06:55:52 AM:
VMName ControllerType ControllerNumber ControllerLocation DiskNumber Path
------ -------------- ---------------- ------------------ ---------- ----
Nasuni-Demo2 SCSI 0 0 C:\ClusterStorage\Volume1\Nasuni-Demo2\Cache.VHDX

2014.12.05 06:55:52 AM: Created and added 64 TB dynamic cache disk 'C:\ClusterStorage\Volume1\Nasuni-Demo2\Cache.VHDX' to VM 'Nasuni-Demo2'
2014.12.05 06:55:54 AM:

ComputerName : HV02-A
Path : C:\ClusterStorage\Volume1\Nasuni-Demo2\Cow.VHDX
VhdFormat : VHDX
VhdType : Dynamic
FileSize : 4194304
Size : 64424509440
MinimumSize :
LogicalSectorSize : 512
PhysicalSectorSize : 4096
BlockSize : 33554432
ParentPath :
DiskIdentifier : 48a4a329-3303-4c7e-b4c9-e958fcf67e03
FragmentationPercentage : 0
Alignment : 1
Attached : False
DiskNumber :
Key :
IsDeleted : False
Number :

2014.12.05 06:55:55 AM:
VMName ControllerType ControllerNumber ControllerLocation DiskNumber Path
------ -------------- ---------------- ------------------ ---------- ----
Nasuni-Demo2 SCSI 1 1 C:\ClusterStorage\Volume1\Nasuni-Demo2\Cow.VHDX

2014.12.05 06:55:55 AM: Created and added 60 TB dynamic cow disk 'C:\ClusterStorage\Volume1\Nasuni-Demo2\Cow.VHDX' to VM 'Nasuni-Demo2'
2014.12.05 06:56:07 AM: Started VM 'Nasuni-Demo2'
After VM installation, go to Hyper-V Manager:

Open the VM console, you’ll see display similar to:

In this example, I have DHCP server running on the network. The Nasuni Filer VM obtained an IP address via DHCP as shown.
If no DHCP server is running on the network, assign IP address to the Nasuni Filer VM by using the following commands:
- Hit enter to enter the Service Menu, login as service, password is service


- Type in the following commands:
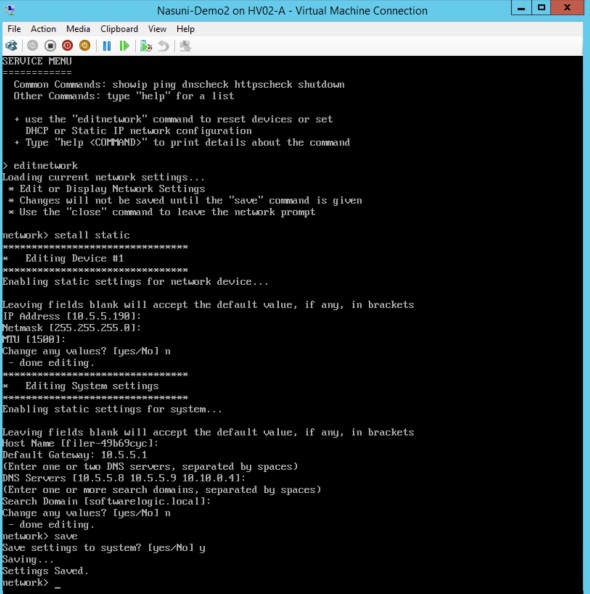
- editnetwork
- setall static
- Enter the desired IP information for the VM.
- Type in “save” to save settings
- Type in “close” to exit the Service Menu

Browse to the IP address of the Nasuni Filer to complete setup. Bypass the certificate security warning. 
Enter/confirm IP settings.
 Click on the Edit button next to the Ethernet 1 device to update its IP info. Enter 9000 for MTU if using jumbo frames.

Review and continue.  Click Continue to save settings.
Enter Serial Number and Authorization code. In the email from Nasui, there will be a link and credentials to obtain these. 
Type in “confirm” to confirm, and check the box to accept the EULA. Confirm/edit the name for this Nasuni Filer. 
If you already have the Nasuni Management Console (VM) deployed, you’ll get this screen:
Check the box to manage this Filer under the central NMC.
Enter/create admin credentials for this Filer. 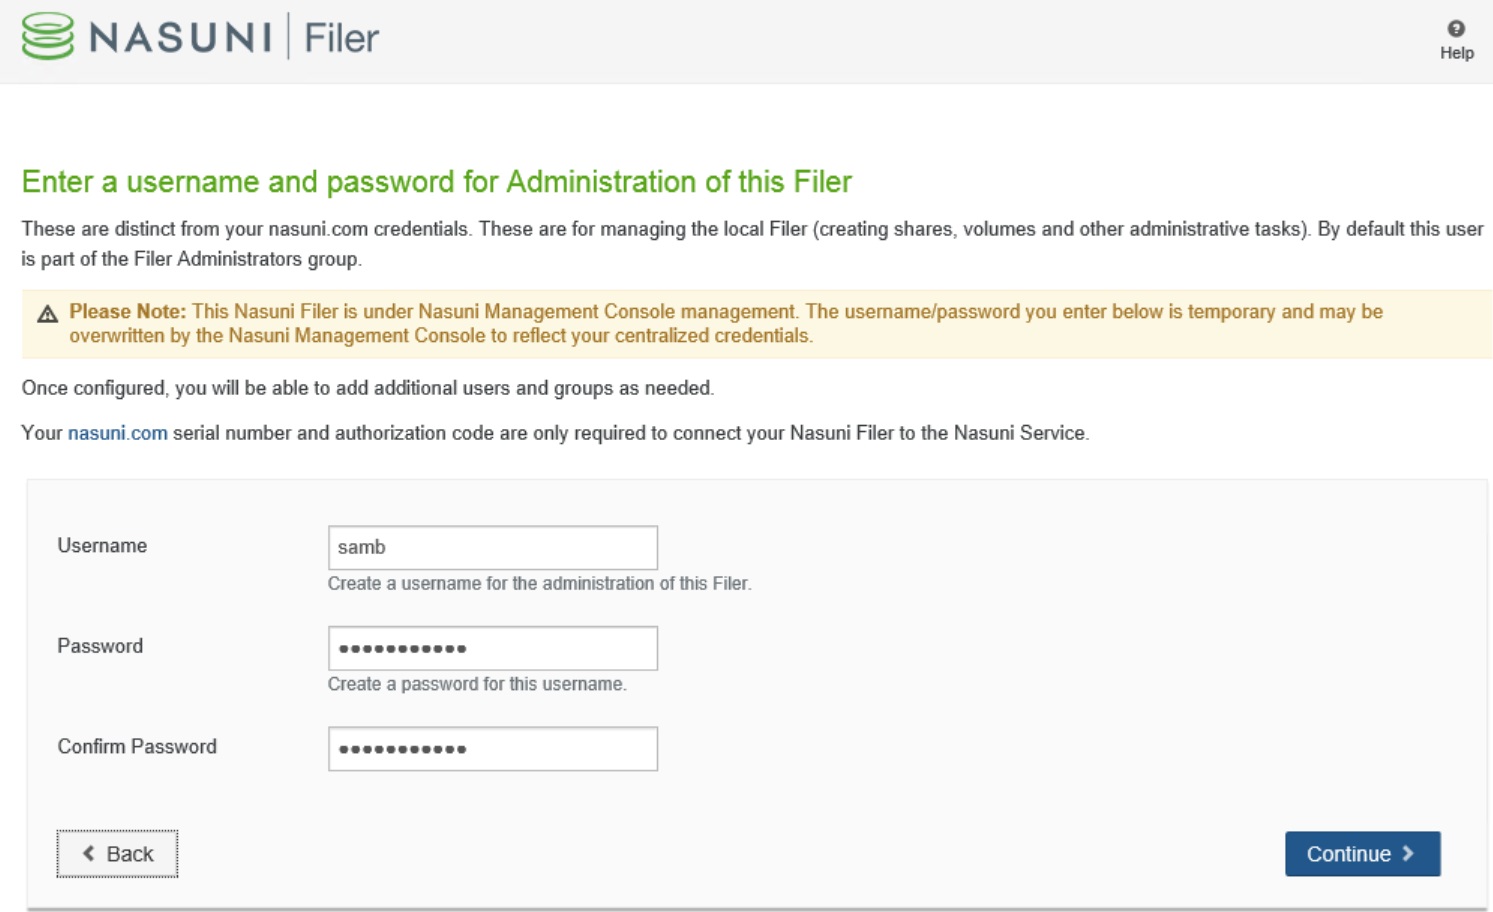
The Nasuni service: Getting Started
Nasuni provides managed storage service that offers interesting functionality in the cloud integrated storage space. To get started with the Nasuni service you can sign up for a 14 day free trial. Once approved, you’ll get an email with links for the bits and credentials to access and use the Nasuni service.

One easy way to start and try the service is to use virtual filer(s). I will install 2 Nasuni filers and 1 Nasuni Management Console VM on Windows Hyper-V 2012 R2 in 2 sites in this demo.
After downloading the filer-hyperv-6.1.1-99.zip file for example, unzip it:
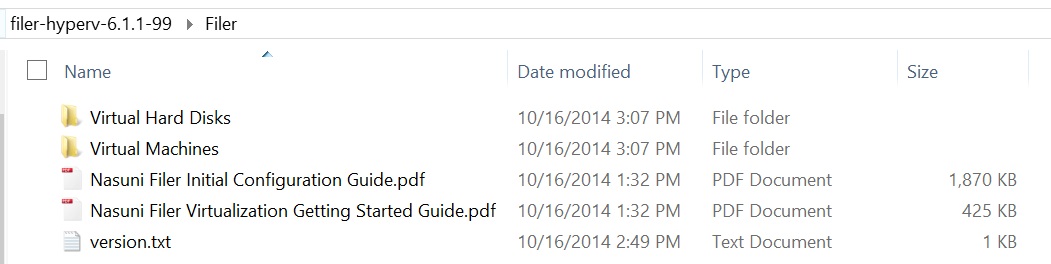
You will need about 17 GB disk space to unzip this file. Under the “Virtual Hard Disks” folder is the Filer.vhd file that will be used by the Install-Nasuni-HyperV.ps1 script that can be downloaded from the Microsoft Script Center Repository.
Nasuni managed storage service overview and how-to
Nasuni provides managed storage service that offers interesting functionality in the cloud integrated storage space.

The Nasuni Filer is a Virtual Machine (on Hyper-V, VMWare or other hypervisor) or a physical appliance that is implemented in each client site. It runs a Linux OS and provides storage to local clients as NFS3, SMB2, or iSCSI. Many Filers can be implemented in one or more client sites.
The Nasuni Management Console (NMC) is implemented as a virtual machine running Linux. It provides a web interface for managing all Filers and the Nasuni service and account throughout the organization.
Volumes are provisioned on the Nasuni filers. They’re thin provisioned. Volume data is replicated automatically via the Nasuni service to the public cloud. Currently, Nasuni uses Azure in the back end. Customer has no direct cloud visibility. Cloud access and storage is bundled and abstracted by the Nasuni service.
The Nasuni UniFS runs on the Nasuni Filers. It provides NFS3 and SMB2 shares to local clients. Shares can be replicated and cached to other Nasuni filers in other client sites via the Nasuni service. The Nasuni service places the primary data set on the public cloud (256-bit AES encrypted) and replicates the actively used files to each site as needed (some configuration required as I will illustrate).
Similar to other cloud integrated storage solutions, Nasuni service is suited for unstructured data/workloads such as file shares. It’s not suited for tier 1 workloads such as Hyper-V, SQL, Exchange, …
The following posts will go over setting up and using the Nasuni service:
Powershell script/function to display text to the console in several colors and save it to log with time/date stamp
2 May 2020:
Microsoft is retiring the Technet Gallery as of June 2020. This function has been incorporated into the AZSBTools PowerShell module available in the PowerShell Gallery as the Write-Log function.
This is a handy function to include in scripts. It allows for sending text to the screen in several colors in the same line, and logs text to a log file with time/date stamp. To use it, download it from the Microsoft Script Center Repository, unblock the file, open it in Powershell_ISE, run it to load the function in memory, and use it.
Update: v1.1 – 12/01/2014 – added multi-color display in the same line
Example:
log Found,25,"files in folder",c:\ Green,Yellow,Green,Cyan

Example:
Log -String "Hello World" -Color Yellow -LogFile c:\log.txt
This example displays the “Hello World” string to the console in yellow, and adds it as a new line to the file c:\log.txt. If c:\log.txt does not exist it will be created.
Log entries in the log file are time stamped.
 Example:
Log "$((Get-Location).Path)" Cyan
This example displays current path in Cyan, and does not log the displayed text to log file.
 Example:
$p = Get-Process | select -First 1
"$($p.name) process ID is $($p.id)" | log -color DarkYellow
Sample output of this example:

Example:
log Found,(Get-ChildItem -Path .\ -File).Count,"files in folder",(Get-Item .\).Ful
lName Green,Yellow,Green,Cyan .\mylog.txt
Sample output of this example:

